Cadillac CTS Parts
- Select Vehicle by VIN
- Select Vehicle by Model
For the most accurate results, search by your VIN (Vehicle Identification Number).

Why choose GMPartsGiant
- Large Inventory
The best site to buy Cadillac CTS genuine parts for years has been GMPartsGiant.com. We're the best online parts and accessory store for your Cadillac CTS. GMPartsGiant.com offers a large parts and accessory inventory to cover all your vehicle's repairs. Feel free to browse through our genuine Cadillac CTS parts and accessory catalog to find all your vehicle's needs.
- Fast Shipping Times
All of our Cadillac CTS auto parts and accessories are expedited directly from verified dealers and backed by the manufacturer's warranty. Our experienced team ensures the orders are packed to provide quick transit times. The majority of the orders are shipped out within a couple of business days to get the parts out to you as fast as possible.
- Low Prices
Our low prices say it all. You can rest assured that you will always receive unbeatable prices on OEM Cadillac CTS parts. Our giant inventory is beyond compare and has everything you need at an extraordinary value not found anywhere else. Whether you're restoring an old vehicle or upgrading the performance of your vehicle you can count on the quality of our products without hurting your bank account.
Popular Genuine Cadillac CTS Parts
- Engine Parts View More >
- Front Suspension, Steering Parts View More >
- Fuel System, Exhaust, Emission System Parts View More >
- Brakes Parts View More >
- Transmission - Automatic Parts View More >
- Frames, Springs, Shocks, Bumpers Parts View More >
- Cooling System, Grille, Oil System Parts View More >
- Interior Trim, Front Seat Trim, Seat Belts Parts View More >


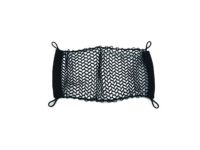
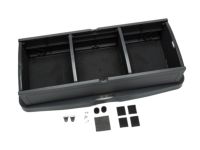
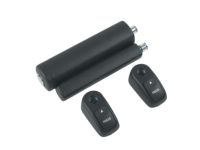
Genuine Cadillac CTS Accessories


Shop Genuine Cadillac CTS Parts with GMPartsGiant.com
The Cadillac CTS, an executive car produced by General Motors (GM) from 2003 to 2019, spanned three generations. Priced similarly to compact luxury cars, it aligned more with mid-size competitors in size. Replacing the Catera and indirectly preceding the CT5, the CTS was designed by Wayne Cherry and Kip Wasenko for the first model and by Bob Boniface and Robin Krieg for the third. The original model, introduced in 2003, was a rear-wheel-drive GM brand built on the Sigma platform and equipped with a fully independent suspension. Originally powered by a 3.2-liter V6 engine producing 220 hp, it evolved over time, with a 3.6-liter DOHC V6 introduced in 2004, and a 2.8-liter variant replacing the 3.2-liter version in 2005. The second generation CTS, unveiled in 2006, took design cues from the 2003 Cadillac Sixteen concept car, offering expanded dimensions, a revamped exterior, advanced tech features, and superior brake components. The third generation, introduced in 2013, offered the same engines as the ATS, with a new twin-turbo direct-injection V6 engine delivering 420 hp reserved for the CTS-V. The 2014 CTS was named Car of the Year by Motor Trend, lauded for its handling, reliability, and construction, despite criticisms of its CUE multimedia system.
Cadillac CTS vehicle owners commonly report two significant issues. The first is early engine failure, indicated by issues like misfiring or difficult starting, accompanied by a whining noise. In these cases, a faulty fuel pump is often the culprit. The second common issue pertains to the braking system. Drivers have noted strange noises, pulsating and vibrating brake pedals, and slow brake response. Visible score marks on the brake rotors often accompany these symptoms, indicating the need for immediate replacement of either the brake disc or brake pad to ensure the safety of both driver and passengers. Apart from these, there are other minor yet significant problems to attend to. The headlight, for instance, can become dim over time, impairing the driver's vision. Similarly, the windshield wiper or wiper blade can wear out, affecting visibility during adverse weather. Additionally, a wheel cover that helps reduce the accumulation of dirt and moisture to maintain wheel function can also wear out over time. Therefore, these components need timely attention and replacement for the vehicle's safe operation.
In terms of quality and longevity, OEM parts are top-tier. This is because they are made according to Cadillac's demanding factory specifications and go through strict quality control. At GMPartsGiant.com, we provide a vast inventory of genuine Cadillac CTS parts, including Front End Sheet Metal, Heater, Body Moldings, Sheet Metal, Rear Compartment Hardware, Roof Hardware, all at the most competitive prices online. Rest assured, our parts, such as Transmission - Manual, Transfer Case are fully supported by the manufacturer's warranty. We also offer a hassle-free return policy and swift delivery service, ensuring your utmost satisfaction with every purchase.
Cadillac CTS Parts Questions & Answers
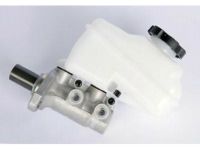
- Q: How to remove a master cylinder?A: To remove the brake master cylinder, begin by locating it in the engine compartment and disconnecting the electrical connector at the brake fluid level switch. The fittings at the ends of the brake lines are then loosened and the brake master cylinder is removed from the power booster.
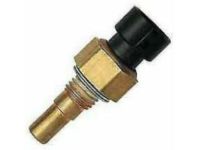
- Q: What does the coolant temperature indicator system in Cadillac CTS include?A: The Engine Coolant Temperature (ECT) sensor is vital since it sends accurate information needed for the Powertrain Control Module (PCM) to operate properly and it also functions as the coolant temperature sending unit for the vehicle's temperature gauge. Make sure to inspect the cooling system.
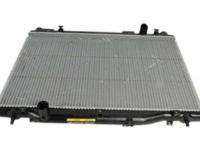
- Q: How do you remove and install a radiator?A: To remove the radiator, start by unhooking the cable from the battery negative terminal and raising the vehicle on jackstands. Take off the lower splash shield and empty out the cooling system, if in good condition, save the coolant. Take away both ends of the radiator hoses and also expansion tank hose from it. Unfasten radiator support bracket mounting bolts and brackets as well condenser upper mounting bolts. Remove cooling fans above them and disconnect transmission cooler lines below them. Remove condenser lower mounting bolts alongside push-pins from sides of radiator as well as side seal panels. Raise up radiator without spilling coolant or scratching paint carefully. Clean radiator for leaks or damage. To install a radiator inspect condition of rubber insulators in lower crossmember first . Place radiator properly on insulators before attaching top brackets . Fill cooling system with right mix of antifreeze to water, check for possible leaks after you have started engine then add more coolant if needed be . If working on a vehicle with an automatic transaxle, check fluid level and add if necessary . For charge air cooler radiators, follow almost the same steps include disconnecting battery negative cable then raise car using jack stands. The bottom guard must be removed while retaining charge air coolant especially when it is still fit for use. Lower splash shield has to be taken off along with front bumper cover but power steering pump should be disconnected from charge air cooler pump to radiator hoses beforehand. Disconnect power steering cooler lines which need plugging afterward . Bolted parts between charge air cooler radiators and condensers must be removed so that each corresponding unit could be let down from its original position . Finally do reverse process filling charge air system with proper mixture of water/antifreeze bleeding it accordingly Then top off power steering fluids starting up engine to verify leakages adding more coolants if required hence getting power steerings liquids checked plus additional ones poured when necessary.
- Q: How do I remove the Parking Brake Shoe?A: To take off the rear brakes, first of all, loosen the wheel lug nuts and lift the back of the automobile on jackstands. Release your parking brake, take off your wheel plus a screw that holds a disc/drum to a hub. Next remove parking brake shoe adjuster spring and adjuster from ends of parking brake shoes. Using locking pliers, remove one end of the parking brake shoe return spring then use them to pull it out. By rotating the hold-down spring retainer pin with pliers and removing it from shoes this will help in releasing the hold down springs then they can be taken out. Finally remove the shoes from backing plate. To install new brakes, clean backing plate with brake cleaner and lightly grease shoe contact points with brake grease. Disconnecting if necessary, disconnect parking break cable; unclip actuator from backing plate if necessary too. Insert into acutator (brake actuator) then install pins as well as shoe hold-down springs for new break pads Remove caliper bracket and rear brake pads and install caliper to vectorize them towards vehicle's front while you push on wheel in order to spin it freely once more. Make sure that there is no damage on axial flange before installing rear disc for braking at back Adjust starwheel until shoes touch drum lining before rotating disc around axle flange Apply parking brakes several times by rubbing noise while suspending which came across many times Attach caliper bracket, rear brake pads and caliper; later fix a wheel using lug nuts Check that wheel rotates freely or else apply handbrake for prevention Use your wrench to tighten lug nuts as well as lower car so that you can check whether brakes are working properly or not In case satisfactory action is needed, adjust your parking brake.