Cadillac Deville Parts
- Select Vehicle by VIN
- Select Vehicle by Model
For the most accurate results, search by your VIN (Vehicle Identification Number).
Why choose GMPartsGiant
- Large Inventory
The best site to buy Cadillac Deville genuine parts for years has been GMPartsGiant.com. We're the best online parts and accessory store for your Cadillac Deville. GMPartsGiant.com offers a large parts and accessory inventory to cover all your vehicle's repairs. Feel free to browse through our genuine Cadillac Deville parts and accessory catalog to find all your vehicle's needs.
- Fast Shipping Times
All of our Cadillac Deville auto parts and accessories are expedited directly from verified dealers and backed by the manufacturer's warranty. Our experienced team ensures the orders are packed to provide quick transit times. The majority of the orders are shipped out within a couple of business days to get the parts out to you as fast as possible.
- Low Prices
Our low prices say it all. You can rest assured that you will always receive unbeatable prices on OEM Cadillac Deville parts. Our giant inventory is beyond compare and has everything you need at an extraordinary value not found anywhere else. Whether you're restoring an old vehicle or upgrading the performance of your vehicle you can count on the quality of our products without hurting your bank account.
Popular Genuine Cadillac Deville Parts
- Engine Parts View More >
- Front Suspension, Steering Parts View More >
- Fuel System, Exhaust, Emission System Parts View More >
- Brakes Parts View More >
- Transmission - Automatic Parts View More >
- Frames, Springs, Shocks, Bumpers Parts View More >
- Cooling System, Grille, Oil System Parts View More >
- Interior Trim, Front Seat Trim, Seat Belts Parts View More >


Shop Genuine Cadillac Deville Parts with GMPartsGiant.com
The Cadillac Deville, whose name is derived from the French term "de la ville" or "of the town," is a venerable eight-generation luxury car line from the brand. Initially designed as a pillarless two-door vehicle accommodating 5-6 passengers without any division, the Deville was first showcased at the 1949 General Motors Motorama. Notable for its chrome trim around the front wheel opening, a false air scoop, and one-piece windshield and rear glass, the Deville combined exterior sophistication with an elegant interior of gray leather trimmed in black. Over its long history, the Deville evolved significantly. In 1955, it expanded its offering to include both coupe and sedan body types, adding versatility to its range. This move helped cement its position in Cadillac's main luxury car series. The latest iteration, released in 2000, was based on a K-body platform and powered by a 4.6L Northstar V8 engine paired with a 4-speed automatic transmission. The 2000 model showcased a smoother, aerodynamically friendly design, LED taillights, a power rear window sunshade, heated rear seats, a stability control system, and GPS. Of special note is the popular night vision system that uses a passive infrared sensor camera to detect infrared radiation, which is processed and displayed on the windshield through an automotive head-up display. This affordable, versatile system has been widely installed even in other models. The Cadillac Deville, therefore, represents a blend of classic luxury and advanced technology, carrying forward the brand's legacy of sophistication and innovation.
Despite its development over nearly five decades, the Cadillac Deville is not without its shortcomings, particularly as usage time increases. A prevalent issue among Deville owners is an engine problem characterized by excessive oil consumption, noticeable oil smells while driving, oil leaks, and strange noises. Defective components such as the spark plug, timing chain, and timing chain tensioner may cause poor fuel economy, engine misfires, and difficulty starting, so owners are advised to inspect these parts if experiencing similar symptoms. Another common issue is overheating and antifreeze leaks. Indications of this problem include rising cabin temperatures, less effective air conditioning, loud noises when the compressor is running, and a stationary compressor, signaling a failing A/C compressor that needs replacement. Additionally, even less conspicuous parts like the wheel cover and antenna, which serve decorative and functional purposes respectively, require attention to ensure overall vehicle performance and a pleasant driving experience.
Choosing OEM parts is the best decision for guaranteeing superior quality and perfect performance. These components undergo stringent quality checks and are carefully constructed to comply with Cadillac's factory specifications, ensuring a smooth installation process. At GMPartsGiant.com, we offer an extensive inventory of genuine Cadillac Deville parts, including Front End Sheet Metal, Heater, Body Moldings, Sheet Metal, Rear Compartment Hardware, Roof Hardware at unbeatable prices. Supported by a manufacturer's warranty, our parts, have a hassle-free return policy, and rapid delivery service, your shopping experience here will surely be top-notch!
Cadillac Deville Parts Questions & Answers
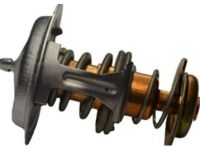
- Q: How to replace a thermostat in a cooling system?A: To remove the thermostat, disconnect the cable from the negative terminal and drain the cooling system. Loosen the hose clamp and remove the hose from the thermostat housing, or the thermostat housing cover with the radiator hose attached if the clamp cannot be accessed and remove the thermostat cover mounting bolts and detach the housing cover.
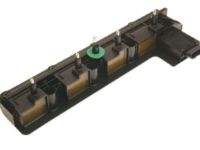
- Q: How do you remove the ignition coil assembly on Cadillac DeVille and DTS?A: To remove the ignition coil assembly, start by disconnecting the negative battery cable and removing the intake manifold service cover. Then, disconnect the electrical connector from the ignition control module and remove the radiator support cover, moving the radiator hose out of the way. Next, remove the ignition coil assembly bolts in the indicated sequence and take out the assembly from the valve cover. Inspect the spark plug boots for carbon tracking and deterioration. When installing the ignition coil assembly, tighten the mounting bolts gradually and evenly. For the rear ignition coil assembly, follow the same steps but also remove the Air Injection Reaction (AIR) vent solenoid. If replacing the ignition control module, tighten the mounting bolts in the indicated sequence. Finally, install the AIR vent solenoid and reverse the removal process for installation.
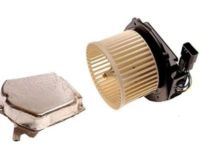
- Q: How do you remove the blower motor on Cadillac DeVille and DTS?A: To take out a blower motor for 1999 models (excluding Seville), first disengage the cable from the negative pole of the battery. Then, if available, remove strut tower cross brace and bracket from relay center. Relocation relay center and MAP sensor to one side and remove ignition coil assembly in addition to solenoid purge valve as well as any other accessories if required. Cut rubber insulator and take off metal patch plate from engine compartment, also remove inertia plate from blower motor case. Disconnect wiring connector and cooling hose from blower motor, unfasten mounting screws pulling blower assembly out of housing. Tilt the blower motor under if there is not enough room unscrew nuts on the fan so that you separate it from its' respective blades and then pull out your fan separately together with a motor. For Seville of 1999 and 2000-2005 models, extract trim panel, carpet backward then pull glove box through it right space. Take away dash integration module with its mounting bracket; disconnect wire connection of a blower motor and then get rid of securing screws before sliding out this assembly through its cavity/compartment. Exclude lower insulator panel at front passenger's side as you undo electrical connector meant for air conditioning system's evaporator/fan thus releasing it completely using two compatible bolts only. While removing auxiliary blower motors excluding those in Seville of 1999, you have to dismantle central console rear cover after which electrical connections will be disconnected plus fasteners withdrawn allowing fan to be separated from associated engines by means of some holding clips alone; thereby enabling these blowers upon which they were installed with respective bearings for instance or even casings themselves may easily be replaced without necessarily replacing whole systems entirely unlike such fans themselves treated on most vehicles usually as disposable items altogether except retrofitting purposes obviously because they do not employ energy-saving devices like brushless DC motors generally found every other appliances for instance. For Seville of 1999/2000-2005, get rid of center console; electric connector must be unplugged, air ducts disconnected, bracket removed and finally blower lowered until its' separate from rear air duct. However, you will have to remove the whole instrument panel by first taking out carpeting followed by conduits then let the auxiliary blower motor support come out completely. Remove central console but disconnect power connections along with unfastening screws that lead to detachment of spare fan case having a motor inside. Everything is in reverse order during installation process.
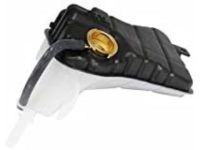
- Q: How do you remove the coolant reservoir or expansion tank?A: To remove the coolant reservoir or expansion tank, start by draining the cooling system and removing the radiator support cover if necessary. Then, detach the hose from the top of the expansion tank and remove the radiator support brace and cross-vehicle brace if equipped. Disconnect the coolant level sensor connector and remove any relay mounting brackets or fuse/relay panels that may be in the way. Loosen the clamp from the lower hose and remove it. Finally, remove the mounting bolts or nuts and pull the coolant reservoir or expansion tank straight up and out of the vehicle. To install, clean the inside of the reservoir, scrubbing hard-to-reach areas with hot, soapy water and rinsing with clean water. Then, follow the reverse steps of removal and refill the cooling system if necessary.