- Live Chat
- 1-888-737-9766
Cadillac Seville Parts
- Select Vehicle by VIN
- Select Vehicle by Model
For the most accurate results, search by your VIN (Vehicle Identification Number).
Why choose GMPartsGiant
- Large Inventory
The best site to buy Cadillac Seville genuine parts for years has been GMPartsGiant.com. We're the best online parts and accessory store for your Cadillac Seville. GMPartsGiant.com offers a large parts and accessory inventory to cover all your vehicle's repairs. Feel free to browse through our genuine Cadillac Seville parts and accessory catalog to find all your vehicle's needs.
- Fast Shipping Times
All of our Cadillac Seville auto parts and accessories are expedited directly from verified dealers and backed by the manufacturer's warranty. Our experienced team ensures the orders are packed to provide quick transit times. The majority of the orders are shipped out within a couple of business days to get the parts out to you as fast as possible.
- Low Prices
Our low prices say it all. You can rest assured that you will always receive unbeatable prices on OEM Cadillac Seville parts. Our giant inventory is beyond compare and has everything you need at an extraordinary value not found anywhere else. Whether you're restoring an old vehicle or upgrading the performance of your vehicle you can count on the quality of our products without hurting your bank account.
Popular Genuine Cadillac Seville Parts
- Engine Parts View More >
- Front Suspension, Steering Parts View More >
- Fuel System, Exhaust, Emission System Parts View More >
- Brakes Parts View More >
- Transmission - Automatic Parts View More >
- Frames, Springs, Shocks, Bumpers Parts View More >
- Cooling System, Grille, Oil System Parts View More >
- Interior Trim, Front Seat Trim, Seat Belts Parts View More >


Shop Genuine Cadillac Seville Parts with GMPartsGiant.com
The Cadillac Seville, produced from 1975 to 2004, marked a significant shift in Cadillac's approach to luxury vehicles. Initially launched as the brand's smallest two-door hatchback sedan, it evolved into a mid-size luxury model by the 1990s. The Seville introduced in May 1975 was a compact yet agile car boasting a spacious interior and standard electronic fuel injection. It represented a break from the traditional large, expensive American luxury cars as the Seville became the smallest yet priciest in the range, reflecting a shift in marketing and pricing strategies in response to the rising competition from European imports. Its construction utilized a bolt-on subframe and a rear suspension derived from the 1968 to 1974 X-body, along with thicker bushings in the front body. In 1998, a new generation of the Seville emerged with a longer wheelbase and front-wheel drive. Key standard features included dual-zone automatic climate control, automatic differential suspension, and traction control. The design language for the next decade was shaped by the introduction of sharp, angular bodywork and a wide wheelbase that gave it a sturdy, luxurious appearance. Notably, the 1981 model featured a novel digital instrument cluster and offered an optional 4.1L V6 engine. In 1985, a more compact body combined the original Seville's sharp, rounded corners with a new aerodynamic design and a transverse V8 with front-wheel drive, offering fuel economy nearing 30 mpg on highways. Despite some initial sales disappointments, continuous updates, including the introduction of the Northstar system in 1993 with a four-cylinder aluminum V8 engine, kept the Cadillac Seville competitive and appealing, marking its place in Cadillac's history.
Cadillac Seville, a luxury car renowned for high performance, isn't immune to wear and tear. Owners have frequently reported issues primarily with the steering system and the emission system. Steering issues often present as an illuminated Traction Control Light on the dashboard, a loose or rough steering wheel, and peculiar sounds when turning the wheels. Moreover, the car might handle differently after a front-end alignment, or the engine may sporadically slow down, stall, or accelerate then decelerate. Key components to inspect when these issues arise include the steering angle sensor, steering shaft, and power steering pressure switch. Emission system issues are not only detrimental to the car's performance but also to the environment. Drivers may detect exhaust fume odors while driving, fail emission tests due to high hydrocarbon and carbon monoxide emissions, or observe the Check Engine Light illuminating. These symptoms could indicate a faulty air inject check valve. Furthermore, the wheel cover, essential for protecting the wheels from dirt and moisture, can also wear out over time and compromise the wheels' proper functioning, warranting regular checks for optimal safety.
For Cadillac owners with dreams of keeping their vehicles running in prime condition, choosing OEM parts is a smart decision. Meticulously crafted, these parts follow strict factory specifications and are manufactured in top-notch facilities with advanced technologies. Furthermore, they undergo rigorous testing to ensure durability and safety, making them a reliable choice for Cadillac owners. At GMPartsGiant.com, we boast a vast inventory of genuine Cadillac Seville parts, including Front End Sheet Metal, Heater, Body Moldings, Sheet Metal, Rear Compartment Hardware, Roof Hardware at unbeatable prices online. Each OEM Cadillac Seville part is backed by the manufacturer's warranty, giving you peace of mind with your purchase. Additionally, our services include a hassle-free return policy and expedited delivery. So, what's holding you back? Start your shopping journey with us today!
Cadillac Seville Parts Questions & Answers
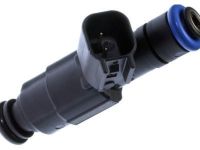
- Q: How do I remove the fuel rail and injectors?A: To remove the fuel rail and injectors, start by relieving the fuel system pressure and disconnecting the battery. Then, remove the intake manifold service cover and the air intake duct. On 1999 models, also remove the throttle body and gasket, as well as the throttle body spacer and spacer gasket. Disconnect the fuel supply and return lines from the fuel rail, and on 2005 and earlier models, disconnect the vacuum hose from the fuel pressure regulator. On 2000 and later models, disconnect the PCV fresh air tube. Remove the nut attaching the fuel rail end-point bracket retainer, and disconnect the electrical connectors from the fuel injectors. Remove the nuts securing the coolant pipes to the front fuel rail mounting studs, and then remove the fuel rail and injectors as a single assembly. To remove an injector from the fuel rail, flip up the U-clip retainer and pull out the injector. Finally, remove the old o-rings from the injectors. When installing the injectors, use new o-rings and, on 1999 models, a new gasket for the spacer. Tighten the spacer bolts to the specified torque. Installation is the reverse of removal, and be sure to check for fuel leaks after starting the engine.
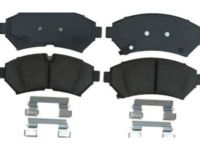
- Q: How do you remove and replace brake pads?A: To be replacing and removing the brake pads, commence by uncapping the brake fluid reservoir and using a suction gun to siphon off two-thirds of the fluid. Next, loosen wheel lug nuts, lift the vehicle up, and support it by jackstands that are secure. Remove the wheels at front or rear ends; check the condition of the disc. If machining is required, remove disc, calipers and pads. For the removal of frontal pad wash brake assembly with brake system cleaner and push piston back into bore with C-clamp. Take out bottom caliper mounting bolt, rotate caliper upwards till inner & outer brake pads are removable .Take out anti-rattle clips and check them for wear. Lubricate caliper mounting bolts when reinstalling upper & lower anti-rattle clips as well as outside/inside ones.Apply 5 force on tightness of mounting bolt.Presently you can place wheel into position; lower your car down until tire touches ground; tighten lug nuts.Finally apply then release brake pedal before checking fluid level prior to test drive of brakes.Rear pad removal can only be accomplished after washing brake assembly as well as releasing parking break cable in addition to removal of lower caliper mounting bolt.Turn up caliper to detach from retainers plus take out pads.Installing requires putting anti-squeal compound on backing plates in addition to rotating it so that piston goes inside while new pad rattle clip should be attached.Lubricate caliper guide pin when turning down caliper installing mounting bolt.Reconnecting involves installing parking break cable henceforth put wheel while lowering auto; tightening lug nuts.Release brake pedal but do not hold it instead repeat until all air is removed from hydraulic circuit.Check if there is enough fluid otherwise top up reservoir before testing braking system.