- Live Chat
- 1-888-737-9766
Chevrolet C1500 Parts
- Select Vehicle by VIN
- Select Vehicle by Model
For the most accurate results, search by your VIN (Vehicle Identification Number).

Why choose GMPartsGiant
- Optimal Shopping Experience
Want to buy parts for your vehicle? Look no further than GMPartsGiant.com, the best place for Chevrolet C1500 genuine parts. For years, all of our Chevrolet C1500 parts and accessories have been expedited directly from dedicated dealers and backed by the manufacturer's warranty, so buying from GMPartsGiant.com is always risk-free.
- Dedicated Customer Service
Our first-class customer service team is committed to providing you with the best assistance possible. Dedicated representatives are standing by to assist you by email, live chat, or phone. Every effort is made to ensure your order for OEM Chevrolet C1500 parts arrives fast no matter your location in the nation, so your vehicle is up and running and back on the road.
- Unbeatable Prices
What makes us the best online source for Chevrolet C1500 parts and truck parts? Our goal is to offer the lowest prices. You get giant savings shopping with GMPartsGiant.com. With a complete parts catalog, we cover a full selection of affordable OEM Chevrolet C1500 parts and pickup parts with a huge inventory.
Popular Genuine Chevrolet C1500 Parts
- Engine Parts View More >
- Fuel System, Exhaust, Emission System Parts View More >
- Brakes Parts View More >
- Transmission - Automatic Parts View More >
- Frames, Springs, Shocks, Bumpers Parts View More >
- Cooling System, Grille, Oil System Parts View More >
- Front Axle, Front Suspension, Steering Parts View More >
- Front End Sheet Metal, Heater Parts View More >


Shop Genuine Chevrolet C1500 Parts with GMPartsGiant.com
The Chevrolet C1500, a part of General Motors' GMT400 series, is a rear-wheel-drive pickup known for its versatile design and performance features. Production of this model continued until 1992, and the transition from the earlier round model brought significant upgrades such as rear seats in all two-seat cabs and front seats in the extended cab. The 1994 C1500 chassis remained largely unchanged, but the 1995 model year brought aesthetic enhancements including a temporary front-end upgrade and reshaped, enlarged side mirrors. All 1500 Series trucks also received safety upgrades like driver's side airbags, all-wheel ABS, a central brake light, and a gear shift indicator. The GMT800 series saw the introduction of a three-piece chassis system which significantly enhanced the flexibility of the vehicle, and the platform was able to support almost 40 truck configurations. The C1500 is equipped with either the 4L60E or the 4L65E transmission, the former being an electronically controlled version of the turbocharged 700R4 transmission. The 4L65E, while externally identical to the 4L60E, boasts greater reliability with its 5-speed setup. Another notable feature of the C1500 is the NV4500 5-speed manual transmission, a popular choice for light commercial vehicles and upgraded SUVs. Furthermore, the C1500 incorporates mild hybrid technology with a single 7 kW three-phase electric motor, which improves fuel efficiency by replacing the starter motor and alternator, supporting the transmission, and allowing the engine to shut down and restart as needed. This feature enables the Silverado, a full-size pickup truck version, to improve its city fuel efficiency by up to 10%.
Despite belonging to the long-standing Chevrolet C/K line, the Chevrolet C1500 can exhibit issues due to long-term heavy use, like hauling or transporting goods over various terrains. Owners have reported suspension system problems, like bottoming out over obstacles, hearing excessive road noise, creaking, cracking, or grinding sounds while steering or going over bumps, and visible damage to front tires, brakes, and suspension parts. These issues could indicate the need to replace a faulty leaf spring insulator. Electrical system problems are also prevalent, with symptoms like dim or flickering gauges, inaccurate readings from the voltage regulator, erratic speedometer, squealing noises behind the dashboard, and the Check Engine Light activating. Such issues may necessitate a check of the instrument cluster and speedometer. Furthermore, air conditioning issues, tied to the A/C switch, could lead to rapid switching of the A/C, failure to cool the cabin, and overheating of A/C parts. These may require attention to the A/C pressure switch or control switch. Additionally, proper care should be taken of the headlight and windshield wiper or wiper blade, ensuring clear vision and safety on the road at all times.
For unrivaled quality, OEM parts are the ultimate choice. These parts are manufactured by Chevrolet's official factory using top-quality materials and undergo strict testing procedures, ensuring outstanding dependability and long-lasting durability. Our vast inventory of OEM Chevrolet C1500 parts, like Transmission - Manual, Rear Body Structure, Moldings & Trim, Cargo Stowage, supported by the manufacturer's warranty and offered at the unmatched market prices, is sure to meet your needs. Moreover, our committed customer service team is here to assist you throughout your shopping experience for parts. Enjoy your purchase journey with us, backed by our hassle-free return policy and expedited delivery service.
Chevrolet C1500 Parts Questions & Answers
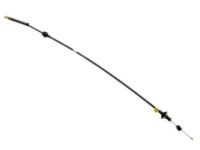
- Q: How do you disconnect the accelerator cable from the throttle lever?A: Disconnect the cable from the negative battery terminal. Caution: On models equipped with the Theftlock audio system, be sure the lockout feature is turned off before performing any procedure which requires disconnecting the battery. Access the throttle body by removing the air filter assembly from the TBI unit on TBI systems, or by removing the air intake duct and resonator from the throttle body on Central SFI and MPFI systems. Detach the cruise control cable from the throttle lever, if equipped. Rotate the throttle lever and separate the throttle cable end from the throttle lever by passing the cable through the slot in the throttle lever. Depress the locking tabs on the cable housing and push the cable housing through the bracket, then detach the cable from the cable routing retainers. Remove the trim panel from under the dash and detach the cable from the accelerator pedal by pulling the accelerator cable retainer out of the pedal and sliding the cable through the slot. Depress the locking tabs on the cable housing and push the cable through the firewall and into the engine compartment. Finally, remove the cable from the engine compartment. Installation is the reverse of removal.
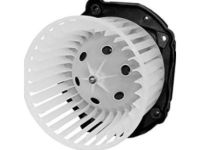
- Q: How to remove the Blower Motor in a Chevrolet C1500 and K1500?A: The front blower motor is on the right side of the dash. For removal, disconnect the battery's negative cable. Disconnect blower wiring and hose. Remove the glove box and right kick panel. On older models, disconnect the ECM wiring and remove a bolt from the instrument panel. For 1988-1991 models, unscrew the fan nut. For 1992 onwards, remove the motor shaft tip and detach the fan using a puller. On Suburban models, disconnect the battery, remove the rear trim panel, and unplug blower motor wiring. Then, remove the blower motor. Installation is the reverse process.
- Q: How to remove the coolant overflow hose from the reservoir on Chevrolet C1500 and K1500?A: Remove the coolant overflow hose from the reservoir. Then, remove the screws and detach the reservoir, which is secured with two screws. Prior to installation, ensure the reservoir is clean and free of debris which could be drawn into the radiator. If necessary, wash it with soap and water. Installation is simply the reverse of the removal process.
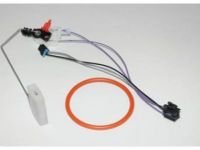
- Q: How to check the fuel level sending unit?A: To check the fuel level sensor, start by removing the fuel tank and the fuel level sensor or fuel pump module. Connect the probes of an ohmmeter to the fuel level sensor terminals of the fuel pump electrical connector. Position the float in the down position and note the reading on the ohmmeter. Move the float up to the full position and observe the meter. If the fuel level sensor resistance does not change smoothly as the float travels from empty to full, it needs to be replaced. For 1988 through 1996 models, remove the fuel tank and the fuel pump/fuel level sensor. Disconnect the sensor harness connector and remove the sensor mounting screws. Separate the sensor from the frame of the fuel pump/sensor assembly. Installation is the reverse of removal. For 1997 through 2000 models, remove the fuel tank and the fuel pump module. Disconnect the fuel level sensor electrical connector from the module cover and remove the sensor retaining clip. Pinch the tabs together and slide the fuel level sensor off the module, noting the wiring routing for installation. Installation is the reverse of removal.