- Live Chat
- 1-888-737-9766
Chevrolet Colorado Parts
- Select Vehicle by VIN
- Select Vehicle by Model
For the most accurate results, search by your VIN (Vehicle Identification Number).

Why choose GMPartsGiant
- Optimal Shopping Experience
Want to buy parts for your Chevrolet Colorado? Look no further than GMPartsGiant.com, the best place for Chevrolet Colorado genuine parts. For years, all of our Chevrolet Colorado auto parts and accessories have been expedited directly from dedicated dealers and backed by the manufacturer's warranty, so buying from GMPartsGiant.com is always risk-free.
- Dedicated Customer Service
Our first-class customer service team is committed to providing you with the best assistance possible. Dedicated representatives are standing by to assist you by email, live chat, or phone. Every effort is made to ensure your order for OEM Chevrolet Colorado parts arrives fast no matter your location in the nation, so your vehicle is up and running and back on the road.
- Unbeatable Prices
What makes us the best online source for Chevrolet Colorado parts and Chevrolet Colorado truck parts? Our goal is to offer the lowest prices. You get giant savings shopping with GMPartsGiant.com. With a complete Chevrolet Colorado parts catalog, we cover a full selection of affordable OEM Chevrolet Colorado parts and pickup parts with a huge inventory.
Popular Genuine Chevrolet Colorado Parts
- Engine Parts View More >
- Front Suspension, Steering Parts View More >
- Fuel System, Exhaust, Emission System Parts View More >
- Brakes Parts View More >
- Transmission - Automatic Parts View More >
- Frames, Springs, Shocks, Bumpers Parts View More >
- Cooling System, Grille, Oil System Parts View More >
- Front Axle, Front Suspension, Steering Parts View More >


Genuine Chevrolet Colorado Accessories


Shop Genuine Chevrolet Colorado Parts with GMPartsGiant.com
The Chevrolet Colorado is a compact to mid-sized pickup truck, produced by Chevrolet since 2004 across two generations. Succeeding the brand's previous pickup models, the Colorado has seen significant upgrades over time, particularly in engine and transmission offerings. The first generation provided a standard 2.8L LK5 I4 engine, with an optional 3.5L I5 available for the four-door version and Z71 package. The second-generation, launched in 2011, offered a 2.4L or 2.5L I4 gasoline engine, with a more powerful 3.6L V6 for higher trim levels. Initial transmission options included a 5-speed manual and a 4-speed automatic, but the newer edition expanded these options to include a 6-speed manual, 6-speed automatic, and an 8-speed automatic. The hybrid model also featured a unique Bi-Fuel system. In terms of body style, the Colorado comes in 2-door or 4-door options, offering regular cab, extended cab, and crew cab configurations, with either rear-wheel-drive or four-wheel-drive layouts. Wheelbase dimensions have evolved, with the second generation expanding to between 128.3-140.5 inches, depending on cab type. With a name inspired by an American state, the Chevrolet Colorado has become one of the brand's most iconic models, recognized globally and awarded the Motor Trend nomination in 2015 and 2016.
Despite its popularity in North America, the Chevrolet Colorado isn't free from complaints by vehicle owners, particularly concerning engine and braking problems. Owners have reported issues like engine misfires, poor idling, a sluggish response to acceleration, and the engine light being on, which may signal a failing body control module or a broken timing chain guide. Braking problems include the ABS light activating and the ABS working improperly, which could be due to a faulty ABS sensor, affecting stopping time and stability in icy or wet conditions, or a malfunctioning wheel speed sensor causing the ABS light to turn on, poor ABS performance, and the traction control light to stay on. Furthermore, Colorado owners are advised not to wait for serious accidents before replacing auto parts; preventative measures are always better. Hence, parts like windshield wiper blades should be replaced annually in hot, sunny environments and every six months in dusty, sandy regions, and seat belts should be replaced after any accident that activates the pretensioners.
Every OEM part is meticulously built to precisely match the original part's specs. They also adhere to strict official quality control standards during manufacture to guarantee exceptional quality. In need of new Chevrolet Colorado parts, including Brakes, Rear Axle, Propeller Shaft, Wheels, Tires, Interior Trim, Front Seat Trim, Seat Belts, Front End Sheet Metal, Heater? We suggest you explore our vast collection of genuine Chevrolet Colorado parts, such as Transmission - Manual, Body Moldings, Cab Sheet Metal, Pickup Box, Roof Hardware, all available at the most competitive prices. Furthermore, every OEM part, like Rear Body Structure, Moldings & Trim, Cargo Stowage, Transfer Case we provide is backed by a manufacturer's warranty and comes with the promise of swift delivery and a hassle-free return policy.
Chevrolet Colorado Parts Questions & Answers
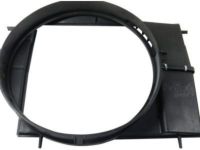
- Q: How do you remove Fan Clutch,Fan Shroud and Radiator fan for Chevrolet Colorado and GMC Canyon?A: To remove the radiator fan from a vehicle's cooling system, start by partially draining the cooling system and removing the upper radiator hose. If the vehicle has a V8 engine, also remove the air filter housing. Next, unclip the air conditioning hoses from the fan shroud and remove the clips at the left and right junctures of the upper and lower fan shroud section. Pull the upper shroud from the clips at the side brackets. Finally, remove the fan clutch hub from the water pump by turning it counterclockwise. To install the fan, first unbolt it from the clutch if necessary and then tighten the fan-to-clutch bolts to the specified torque. Reverse the removal steps to complete the installation. Finally, check the coolant level and add more if needed to bring it to the appropriate level.
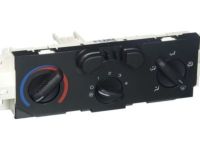
- Q: How do you remove the A/C Switch?A: To remove the A/C switch, start by disconnecting the cable from the negative terminal of the battery. Then, use a flat-bladed plastic trim tool to remove the center trim panel from the instrument panel. Next, remove the A/C switch retaining screws and pull the unit from the dash. You can pull it out just enough to disconnect the electrical connections and control cables from the A/C switch, using a small screwdriver to release the clips. To install the A/C switch, simply reverse the removal procedure.
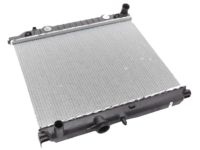
- Q: How do you remove a radiator?A: To remove the radiator, start by disconnecting the cable from the negative terminal of the battery. Then, drain the cooling system and remove the fan shroud, fan, and clutch. Next, raise the vehicle and support it securely on jackstands. Remove the lower radiator hose and, if applicable, detach the transmission cooler lines from the radiator. Lower the vehicle and remove the grille. Take out the radiator mount bracket and the condenser mounting bolts. Pull the condenser forward and remove the radiator. Before installing the radiator, replace any damaged radiator hoses and hose clamps. To install the radiator, ensure it seats properly in the lower saddles and that the upper brackets are secure. Install the transmission cooler line retaining clips onto the quick-connect fitting before installing the lines. Snap the cooler lines into place on the quick-connect fittings and reinstall the plastic collars to lock the retaining clip in place. Finally, refill the cooling system and check the automatic transmission fluid level.
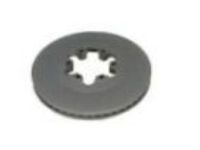
- Q: How do you inspect and replace the Brake Disc?A: To inspect the brakes, start by loosening the wheel lug nuts and raising the vehicle on jackstands. Remove the brake caliper, suspending it out of the way with wire. Visually inspect the disc surface for score marks and damage, and check for disc runout using a dial indicator. If necessary, have the disc refinished by a machine shop. When replacing brake pads, it is recommended to resurface the discs for a smooth finish. Make sure not to machine the disc below the specified minimum thickness. To remove the front hub and bearing assembly, place it on a solid work surface and separate the disc from the hub. For installation, assemble the disc and hub, tighten the bolts to the specified torque, and then follow the reverse steps of removal. Finally, install the wheel and lug nuts, lower the vehicle, and tighten the lug nuts. Test the brakes before driving the vehicle.