- Live Chat
- 1-888-737-9766
GMC Sierra Parts
- Select Vehicle by VIN
- Select Vehicle by Model
For the most accurate results, search by your VIN (Vehicle Identification Number).

Why choose GMPartsGiant
- Optimal Shopping Experience
Want to buy parts for your GMC Sierra? Look no further than GMPartsGiant.com, the best place for GMC Sierra genuine parts. For years, all of our GMC Sierra auto parts and accessories have been expedited directly from dedicated dealers and backed by the manufacturer's warranty, so buying from GMPartsGiant.com is always risk-free.
- Dedicated Customer Service
Our first-class customer service team is committed to providing you with the best assistance possible. Dedicated representatives are standing by to assist you by email, live chat, or phone. Every effort is made to ensure your order for OEM GMC Sierra parts arrives fast no matter your location in the nation, so your vehicle is up and running and back on the road.
- Unbeatable Prices
What makes us the best online source for GMC Sierra parts and GMC Sierra truck parts? Our goal is to offer the lowest prices. You get giant savings shopping with GMPartsGiant.com. With a complete GMC Sierra parts catalog, we cover a full selection of affordable OEM GMC Sierra parts and pickup parts with a huge inventory.
Popular Genuine GMC Sierra Parts
- Engine Parts View More >
- Fuel System, Exhaust, Emission System Parts View More >
- Brakes Parts View More >
- Transmission - Automatic Parts View More >
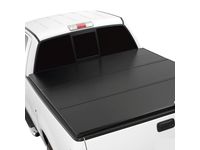
- Frames, Springs, Shocks, Bumpers Parts View More >
- Cooling System, Grille, Oil System Parts View More >
- Front Axle, Front Suspension, Steering Parts View More >
- Front End Sheet Metal, Heater Parts View More >


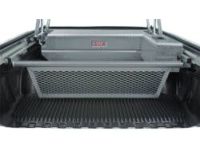
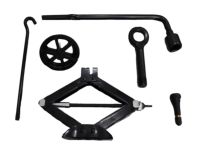
Genuine GMC Sierra Accessories

Shop Genuine GMC Sierra Parts with GMPartsGiant.com
The GMC Sierra, a full-size pickup truck manufactured by General Motors. Introduced in 1987, the Sierra is known for its versatility, serving as a commuter vehicle, a hauler, or a transporter. The first GMC Sierra 1500 and 2500 debuted in 1998 for the 1999 model year. In its second generation (2006-2013), the Sierra line expanded with offerings of 2-wheel and 4-wheel drive versions in HD, classic crew cab, extended cab, hybrid, and the luxury-oriented Sierra Denali with all-wheel drive. Its powertrain was boosted with V8 engines and enhanced 5-speed manual and automatic transmissions, along with the addition of 6-speed options. The third generation (2013-present) was launched at the North American International Auto Show in 2012, carrying over the same trim levels and introducing the 2016 GMC Sierra SLT and the special edition GMC Sierra All Terrain X. Today, the GMC Sierra boasts higher horsepower V6 and V8 engines, maintaining the previous generation's transmissions and introducing a new 4-speed "2-Mode Hybrid transmission" 2ML70 for the Hybrid trim level.
Despite its notable performance and high quality, the GMC Sierra can still exhibit some common issues due to prolonged driving or improper usage. Firstly, excessive fuel consumption is a common problem not only in the Sierra but in many other vehicles as well. Some owners have reported the need for frequent refueling, a situation likely attributed to worn-out spark plugs or a faulty fuel pump. Secondly, drivers may notice distinct vibrations while driving, experiencing it through the steering wheel and noticing extended braking times or unusual noises when driving over bumps. This might be caused by faulty shock absorbers, a failed drive shaft, or damaged strut mounts, which would necessitate inspection and replacement to prevent worsening conditions. Regular maintenance and attention to every part of your Sierra is crucial for its longevity. Particularly, components like seat belts, drive belts, fuel filters, and windshield wipers, which are known to wear out over time, should be promptly replaced to ensure a safe and smooth driving experience.
In terms of quality, OEM parts are unmatched. They undergo comprehensive quality control checks and are manufactured following GMC's official factory standards. All these steps ensure the elimination of flaws and irregularities. Therefore, you can rest assured knowing they offer an extraordinary lifespan and a perfect fit. GMPartsGiant.com is your ideal destination offering a large inventory of genuine GMC Sierra parts, like Transmission - Manual, Rear Body Structure, Moldings & Trim, Cargo Stowage at unbeatable prices online. Rest assured knowing our OEM GMC Sierra parts, such as Transfer Case are backed by the manufacturer's warranty, not to mention our hassle-free return policy and expedited delivery service. So why wait? Start your maintenance journey now!
GMC Sierra Parts Questions & Answers
- Q: How to remove the air intake duct and air filter housing on Chevrolet Avalanche,Silverado,Suburban,Tahoe,GMC Sierra,Yukon,Yukon Denali and Yukon XL?A: To remove the air intake duct on V8 models, first remove the intake manifold cover and disconnect the PCV fresh air inlet hose. Then detach the radiator hose clip and loosen the hose clamp screws at the MAF sensor and throttle body. Lift the duct straight up to disengage the locator pin from its insulator grommet. To remove the air filter box, disconnect the electrical connector from the MAF sensor and pull the box straight up to disengage the two locator pins from their insulator grommets. While the box is out, inspect the rubber mounting grommets and replace any that are damaged. Installation is the reverse of removal.
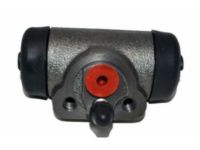
- Q: How to remove and install a wheel cylinder for Chevrolet Avalanche,Silverado,Suburban,Tahoe,GMC Sierra,Yukon,Yukon Denali and Yukon XL?A: To remove and install a wheel cylinder, first raise the rear of the vehicle and support it securely on jackstands, and block the front wheels to prevent rolling. Remove the brake shoe assembly and all dirt and foreign material from around the wheel cylinder. Using a flare-nut wrench, unscrew the brake line fitting from the wheel cylinder, being careful not to pull the line away from the cylinder. Remove the wheel cylinder mounting bolts and detach the cylinder from the brake backing plate. To install, place the wheel cylinder in position and connect the brake line fitting, being careful not to cross-thread it. Install the mounting bolts and tighten them to the torque specifications, then tighten the brake line fitting securely. Install and adjust the brake shoes, bleed the brakes, and confirm that the brakes are fully operational before resuming normal driving.
- Q: How to check, remove, and install a vacuum or hydraulic booster?A: To check the operating and airtightness of a vacuum booster, depress the pedal and start the engine. Ensure that the pedal goes down slightly and that there is no change in the pedal reserve distance. For a hydraulic booster, turn off the engine and depress the brake pedal to deplete the pressure in the accumulator. If the booster is working properly, the brake pedal will sink toward the floor and then rise back up against your foot. To remove the booster, disconnect the cable from the negative battery terminal, detach the vacuum or pressure and return lines, remove the master cylinder, disconnect any electrical connectors, and remove the pushrod retaining clip and the four nuts retaining the booster. To install the booster, use a new gasket and tighten the mounting nuts to the torque specifications. If working with a hydraulic booster, bleed the power steering system and check the fluid level.