


Your vehicle deserves only genuine OEM GM parts and accessories. To ensure reliability, purchase GM part # 12521221 Cover Assembly, Crankcase Front End. It is sometimes referred to as Buick Timing Cover. Our GM parts and accessories are expedited directly from authorized GM dealers strategically located all across the U.S. and are backed by the manufacturer's 12 month, 12,000 mile warranty. OEM GM parts are the best for restoring your vehicle to factory condition performance. This part fits specific Buick Century, Regal models.
Affordable, reliable and built to last, GM part # 12521221 Cover Assembly, Crankcase Front End stands out as the smart option. GMPartsGiant.com is your prime online source with the biggest and best selection of genuine GM parts and accessories at giant discounted prices. We have the OEM GM parts and accessories you need at the wholesale prices. GMPartsGiant.com has you covered no matter what type of GM vehicle you drive. For detailed Buick parts information, click here.
×
My Garage
My Account
My Cart
Make sure this part fits your vehicle
Buick 12521221 Cover Assembly, Crankcase Front End
1987-1991 Buick
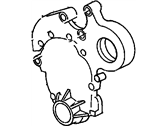

- Part DescriptionCOVER
- PositionFront
- ManufacturerGeneral Motors
- Manufacturer's NotesThis part is discontinued.
Product Specifications
Brand Genuine Buick Manufacturer Part Number 12521221 Part Description COVER Other Names Timing Cover Item Dimensions 18.6 x 18.2 x 5.5 inches Item Weight 7.00 Pounds Position Front Condition New Fitment Type Direct Replacement Manufacturer General Motors SKU 12521221 Warranty This genuine GM part is guaranteed by GM's factory warranty. Shipping & Return Shipping Policy Return Policy Warning: California’s Proposition 65Vehicle Fitment
Year Make Model Engine Important vehicle option details 1987-1989 Buick Century 6 Cyl 2.8L CUSTOM 2 DOOR, CUSTOM 4 DOOR, CUSTOM STATION WAGON, LIMITED 2 DOOR, LIMITED 4 DOOR 1988-1991 Buick Regal 6 Cyl 2.8L, 6 Cyl 3.1L 2 DOOR, 4 DOOR, CUSTOM 2 DOOR, CUSTOM 4 DOOR, LIMITED, LIMITED 2 DOOR, LIMITED 4 DOOR, REGAL
Customer Questions & Answers
- Q:I am wonder if this is complete and correct part for my vehicle. Posted by GMPartsGiant Specialist
- A:You can Select Your Vehicle to check if 12521221 fits your vehicle.Posted by GMPartsGiant Specialist
- Q:What are the removal and installation procedures for Timing Cover? Posted by Customer
- A:For the removal and installation procedures for Buick Engines, follow these steps: Drain the cooling system, remove the radiator, fan, pulley, and belt. Remove the fuel pump and alternator if necessary. Remove the distributor, noting its position if it won't be disturbed. Remove the thermostat bypass hose, harmonic balancer, timing chain-to-crankcase bolts, and oil pan-to-Timing Cover bolts to remove the Timing Cover. Drive out the old seal and the shedder, coil the new packing around the opening, drive in the shedder, and properly size the packing. Align the timing marks on the sprockets, remove the camshaft sprocket bolt without changing its position, and remove the front crankshaft oil slinger. Remove the crankshaft distributor drive gear and the fuel pump eccentric on the 350 engine or the camshaft sprocket bolts on the V6. Carefully pry the camshaft and crankshaft sprockets forward, then remove them along with the chain. To install, ensure No. 1 piston is at top dead center, assemble the timing chain on both sprockets, slide them onto the shafts with 0-marks aligned, install the slinger on the crankshaft, slide the fuel pump eccentric and woodruff key on the camshaft, and install the distributor drive gear and eccentric bolt. Tighten the bolts to specified torque values, install the timing case cover, new seal, and gasket, and secure the cover with bolts. Clean all gasket mating surfaces and apply silicone sealer to the oil pan-to-cylinder block joint before reinstalling the oil pan and other parts. For Pontiac Engines (265 and 301), drain the cooling system, disconnect hoses, vacuum lines, and spark plug wires, and remove the radiator. Disconnect accelerator linkage, temperature gauge wire, and fuel lines. Remove the hood latch brace, PCV valve hose, rocker covers, distributor, intake manifold, and valve cover. Loosen rocker arm nuts and remove pushrods and lifters. Remove the harmonic balancer, fuel pump, and oil pan-to-timing cover bolts, and then the timing cover and gasket, followed by the fuel pump eccentric and bushing. Align timing marks and remove timing chain and sprockets. To install, position the engine with No. 6 piston at top dead center, rotate the crankshaft to align the camshaft gear mark at 12 o'clock, and slide the camshaft and crankshaft sprockets onto the shafts with 0-marks aligned. Install the slinger on the crankshaft, fuel pump eccentric, and camshaft sprocket bolts or camshaft thrust plate. Lubricate components and install them as per the removal process. For Chevrolet Engines (305 and 350), drain the radiator, remove belts, fan, pulley, crankshaft pulley, and balancer. Clean all gasket mounting surfaces. To install, apply silicone sealer to the oil pan-to-cylinder block joint, use a centering tool for the front cover, tighten cover bolts, install the harmonic balancer, pulley, water pump, belts, radiator, and all other parts. For Oldsmobile Engines (307, 350, and 403), drain the coolant, disconnect hoses, remove fan, belts, pulley, crankshaft pulley, balancer, and oil pan on some models. Remove front cover bolts, cover, timing indicator, and water pump. Grind dowel pins and chamfer their ends on later models. Trim gaskets, clean mating surfaces, apply sealer, and install new seals and gaskets. Install the cover, tighten bolts, and install balancer, pulley, water pump, belts, radiator, and other components. For Oldsmobile Diesel Engines (263 and 350), drain the coolant, disconnect hoses, remove belts, fan, pulley, crankshaft pulley, and balancer using a puller. Unbolt and remove the cover, timing indicator, and water pump. Grind dowel pins and chamfer their ends. Trim gaskets, clean mating surfaces, and apply sealer. Install new seal and gasket, press down on the cover, rotate it to guide the pan seal, and tighten bolts. Lubricate balancer seal surface and install the balancer and other parts in reverse of removal.Posted by GMPartsGiant Specialist
- Q:How should the old gasket material be removed from the sealing surfaces for the 1989 Chevrolet Beretta? Posted by Customer
- A:The old gasket material should be removed using a scraper and degreaser.Posted by GMPartsGiant Specialist
- See expert answers on similar Timing Cover
- Q:What additional components should be disconnected or unbolted for the 1990 Chevrolet Beretta? Posted by Customer
- A:You should also disconnect the coolant hoses from the fill pipe and water pump, unbolt the spark plug wire shield at the water pump, and disconnect the canister purge hose and tie it aside.Posted by GMPartsGiant Specialist
- See expert answers on similar Timing Cover
If you have any questions about this product, please don't hesitate to ask us. We will be happy to help you!
Genuine GM Part 12521221, the Right Choice
Why choose GM Parts Giant
- Dedicated Service
Your complete satisfaction is our #1 goal
- Lowest Prices
Best deals on genuine OE parts from dealerships
- Fast Delivery
Orders are processed and delivered promptly