


Your vehicle deserves only genuine OEM GM parts and accessories. To ensure reliability, purchase GM part # 19178430 Rear Leveling Shock Absorber Assembly. It is sometimes referred to as Chevrolet Shock Absorber. Our GM parts and accessories are expedited directly from authorized GM dealers strategically located all across the U.S. and are backed by the manufacturer's 12 month, 12,000 mile warranty. OEM GM parts are the best for restoring your vehicle to factory condition performance. This part fits specific Chevrolet Caprice, Impala models.
Affordable, reliable and built to last, GM part # 19178430 Rear Leveling Shock Absorber Assembly stands out as the smart option. GMPartsGiant.com is your prime online source with the biggest and best selection of genuine GM parts and accessories at giant discounted prices. We have the OEM GM parts and accessories you need at the wholesale prices. GMPartsGiant.com has you covered no matter what type of GM vehicle you drive. For detailed Chevrolet parts information, click here.
×
My Garage
My Account
My Cart
Make sure this part fits your vehicle
Chevrolet 19178430 Rear Leveling Shock Absorber Assembly
1994-1996 Chevrolet
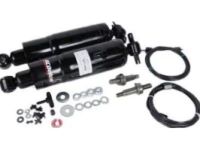


- Part DescriptionAbsorber Asm,Rear Leveling Shock ; Absorber, Shock Absorber Air Lift
- PositionRear
- Replaces22064603, 22064630, 19167561, 19178393
- ManufacturerGeneral Motors
$166.75 MSRP: $330.84 1
You Save: $164.09 (50%)
Ships in 1-2 Business Days
Product Specifications
Brand Genuine Chevrolet Manufacturer Part Number 19178430 Part Description Absorber Asm,Rear Leveling Shock ; Absorber, Shock Absorber Air Lift Other Names Shock, Shock Absorber Item Dimensions 19.6 x 6.7 x 4.1 inches Item Weight 5.70 Pounds Position Rear Condition New Fitment Type Direct Replacement Replaces 22064603, 22064630, 19167561, 19178393 Manufacturer General Motors SKU 19178430 Warranty This genuine GM part is guaranteed by GM's factory warranty. Shipping & Return Shipping Policy Return Policy Warning: California’s Proposition 65Vehicle Fitment
Year Make Model Engine Important vehicle option details 1994-1996 Chevrolet Caprice 8 Cyl 4.3L, 8 Cyl 5.7L CLASSIC 4 DOOR, CLASSIC STATION WAGON 1994-1996 Chevrolet Impala 8 Cyl 5.7L CLASSIC 4 DOOR, CLASSIC STATION WAGON
Customer Questions & Answers
- Q:I am wonder if this is complete and correct part for my vehicle. Posted by GMPartsGiant Specialist
- A:You can Select Your Vehicle to check if 19178430 fits your vehicle.Posted by GMPartsGiant Specialist
- Q:How do you remove and install MacPherson struts on a Cadillac ElDorado and Fleetwood? Posted by Customer
- A:To remove and install struts on your vehicle, follow these steps. Begin by disconnecting the negative battery cable. Then, raise and securely support the vehicle, ensuring it's supported by the frame with the control arms hanging freely. Remove the wheel and tire assembly. On Eldorado and Seville models, if equipped, detach the electrical connector from the top of the strut. On Deville and Fleetwood models, loosen the strut housing tie bar through bolts at each end. For Eldorado and Seville models with a 4.6L engine, remove the road sensing suspension position sensor from the lower control arm. Remove the nuts attaching the top of the strut to the body. For Deville and Fleetwood models equipped with anti-lock brakes, disconnect the wheel speed sensor and remove the sensor bracket from the strut. On Eldorado and Seville models, remove the stabilizer link from the strut, and also remove the brake line bracket from the strut. Finally, remove the strut-to-knuckle bolts and remove the strut while supporting the knuckle with wire to prevent damage to the ball joint or halfshaft. To install the new strut, attach it to the knuckle using the bolts and nuts. Then, attach the strut to the body with the nuts. For Deville and Fleetwood models, position the washer and tie bar before installing the strut-to-body nuts. Install the brake line bracket onto the strut. On Eldorado and Seville models, connect the stabilizer link to the strut. For Deville and Fleetwood models with anti-lock brakes, install the wheel speed sensor bracket and connect the sensor. On Eldorado and Seville models, install the road sensing suspension sensor to the lower control arm and connect the electrical connector at the top of the strut if it's equipped. Tighten the strut-to-knuckle bolts to 140 ft lbs (190 Nm), strut-to-body nuts to 18 ft lbs (24 Nm), stabilizer link nuts to 48 ft lbs (65 Nm), and tie bar through bolts to 20 ft lbs (27 Nm). Finally, install the wheel and tire assembly, lower the vehicle, and check and adjust the front wheel alignment as necessary. For overhauling the strut assembly, first, mount it in a strut compressor tool like J-34013 or an equivalent. Turn the compressor forcing screw until the spring compresses slightly. Use a T-50 Torx bit to prevent the strut shaft from turning, and then remove the nut on top of the strut shaft. Loosen the compressor screw while guiding the strut shaft out of the assembly. Continue loosening the compressor screw until you can remove the strut and spring. To install, mount the strut in the compressor tool, using clamping tool J-34013-20 or an equivalent to hold the strut shaft in place. Install the spring over the strut with the flat on the upper spring seat facing out from the centerline of the vehicle or in the same direction as the steering knuckle mounting flange. If the bearing was removed from the upper spring seat, reinstall it in the same position before attaching it to the strut mount. Turn the compressor screw to compress the spring while guiding the strut shaft through the top of the strut assembly. If necessary, use tool J-34013-38 or an equivalent to guide the shaft. When the strut shaft threads are visible through the top of the strut assembly, install the washer and nut. Remove clamping tool J-34013-20 from the strut shaft and tighten the strut shaft nut to 55 ft lbs (75 Nm) while holding the strut shaft with a T-50 Torx bit. Finally, remove the strut assembly from the compressor tool.Posted by GMPartsGiant Specialist
- Q:How to remove and install shock absorbers on Cadillac ElDorado and Fleetwood? Posted by Customer
- A:To remove and install the shock absorbers on Deville and Fleetwood models, start by raising and safely supporting the vehicle, then removing the wheel and tire assembly and the trunk side cover. Disconnect the electronic level control airline from the strut, making sure to clean the connector and surrounding area and squeeze the spring clip to release the connector. If equipped with Computer Command Ride, detach the electrical connector and proceed to remove the strut tower mounting nuts from inside the trunk. Remove the bolts, washers, and nuts from the knuckle and stabilizer bar bracket to free the strut. When installing the strut, ensure the wiring is upright and centered on the strut mount if equipped with Computer Command Ride. Tighten the strut tower mounting nuts to 19 ft. lbs. (25 Nm) and the strut-to-knuckle nuts to 140 ft. lbs. (190 Nm). Moisten the air line O-rings with lubricant and push the air line and connector fully into the fitting. Reattach the electrical connector if equipped with Computer Command Ride. Finally, reinstall the trunk side cover, pressurize the electronic level control system, install the wheel and tire assembly, and lower the vehicle, checking the rear wheel alignment. For 1990-92 Eldorado and Seville models, begin by raising and safely supporting the vehicle, then removing the wheel and tire assembly. If equipped with a 4.6L engine, detach the shock absorber electrical connector from the rear suspension support. Support the lower control arm with a suitable jack to relieve the spring load, and remove the shock absorber lower mounting nut and bolt. If equipped with a 4.9L engine, detach the electrical connector from the top of the shock absorber. Disconnect the air line from the shock absorber, making sure to clean the connector and surrounding area and rotate the spring clip to release the connector lock. Remove the upper mounting nut, retainer, and insulator, then compress the shock absorber by hand and remove it through the upper control arm. When installing the shock absorbers, inspect the upper and lower insulators for damage and replace as needed. Position the shock absorber in the suspension support, moisten the air line O-rings, and push the air line and connector fully into the fitting. Attach the electrical connector if equipped and tighten the upper shock absorber nut to 55 ft. lbs. (75 Nm) and the lower shock absorber nut to 75 ft. lbs. (102 Nm). Install the wheel and tire assembly and lower the vehicle. Finally, for 1993-98 Eldorado and Seville models, raise and safely support the vehicle, remove the wheel and tire assembly, disconnect the electronic level control height sensor link if removing the left strut, and install two lug nuts to hold the rotor on the hub and bearing assembly. If equipped with a stabilizer bar, remove the mounting bolt at the strut, and remove the rear brake caliper, following steps to loosen the parking brake cable, remove the cable support bracket, and suspend the caliper. Loosen but do not remove the knuckle pivot bolt on the outer end of the control arm and support the outer end of the control arm with a suitable jack or jackstand. If equipped with Computer Command Ride, detach the electrical connector at the top of the strut and disconnect the air line from the strut, ensuring to clean the connector and surrounding area and rotate the spring clip to release the connector lock. Remove the upper strut rod cap, mounting nut, retainer, and insulator, then slowly lower the jack or remove the jackstand to relieve the spring pressure. Compress the strut by hand and rotate the strut and knuckle assembly outward to remove it from the knuckle. When installing the shock absorbers, inspect the upper and lower insulators for damage, and position the strut fully in the knuckle with the tang on the strut bottomed in the knuckle slot. Install the knuckle pinch bolt and tighten it, install the lower insulator on the strut, position the strut rod in the suspension support, and install the upper strut insulator, retainer, and nut. Moisten the air line O-rings with lubricant, rotate the spring retainer to the engaged position, and push the air line and connector fully into the fitting. Attach the electrical connector if equipped, and reinstall the wheel and tire assembly, then lower the vehicle.Posted by GMPartsGiant Specialist
If you have any questions about this product, please don't hesitate to ask us. We will be happy to help you!
Genuine GM Part 19178430, the Right Choice
Why choose GM Parts Giant
- Dedicated Service
Your complete satisfaction is our #1 goal
- Lowest Prices
Best deals on genuine OE parts from dealerships
- Fast Delivery
Orders are processed and delivered promptly