


Your vehicle deserves only genuine OEM GM parts and accessories. To ensure reliability, purchase GM part # 19179578 Distributor Ignition Control Module Assembly. It is sometimes referred to as Chevrolet Igniter, Chevrolet Ignition Control Module. Our GM parts and accessories are expedited directly from authorized GM dealers strategically located all across the U.S. and are backed by the manufacturer's 12 month, 12,000 mile warranty. OEM GM parts are the best for restoring your vehicle to factory condition performance. This part fits specific Chevrolet Blazer, Camaro, Tahoe models.
Affordable, reliable and built to last, GM part # 19179578 Distributor Ignition Control Module Assembly stands out as the smart option. GMPartsGiant.com is your prime online source with the biggest and best selection of genuine GM parts and accessories at giant discounted prices. We have the OEM GM parts and accessories you need at the wholesale prices. GMPartsGiant.com has you covered no matter what type of GM vehicle you drive. For detailed Chevrolet parts information, click here.
×
My Garage
My Account
My Cart
Make sure this part fits your vehicle
Chevrolet 19179578 Distributor Ignition Control Module Assembly
1985-1997 Chevrolet
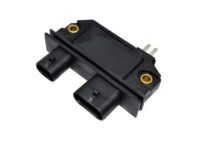


- Part DescriptionModule Asm,Distributor Ignition Control ; Module, Distributor (Also Knock Sensor)
- Replaces10482827, 16139389, 10482834, 10482829, 16139369, 16140039
- ManufacturerGeneral Motors
$70.53 MSRP: $148.16 1
You Save: $77.63 (53%)
Ships in 1-2 Business Days
Product Specifications
Brand Genuine Chevrolet Manufacturer Part Number 19179578 Part Description Module Asm,Distributor Ignition Control ; Module, Distributor (Also Knock Sensor) Other Names Ignition Lock Cylinder, Ignition Module, Module Item Dimensions 3.0 x 2.9 x 2.8 inches Item Weight 0.60 Pounds Condition New Fitment Type Direct Replacement Replaces 10482827, 16139389, 10482834, 10482829, 16139369, 16140039 Manufacturer General Motors SKU 19179578 Warranty This genuine GM part is guaranteed by GM's factory warranty. Shipping & Return Shipping Policy Return Policy Warning: California’s Proposition 65Vehicle Fitment
View MoreYear Make Model Engine Important vehicle option details 1986-1995 Chevrolet Astro 6 Cyl 4.3L VAN ASTRO 1987-1995 Chevrolet Blazer 6 Cyl 2.8L, 6 Cyl 4.3L, 8 Cyl 5.0L, 8 Cyl 5.7L, 8 Cyl 6.2L Diesel 1/2 TON, 2 DOOR, 4 DOOR 1992-1995 Chevrolet C1500 6 Cyl 4.3L, 8 Cyl 5.0L, 8 Cyl 5.7L, 8 Cyl 7.4L C1500 EXTENDED CAB LONG BOX, C1500 EXTENDED CAB STANDARD BOX, C1500 REGULAR CAB LONG BOX, C1500 REGULAR CAB STANDARD BOX 1992-1995 Chevrolet C2500 6 Cyl 4.3L, 8 Cyl 5.0L, 8 Cyl 5.7L, 8 Cyl 7.4L C2500 EXTENDED CAB LONG BOX, C2500 EXTENDED CAB STANDARD BOX, C2500 REGULAR CAB 1992-1995 Chevrolet C3500 8 Cyl 5.7L, 8 Cyl 7.4L C3500 CAB CHASSIS 135.5, C3500 CAB CHASSIS 159.9, C3500 CAB CHASSIS 183.5, C3500 CREW CAB LONG WHEELBASE, C3500 EXTENDED CAB, C3500 REGULAR CAB 1985-1986 Chevrolet Cadet 6 Cyl 2.8L 2 DOOR HATCHBACK, 2 DOOR NOTCHBACK, 4 DOOR, CONVERTIBLE, CS 2 DOOR HATCHBACK, CS 4 DOOR, CS STATION WAGON, RS 2 DOOR HATCHBACK, RS 2 DOOR NOTCHBACK, RS 4 DOOR, RS CONVERTIBLE, RS STATION WAGON, STATION WAGON, Z24 2 DOOR NOTCHBACK, Z24 2 DOOR PLAINBACK HATCHBACK 1985-1992 Chevrolet Camaro 6 Cyl 2.8L, 6 Cyl 3.1L, 8 Cyl 5.0L, 8 Cyl 5.7L 2 DOOR, RS 2 DOOR, RS CONVERTIBLE 1987-1993 Chevrolet Caprice 6 Cyl 4.3L, 8 Cyl 5.0L, 8 Cyl 5.7L 4 DOOR, BROUGHAM 4 DOOR, CLASSIC 2 DOOR, CLASSIC 4 DOOR, CLASSIC LS 4 DOOR, CLASSIC STATION WAGON, STATION WAGON 1985-1986 Chevrolet Cavalier 6 Cyl 2.8L 2 DOOR HATCHBACK, 2 DOOR NOTCHBACK, 4 DOOR, CONVERTIBLE, CS 2 DOOR HATCHBACK, CS 4 DOOR, CS STATION WAGON, RS 2 DOOR HATCHBACK, RS 2 DOOR NOTCHBACK, RS 4 DOOR, RS CONVERTIBLE, RS STATION WAGON, STATION WAGON, Z24 2 DOOR NOTCHBACK, Z24 2 DOOR PLAINBACK HATCHBACK 1985-1986 Chevrolet Celebrity 6 Cyl 2.8L 2 DOOR, 4 DOOR, STATION WAGON
Customer Questions & Answers
- Q:I am wonder if this is complete and correct part for my vehicle. Posted by GMPartsGiant Specialist
- A:You can Select Your Vehicle to check if 19179578 fits your vehicle.Posted by GMPartsGiant Specialist
- Q:If there's still no spark after replacing the module, what might be the issue for the 1995 Chevrolet Astro? Posted by Customer
- A:If no spark is present even after replacing the module, there may be a fault in the ignition coil.Posted by GMPartsGiant Specialist
- See expert answers on similar Ignition Control Module
- Q:How do I perform a diagnostic check and maintenance on Ignition Control Module for Chevrolet Blazer,S10,GMC Jimmy and Sonoma? Posted by Customer
- A:To check the High Energy Ignition System (HEI), start by disconnecting the four-terminal connector from the distributor and test for a spark at the coil using a spark tester connected to the coil wire. If there is a spark, inspect the distributor cap, rotor, and coil wire for any damage or opens. In case there's no spark, remove the distributor cap and reconnect the four-terminal connector to the ignition control module. Unplug the two-wire connector from the distributor and check for voltage at the module positive (+) terminal of the two-wire connector with the ignition switch turned ON. Depending on the reading, follow the diagnostic steps to identify potential faults and replace the faulty components as necessary.For the removal of the distributor, disconnect the negative battery terminal, remove the distributor cap and rotor, and disconnect the electrical connectors from the ignition control module. Remove both module attaching screws and lift the module away from the distributor. If reusing the same module, avoid wiping off the grease from the module or distributor base. For installation, apply silicone grease on the module face and distributor base if using a new module. Install the module, attach both electrical leads, and then reinstall the distributor rotor and cap. Finally, reattach the cable to the negative battery terminal.For Enhanced Distributor Ignition (EDI) System check, examine the crankshaft sensor reference voltage and resistance, and inspect the crankshaft sensor circuit for any issues. To remove the EDI ignition control module, detach the negative battery cable, disconnect the ignition control module electrical connector, remove both module attaching screws, and lift the module from its mount. For installation, secure the module with screws and plug in the electrical connector. Reattach the cable to the negative terminal of the battery.For Distributorless Ignition System (DIS) check, perform the ignition system checks first. Then, disconnect the two-wire electrical connectors from the ignition control module and verify battery voltage on the pink wire. Check the resistance of the crankshaft sensor and circuit. Also, check the output voltage signal from the crankshaft sensor. If all the tests pass but there is no spark output at any of the coils, the ignition control module may be defective. If any system check findings are incorrect, diagnose the individual circuits and components.To remove the DIS system, detach the negative battery cable, label and disconnect all spark plug wires from the DIS assembly, unplug the electrical connector at the module, and remove the DIS and support bracket assembly. Unbolt and separate the coil and module assemblies, then detach the wires between the module and coil assemblies from the spade terminals on the underside of the coils. Unbolt the module from the support bracket. Installation is the reverse of removal, ensuring the wires are attached to the new module's coil assembly spade terminals in the same order as removed.Posted by GMPartsGiant Specialist
- Q:How to check and replace the knock sensor and Ignition Control Module for Chevrolet C1500 and K1500? Posted by Customer
- A:The knock sensor is responsible for detecting abnormal engine vibrations and reducing spark knock. It produces an AC output voltage that increases with the severity of the knock, which is then fed into the ECM/PCM to retard the timing. The location of the knock sensor varies depending on the year and engine application, but it is typically found on the rear of the engine block or the side of the cylinder head. To check the sensor's resistance, disconnect the electrical connector and measure the resistance between the terminal and the engine block. If the resistance is not within the specified range, the knock sensor should be replaced. To test the sensor's operation, reconnect the connector and use a voltmeter to check for an AC voltage signal while the engine is running. The voltage should increase as the engine speed increases. If no voltage signal is present, the knock sensor should be replaced. When replacing the knock sensor, disconnect the negative battery terminal and remove the distributor or oil pressure sending unit if necessary. Disconnect the electrical connector and remove the knock sensor from the engine block. Installation is the reverse of removal. For models from 1988 to 1995, the ESC module is located near the throttle body. Disconnect the negative battery terminal and detach the electrical connector from the module. Remove the mounting screws and detach the module. Installation is the reverse of removal. For models from 1996 to 2000, the knock sensor module is located in the PCM. Remove the PCM and the knock sensor module cover. Pinch the retaining tabs and pull the knock sensor straight up to remove it. To install the knock sensor module, align the tabs with the notches on the socket and press down until the retaining tabs click into place. Finally, install the knock sensor module cover and the PCM.Posted by GMPartsGiant Specialist
- Q:How can the module be tested if there are suspicions of malfunction for the 1997 Chevrolet C1500? Posted by Customer
- A:The module can be tested with special equipment.Posted by GMPartsGiant Specialist
- See expert answers on similar Ignition Control Module
- Q:Is it necessary to remove the distributor from the engine for the 1996 Chevrolet K1500? Posted by Customer
- A:No, it is not necessary to remove the distributor from the engine for 1988 through 1995 models.Posted by GMPartsGiant Specialist
- See expert answers on similar Ignition Control Module
- Q:What is the location and procedure for replacing the knock sensor module in 1999 Chevrolet K1500? Posted by Customer
- A:For models from 1996 to 2000, the knock sensor module is located in the PCM. To replace it, remove the PCM and the knock sensor module cover. Pinch the retaining tabs and pull the knock sensor straight up to remove it. To install the knock sensor module, align the tabs with the notches on the socket and press down until the retaining tabs click into place. Finally, install the knock sensor module cover and the PCM.Posted by GMPartsGiant Specialist
- See expert answers on similar Ignition Control Module
- Q:How do I perform a check and remove the Enhanced Distributor Ignition (EDI) System for the 1998 Chevrolet S10? Posted by Customer
- A:For EDI System check, examine the crankshaft sensor reference voltage and resistance, and inspect the crankshaft sensor circuit for any issues. To remove the EDI ignition module, detach the negative battery cable, disconnect the ignition module electrical connector, remove both module attaching screws, and lift the module from its mount. For installation, secure the module with screws and plug in the electrical connector. Reattach the cable to the negative terminal of the battery.Posted by GMPartsGiant Specialist
- See expert answers on similar Ignition Control Module
- Q:How do I remove and install the distributor for the 1997 GMC Jimmy? Posted by Customer
- A:To remove the distributor, disconnect the negative battery terminal, remove the distributor cap and rotor, and disconnect the electrical connectors from the module. Remove both module attaching screws and lift the module away from the distributor. If reusing the same module, avoid wiping off the grease from the module or distributor base. For installation, apply silicone grease on the module face and distributor base if using a new module. Install the module, attach both electrical leads, and then reinstall the distributor rotor and cap. Finally, reattach the cable to the negative battery terminal.Posted by GMPartsGiant Specialist
- See expert answers on similar Ignition Control Module
- Q:How do I remove and install the distributor for the 2001 GMC Sonoma? Posted by Customer
- A:To remove the distributor, disconnect the negative battery terminal, remove the distributor cap and rotor, and disconnect the electrical connectors from the module. Remove both module attaching screws and lift the module away from the distributor. If reusing the same module, avoid wiping off the grease from the module or distributor base. For installation, apply silicone grease on the module face and distributor base if using a new module. Install the module, attach both electrical leads, and then reinstall the distributor rotor and cap. Finally, reattach the cable to the negative battery terminal.Posted by GMPartsGiant Specialist
- See expert answers on similar Ignition Control Module
- Q:How do you remove the Ignition Control Module on Pontiac Firebird? Posted by Customer
- A:To remove the distributor, start by removing the distributor cap and rotor. For distributors with an internal capacitor, remove the module mounting screws and the capacitor mounting screw, then separate the ignition control module, capacitor, and harness assembly from the distributor base and disconnect the wiring harness from the ignition control module. For distributors without an internal capacitor, disconnect the wiring harness from the ignition control module, remove the two mounting screws, and remove the ignition control module. To install, apply a layer of silicone lubricant to the metal base of the ignition control module before installing it. The grease acts as insulation between the distributor and the ignition control module, preventing the ignition control module from failing quickly if installed without it.Posted by GMPartsGiant Specialist
- Q:Should you wipe the grease from the module or distributor base if the same module is to be reinstalled for the 1985 Pontiac Fiero? Posted by Customer
- A:No, if the same module is to be reinstalled, do not wipe the grease from the module or distributor base.Posted by GMPartsGiant Specialist
- See expert answers on similar Ignition Control Module
If you have any questions about this product, please don't hesitate to ask us. We will be happy to help you!
Genuine GM Part 19179578, the Right Choice
Why choose GM Parts Giant
- Dedicated Service
Your complete satisfaction is our #1 goal
- Lowest Prices
Best deals on genuine OE parts from dealerships
- Fast Delivery
Orders are processed and delivered promptly