Make sure this part fits

Cadillac 17113542 Manifold Asm,Upper Intake

2002-2005 Cadillac Escalade

Customer Questions & Expert Answers (13)
GM 17113542 Manifold Asm,Upper Intake
  • Part Description
    MANIFOLD KIT, Engine Fuel Intake Manifold
  • Position
    Upper
  • Replaces
    17113213
  • Manufacturer
    General Motors
  • Manufacturer's Notes
    This part is discontinued.
Make sure this part fits
  • Related Parts
  • Product Specifications
  • Vehicle Fitment
  • Customer Questions & Expert Answers
  • Product Specifications

    BrandGenuine Cadillac
    Manufacturer Part Number17113542
    Part DescriptionMANIFOLD KIT, Engine Fuel Intake Manifold
    Other NamesIntake Manifold, Manifold
    Item Dimensions7.4 x 13.5 x 12.5 inches
    Item Weight3.30 Pounds
    PositionUpper
    ConditionNew
    Fitment TypeDirect Replacement
    Replaces17113213
    ManufacturerGeneral Motors
    SKU17113542
    WarrantyThis genuine GM part is guaranteed by GM's factory warranty.
    Shipping & ReturnShipping Policy Return Policy
    Warning: California's Proposition 65
  • Vehicle Fitment

    Year Make Model Engine Important vehicle option details
    2002-2005 Cadillac Escalade1/2 TON, EXT 1/2 TON, YUKON/DENALI/ESCALADE
  • Customer Questions & Expert Answers

    Q:
    I am wonder if this is complete and correct part for my vehicle. Posted by GMPartsGiant Specialist
    A:
    You can Select Your Vehicle to check if 17113542 fits your vehicle.
    Posted by GMPartsGiant Specialist
    Q:
    How to remove and install the intake manifold in V6 engine on Chevrolet Astro? Posted by Customer
    A:
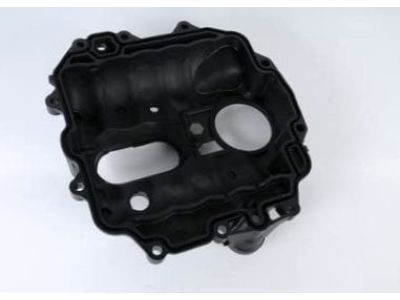
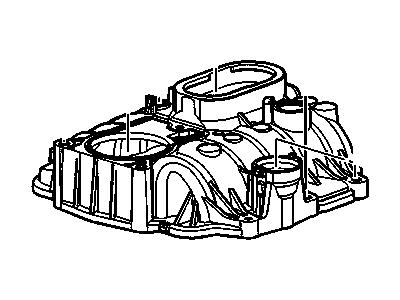
    As for the 1996 and the later models, there is no need to take off the upper intake manifold to work at the lower one, and also for the 1986 and the later models, there is the fuel pressure relief procedure, if, of course, it is necessary. Start with removing the negative terminal of the battery while deractivation of the anti theft system on the cars with such gadget. Remove the air cleaner assembly and adapter or air intake duct and drain the radiator. It is possible to remove the upper fan shroud although this may not be required with later versions and then the engine cover. Remove the upper radiator and heater hoses from the intake manifold as well as, if the car is equipped, release the cruise control servo/bracket. Disconnect the PCV valve hose as well as, for 1999 and some models, the EVAP canister purge solenoid valve electrical connector. At this time the engine should be set at TDC for the number 1 piston it is then time to label and remove the spark plug wires and distributor. Pull off the accelerator cable, the cruise control cable and the throttle valve cable, the TV cable, the intake manifold as well as the fuel lines and label them all. For models from 1985 to 1993, first, and only for these model years, the power brake vacuum line of the booster must be disconnected, and the ignition coil and its bracket must be removed, noting that this does not apply to a coil-in-cap HEI system. On TBI engines, undo the ESC module/bracket and place aside, remove the engine oil filler tube and transmission dipstick from the alternator bracket and remove the alternator bracket from the intake manifold. For the so equipped carbureted and TBI engines, unbolt any Air Management system parts which interfere with the intake manifold and pop the coolant tube on the right side of the intake manifold. On 2002 and earlier CSFI engines, disconnect the EGR pipe which is for the connection between the left exhaust manifold and the intake manifold; you may need to apply penetrating oil in this case. For CMFI engines: take off the upper intake manifold-for CMFI engines only; whereas for CSFI engines do not take off the manifold at all. Take off, if present, the coolant bypass hose joining the water pump and the intake manifold and, if required, take off the A/C compressor from its support but with the refrigeration tubes still connected. For later models, in order to remove the front manifold bolt one must remove the drive belt, the air conditioning compressor side brace, and the power steering pump mounting bracket nuts and bolts. As a preparation for the professional removal of the old manifold, any vacuum and electrical connections which are linked to the intake manifold, carburetor, throttle body or the upper intake plenum has to be labeled and disconnected, then identify the location of each manifold bolt or stud for repositioning later. The manifold mounting bolts should be loosened by turning them counterclockwise and in quarter turns until they can be removed easily by hand.If the manifold gasket has seized apply force to the bolts to break the gasket seal. During the installation it is proper to clean the surfaces that the cylinder heads, block and manifold are placed on using gasket removal solvents if necessary. Found gasket material and detar with scraper, clean with lacquer thinner or acetone and cover the lifter valley to prevent the entry of debris into. drive the thread in the bolt holes with tap and blowing compressed air to clear out any debris. Spread the RTV sealant on the block in the form of a 3/16-inch wide strip on the front and the rear manifold mating surfaces of the block and on a thin coat around the coolant passage holes on the cylinder head side of the new intake manifold gaskets. Place the gaskets at the cylinder heads and align them properly and as the sealant is still wet, place the manifold carefully as well. Screw the bolts/studs in the correct position and tighten them to the right tightness with right sequence. The remaining installation steps are the reverse of the removal and after the engine has been started look for oil and coolant leaks at the intake manifold joints.
    Posted by GMPartsGiant Specialist
    Q:
    How to replace an intake manifold in 2.2L four cylinder engine on Chevrolet Blazer? Posted by Customer
    A:
    Disconnect the cable from the negative battery terminal. Remove the air intake duct assembly. Remove the PCV valve and hose connecting the intake manifold to the valve cover. Remove the upper intake manifold (1997 and earlier MFI models only). Tag and disconnect all electrical connectors at the throttle body and manifold. Remove the fuel lines and any wiring attached to the lower intake manifold. Remove the fuel rail bracket. Remove the spark plug wires from the coil pack. Mark the spark plug wires for reassembly. Pull them up through the intake manifold and lay them over the left side of the engine. Remove the bolt holding the heater hose tube to the right rear of the manifold. Remove the mounting nuts and separate the manifold from the cylinder head. Remove the EGR tube for cleaning. Remove the old gasket and transfer all components still attached to the old manifold to the new one. Before installing the manifold, clean the cylinder head and manifold gasket surfaces. Apply a thin coat of RTV sealant to the intake manifold and cylinder head mating surfaces. Place a new gasket on the manifold, hold the manifold in position against the cylinder head, and install the mounting nuts finger tight. Tighten the mounting nuts in several steps and in the correct sequence. Install the remaining components in the reverse order of removal.
    Posted by GMPartsGiant Specialist
    Q:
    How to remove the intake manifold on Chevrolet C1500? Posted by Customer
    A:
    For removing the intake manifold, start by disconnecting the negative battery cable and draining the cooling system. Then take off air cleaner assembly, throttle body (if intending to resurface or replace the manifold), alternator rear brace, and on air-conditioned models move the compressor out of the way by removing brackets. Next is to unfasten ESC module bracket located on side of manifold, remove idler pulley rear bracket, and label as well as disconnect all fuel lines, wires and vacuum hoses connected to intake manifold looking for interference with other components like transmission dipstick tube, EGA system, PCV system and power brake lines. Detach upper radiator hose from thermostat housing cover and if present disconnect heater fitting in intake manifold. Distributor and ignition coil wires should be removed. Unbolt mounting bolts incrementally until they can be removed by hand with care not to harm gasket sealing surfaces. Pry bar can be placed underneath cast-in lug near thermostat housing to assist in prying up front of manifold when it sticks. Ensure cylinder heads, block and manifold mating surfaces are immaculately clean before installing; this entails removing any sealant or old gasket material using a gasket scraper and wiping surfaces with lacquer thinner or acetone. Remove shop rags covering lifter valley so that no dirt enters engine; then take a tap followed by compressed air to clean bolt holes. Apply thin coat of ATV sealant around coolant passage holes located on cylinder head side of new intake manifold gaskets; position them on cylinder heads being mindful of correct alignment as well as orientation. Front and rear end seals must be installed on 7.4L V8 engines while a 3/16-inch bead of ATV sealant is applied to each corner of end seals where they meet gaskets. Tap threads in bolt holes with correct size tap and apply Loctite 242 or equivalent threadlocker to threads on manifold bolts before installing and torquing bolts to the specified torque sequence. Finally, perform the reinstallation steps in reverse order, start the engine, and carefully inspect for oil, vacuum, and coolant leaks at the intake manifold joints. Disconnect negative battery cable; drain cooling system on 1996 and later models with upper intake manifold removal. Remove air cleaner assembly, ducts, any interfering wiring, throttle and cruise control cables and brackets as well as fuel lines (V6 and small-block VB engines). Coil and bracket also should be removed while PCV hose from EGR inlet tube purge solenoid connectors is removed together with any interfering spark plug wires from 7.4L V8 models. To install upper intake manifold, position gasket and manifold; then tighten bolts in two steps using a criss-cross pattern followed by other installation steps in reverse order.
    Posted by GMPartsGiant Specialist
    Q:
    How to remove the intake manifold on Chevrolet K1500? Posted by Customer
    A:
    For removing the intake manifold, start by disconnecting the negative battery cable and draining the cooling system. Then take off air cleaner assembly, throttle body (if intending to resurface or replace the manifold), alternator rear brace, and on air-conditioned models move the compressor out of the way by removing brackets. Next is to unfasten ESC module bracket located on side of manifold, remove idler pulley rear bracket, and label as well as disconnect all fuel lines, wires and vacuum hoses connected to intake manifold looking for interference with other components like transmission dipstick tube, EGA system, PCV system and power brake lines. Detach upper radiator hose from thermostat housing cover and if present disconnect heater fitting in intake manifold. Distributor and ignition coil wires should be removed. Unbolt mounting bolts incrementally until they can be removed by hand with care not to harm gasket sealing surfaces. Pry bar can be placed underneath cast-in lug near thermostat housing to assist in prying up front of manifold when it sticks. Ensure cylinder heads, block and manifold mating surfaces are immaculately clean before installing; this entails removing any sealant or old gasket material using a gasket scraper and wiping surfaces with lacquer thinner or acetone. Remove shop rags covering lifter valley so that no dirt enters engine; then take a tap followed by compressed air to clean bolt holes. Apply thin coat of ATV sealant around coolant passage holes located on cylinder head side of new intake manifold gaskets; position them on cylinder heads being mindful of correct alignment as well as orientation. Front and rear end seals must be installed on 7.4L V8 engines while a 3/16-inch bead of ATV sealant is applied to each corner of end seals where they meet gaskets. Tap threads in bolt holes with correct size tap and apply Loctite 242 or equivalent threadlocker to threads on manifold bolts before installing and torquing bolts to the specified torque sequence. Finally, perform the reinstallation steps in reverse order, start the engine, and carefully inspect for oil, vacuum, and coolant leaks at the intake manifold joints. Disconnect negative battery cable; drain cooling system on 1996 and later models with upper intake manifold removal. Remove air cleaner assembly, ducts, any interfering wiring, throttle and cruise control cables and brackets as well as fuel lines (V6 and small-block VB engines). Coil and bracket also should be removed while PCV hose from EGR inlet tube purge solenoid connectors is removed together with any interfering spark plug wires from 7.4L V8 models. To install upper intake manifold, position gasket and manifold; then tighten bolts in two steps using a criss-cross pattern followed by other installation steps in reverse order.
    Posted by GMPartsGiant Specialist
    Q:
    How to replace an intake manifold in 2.2L four cylinder engine on GMC Jimmy? Posted by Customer
    A:
    Disconnect the cable from the negative battery terminal. Remove the air intake duct assembly. Remove the PCV valve and hose connecting the intake manifold to the valve cover. Remove the upper intake manifold (1997 and earlier MFI models only). Tag and disconnect all electrical connectors at the throttle body and manifold. Remove the fuel lines and any wiring attached to the lower intake manifold. Remove the fuel rail bracket. Remove the spark plug wires from the coil pack. Mark the spark plug wires for reassembly. Pull them up through the intake manifold and lay them over the left side of the engine. Remove the bolt holding the heater hose tube to the right rear of the manifold. Remove the mounting nuts and separate the manifold from the cylinder head. Remove the EGR tube for cleaning. Remove the old gasket and transfer all components still attached to the old manifold to the new one. Before installing the manifold, clean the cylinder head and manifold gasket surfaces. Apply a thin coat of RTV sealant to the intake manifold and cylinder head mating surfaces. Place a new gasket on the manifold, hold the manifold in position against the cylinder head, and install the mounting nuts finger tight. Tighten the mounting nuts in several steps and in the correct sequence. Install the remaining components in the reverse order of removal.
    Posted by GMPartsGiant Specialist
    Q:
    How to remove and install the intake manifold in 4.3L V6 engine on GMC Sonoma? Posted by Customer
    A:
    First off, disconnect the negative battery cable. For 1994 and 1995 VIN Z models, take out the upper fan shroud, air cleaner assembly, drain the cooling system, and disconnect the radiator as well as heater hoses. Also disassemble the spark plug wires, coil and distributor by unbolting emission relays bracket and remove rear braces from drive belt tensioner, remembering to mark relationship of distributor rotor with respect to other parts before removal. Disconnect the fuel lines at TBI unit; remove accelerator cables, cruise control cables, TV cables from manifold; detach vacuum brake booster pipe; label manifold lines & wires and remove them. Move up EGR hose whilst loosening manifold mounting bolts. Prying front of manifold loose after removing all bolts for that purpose is now allowed. In case of 1996 or later models you will need to start from taking out upper fan shroud then move on to air cleaner assembly followed by draining cooling system plus disconnecting upper hoses from radiator as well as heater. Next unbolt EGR valve and take off ignition coil carefully. Remove small brace between intake manifold & AC compressor then turn engine to TDC for number one piston-prior to removing distributor. Old gasket material must be removed to guarantee clean mating surfaces during re-installation; apply RTV sealant if necessary. Be sure new gaskets are properly aligned when putting in place new intake manifold while sealant is still wet on it. Proceed accordingly tightening recommended sequence's bolts once more when finished reverse remaining steps beginning with starting engine thereafter checking for leaks.
    Posted by GMPartsGiant Specialist
    Q:
    What should be removed after the engine cover for the 2005 Chevrolet Astro? Posted by Customer
    A:
    Remove the air cleaner assembly, then take out the PCV valve and hose.
    Posted by GMPartsGiant Specialist
    See expert answers on similar Intake Manifold
    Q:
    What should be applied to the bolt threads for the 2003 Chevrolet Express? Posted by Customer
    A:
    Apply medium-strength thread locking compound to the bolt threads.
    Posted by GMPartsGiant Specialist
    See expert answers on similar Intake Manifold
    Q:
    What should be done to the mating surfaces before installation for the 1996 Chevrolet Express? Posted by Customer
    A:
    Ensure the mating surfaces are clean before installation, using a gasket scraper and solvent as needed.
    Posted by GMPartsGiant Specialist
    See expert answers on similar Intake Manifold
    Q:
    What should be done when reinstalling the intake manifold for the 1997 Chevrolet S10? Posted by Customer
    A:
    Ensure clean mating surfaces by removing old gasket material and applying RTV sealant as needed. Install new intake manifold gaskets, making sure they align correctly, and set the manifold in place while the sealant is wet. Tighten the manifold bolts in the recommended sequence, then proceed with the remaining installation steps in reverse order, starting the engine and checking for leaks.
    Posted by GMPartsGiant Specialist
    See expert answers on similar Intake Manifold
    Q:
    What is the first step in the process of replacing the intake manifold for the 2002 Chevrolet S10? Posted by Customer
    A:
    The first step is to disconnect the cable from the negative battery terminal to ensure electrical safety.
    Posted by GMPartsGiant Specialist
    See expert answers on similar Intake Manifold
    Q:
    Hello!! I need the bolt set or bolts that hold the upper intake Manifold/Plenum Asm. The part number GM Part No.: 17113542 I just need the bolts the hold this part to the engine!!. I believe it should come with 10 or 11 bolts set. They may be sold individually but I think they come as a set. Some of these bolts vary in length but share the same threads. Posted by Customer: 2001 Light Truck S10 / Sonoma Pickup (2WD)
    A:
    USE PART# 12550027 X8 PER VIN#
    Posted by GMPartsGiant Specialist 18/10/2021
    If you have any questions about this product, please don't hesitate to ask us. We will be happy to help you!

Genuine GM Part 17113542, the Right Choice

To ensure reliability, purchase GM part # 17113542 Manifold Asm,Upper Intake. It is sometimes referred to as Cadillac Intake Manifold. Directly from GM, genuine parts are superb with regards to quality, longevity, and fit. Every single part passed stringent quality testing, so you can be sure that it's safe, durable, and built to perform like your original parts. This part fits specific Cadillac Escalade models.

GMPartsGiant.com is a leading supplier of genuine GM parts and accessories such as GM 17113542 Manifold Asm,Upper Intake. You're certainly in the right place if you're searching for the great cost-effective OEM GM parts. Look no further than our vast inventory of genuine GM parts offered at unbeatable online prices, all of which are backed by the manufacturer's warranty. Not to forget, our hassle-free return policy and quick delivery service ensure a smooth shopping experience for you. For detailed Cadillac parts information, click here.

Why choose GM Parts Giant

  • Dedicated Service

    Your complete satisfaction is our #1 goal

  • Lowest Prices

    Best deals on genuine OE parts from dealerships

  • Fast Delivery

    Orders are processed and delivered promptly