
Why choose GMPartsGiant
- High-Quality Selection
GMPartsGiant.com boasts an impressive inventory of genuine Cadillac parts, ensuring your vehicle performs optimally. As the top online store for genuine parts, we provide the highest quality components at unbeatable value. Explore our vast selection and discover the perfect parts to enhance your Cadillac's performance beyond its original capabilities.
- Unbeatable Value
Choose GMPartsGiant.com for OEM Cadillac parts and enjoy significant savings without sacrificing quality. We're committed to offering unbeatable prices, ensuring our products deliver the same performance and reliability as OEM counterparts. Trust in our exceptional value to provide you with top-notch components that won't break the bank.
- Swift Nationwide Shipping
Our comprehensive Cadillac parts catalog offers everything you need for routine maintenance and repairs. With the best OEM parts inventory at our disposal, we guarantee fast delivery to any location in the nation. Rely on GMPartsGiant.com's quick shipping and have your Cadillac back on the open road in no time.
Popular Genuine Cadillac Parts
- Engine Parts View More >
- Front Suspension, Steering Parts View More >
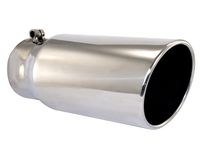
- Fuel System, Exhaust, Emission System Parts View More >
- Brakes Parts View More >
- Transmission - Automatic Parts View More >
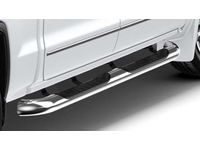
- Frames, Springs, Shocks, Bumpers Parts View More >
- Cooling System, Grille, Oil System Parts View More >
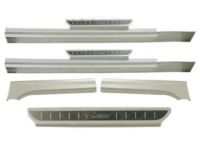
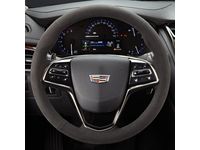
- Interior Trim, Front Seat Trim, Seat Belts Parts View More >


Genuine Cadillac Parts Online Store
Cadillac is a luxury division of General Motors, which introduced the V8 engine in 1915. Cadillac has been creating enviable automobiles for over 100 years. Cadillac is known for its comfort, luxury, and prestige. Cadillac's offerings include coupes and SUVs. And of course the legendary Cadillac Escalade. Cadillac has been known for defining post war American style and luxury. Cadillac cars and Cadillac parts embody an "Art & Science" philosophy which firmly positions itself as a luxury leader with exceptional performance, quality, and bold styling.
The Cadillac Escalade has stood out among all luxury SUVs across the industry. Many celebrities, diplomats, and high profile figures can often be seen driving or being driven in the Cadillac. The president of the United States even drives a custom Cadillac referred to as "The Beast". The Escalade has become synonymous with opulence and prestige, combining its robust performance, with expansive spacious interiors, and state-of-the-art technology. The Cadillac Escalade combines power with luxury, which makes it a symbol of wealth, safety, power, and status across the world.
Cadillac, while symbolizing lavish luxury and high tech innovation, also impresses with its engine and transmission offerings. The stylishly athletic 2022 CT5-V Blackwing employs a powerful 6.2L Supercharged V8 engine, outputting an astonishing 668 horsepower and 659 lb-ft of torque, making it the most powerful production Cadillac ever, while still enjoying the style and grace Cadillac drivers have come to expect from the brand. When paired with Cadillac parts like the 6-speed manual transmission or the 10-speed automatic transmission, enthusiasts will enjoy a truly thrilling driving experience unlike any other from this beautiful yet refined powerhouse. The groundbreaking 2023 Cadillac LYRIQ is an all-electric SUV, representing the brand's shift to electrification with its Ultium battery system. This beautiful electric vehicle allows drivers to travel in style in class unseen before in the luxury car market. These outstanding vehicles emphasize Cadillac's commitment to delivering peak performance, elevated driving experiences and a bold look towards the future.
For unrivaled quality OEM Cadillac parts are the ultimate choice. These parts are manufactured by Cadillac's official factory using top-quality materials and undergo strict testing procedures, ensuring outstanding dependability and long-lasting durability. Should you find yourself in need of new Cadillac parts, such as Front End Sheet Metal, Heater, Body Moldings, Sheet Metal, Rear Compartment Hardware, Roof Hardware, Transmission - Manual, feel free to browse GMPartsGiant's extensive selection of genuine Cadillac parts, like Cab And Body Structure, Mirrors, Doors, Trim, Seat Belts, Wipers, Front Axle, Front Suspension, Steering. Not only are all our OEM Cadillac parts, including Rear Body Structure, Moldings & Trim, Cargo Stowage, Transfer Case priced competitively, but they also come with the original Cadillac, guaranteeing your peace of mind. At GMPartsGiant your satisfaction is our utmost priority.
Cadillac Parts Questions & Answers
- Q: How to remove and install front Coil Springs and Shock Absorber on Cadillac DeVille?A:To remove the strut, first apply the parking brake and block the rear wheels. Loosen the wheel lug nuts and raise the front of the vehicle, supporting it securely on jackstands. Remove the wheel and mark the relationship of the strut to the steering knuckle. Remove the brake hose bracket and ABS wiring harness bracket from the strut. Then, remove the strut-to-knuckle nuts and knock the bolts out with a soft-face hammer. On 1999 models, disconnect the stabilizer bar link from the strut. Separate the strut from the steering knuckle, being careful not to overextend the inner CV joint or stretch the brake hose. If equipped, unplug the electrical connector from the strut. Have an assistant support the strut assembly and remove the three strut upper mounting nuts or bolts. Remove the assembly through the fender well. For inspection, check the strut body for leaking fluid, dents, cracks, and other obvious damage that would require repair or replacement. Check the coil spring for chips and cracks in the spring coating, as this can cause premature spring failure. Inspect the spring seat for hardening, cracks, and general deterioration. If wear or damage is evident, replace the strut. To install the strut, first install the strut coil spring assembly. Once the strut is in place in the strut tower, install the upper mounting nuts or bolts to prevent the strut coil spring assembly from falling back through. This may require an assistant due to the weight and awkwardness of the strut. If equipped, reconnect the electrical connector to the strut. Slide the steering knuckle into the strut flange and insert the two bolts, with the bolt heads pointing towards the front of the vehicle. Install the nuts, align the marks, and tighten them to the specified torque. On 1999 models, reconnect the stabilizer bar link to the strut and tighten the nut to the specified torque. Reconnect the brake hose and ABS harness brackets to the strut, tightening the bolts securely. Install the wheel, lower the vehicle, and tighten the lug nuts to the specified torque. Finally, tighten the three upper mounting nuts or bolts to the specified torque. Have the front-end alignment checked and adjusted if necessary.
- Q: How to remove and install the intake manifold in 5.7L,6.0L,6.2L V8 engine on Cadillac CTS?A:To take off the intake manifold first free the fuel pressure and disconnect the ground cable for the battery. Further, take off the engine top front cover bolts and the cover and in the same manner take off the rear cover bolts and the rear cover. Unplug the electrical connector leading to the throttle body, to have access to the air filter and air intake assembly. Loosen the electrical connectors including the fuel injectors, EVAP solenoid, MAP sensor and the throttle body sensors and mark them so that they can be easily fitted back as they are. Remove the knock sensor connectors and remove the ground straps at the rear of the right cylinder head, and any other harness brackets off the top of the intake manifold. Take out the fuel rails and injectors with the injectors citing the reason that it reduces chances of damaging the injectors. Remove the connections of the coolant hoses and any vacuum hoses linked to the intake manifold or throttle body. Tighten or loosen the intake manifold mounting bolts, in a diagonal sequence, by a quarter turn, till you can easily remove the bolts with your hands; use a prybar to remove the intake manifold gasket if necessary but do not mar the gasket surfaces. Take out the intake manifold, and be sure to note and disconnect any components still connected if any. When reinstalling these parts make sure that the surfaces of the cylinder heads, block and manifold are spotlessly clean, no trace of the old gasket compound should be left without having to scratch off the metal. With safety solvent moistened cloth clean the surfaces and then clean the debris with vacuum cleaner. Turn of the respective threads in the bolt holes with a tap before blowing compressed air over the area to remove any debris. Put the new gaskets in the appropriate area on the intake manifold that will allow them to interlock properly. Lay the manifold in easily, Schlage greying over the internal thread of the bolt before screwing it in the recommended sequence and tightened to the maximum permissible torque but not exceeding it. The rest of the procedure is a reverse order of the removal and includes the inspection of the coolant level and the start of the engine to look for the presence of the vacuum leaks, especially at the intake manifold gaskets.
- Q: How to Replace the Front Crankshaft Seal in V8 Engine on Cadillac Escalade?A:Remove the crankshaft balancer and note the installation depth and orientation of the seal, ensuring the new one is installed the same way. Carefully pry the oil seal out of the cover using a seal puller or a large screwdriver, taking care not to damage the crankshaft or distort the cover; wrapping electrician's tape around the screwdriver tip can help prevent damage. If replacing the seal with the timing chain cover removed, support the cover on two blocks of wood and drive the seal out from the rear using a hammer and punch, being cautious not to scratch or distort the area where the seal fits to avoid leaks. Apply clean engine oil or multi-purpose grease to the outer edge of the new seal and install it in the cover with the lip facing inward, using a seal driver or large socket and hammer to ensure it enters the bore squarely and is driven to the proper depth. Check the balancer hub surface for grooves caused by long-term contact with the seal; if present, replace the crankshaft balancer. Lubricate the balancer hub with clean engine oil and reinstall the crankshaft balancer, completing the installation in reverse order of removal.
- Q: How to remove and install shock absorbers on Cadillac Fleetwood?A:Unbolt the car's battery terminal, lift the vehicle by its frame, and keep it secure when the suspension's knuckles are dangling loose. Then take off both wheels and tires. To dismantle the strut from Deville and Fleetwood models, start by loosening the tie bar bolt at both bar ends, then taking out the nuts holding the strut top to the body. To remove the wheel speed sensor, disconnect it from anti-lock brake models, then take off the sensor bracket placed on the strut. Carefully remove the brake line bracket from the strut. Next, unscrew the bolts holding the strut to the knuckle, and lift out the strut. Secure the knuckle with wire to keep the ball joint and halfshaft from being damaged. First, slot the strut bolts through the knuckle and attach the nuts. After that, place the strut on the car body and feed its bolts through, making sure to have the washer and tie bar positioned before tightening the strut-to-body nuts. If your car has anti-lock brakes, install its brake sensor assembly and fit it to the shaft. Secure the nuts to these components with these torque values: strut-bolt: 140 ft-lbs; body-nut: 18 ft-lbs; link-nut: 48 ft-lbs; and tie bar through-bolt: 20 ft-lbs. Replace the wheel and tires, then carefully lower your vehicle; check and adjust your front-wheel alignment. When replacing the strut, place it in a machine that compresses springs, turn the screw until the spring squeezes down slightly, and hold the strut shaft stable while removing the top nut using a T-50 Torx bit. Twist the compressor screw slowly as you pull the shaft out, and release the strut when the spring can come with it. You'll need to put the strut into the strut compressor tool, engaging a clamping tool to keep the strut shaft secure, then putting the spring on top of the strut with the flat of the spring seat facing straight out from the direction that runs down the center of the vehicle. Thread the strut shaft through the top of the strut assembly while using the compressor screw to compress the spring. When the threads appear, put on the washer and secure the nut. Loosen the clamp holding the strut shaft and tighten the gasket-nut pair to 55 ft lbs, as you use a T-50 socket to keep the strut shaft from moving. Then pull the strut off the tensioner device.


