Make sure this part fits

Cadillac 89060486 Piston Asm,(W/ Pinion)

2005 Cadillac Escalade

Customer Questions & Expert Answers (13)
GM 89060486 Piston Asm,(W/ Pinion)
  • Part Description
    PISTON, Engine Piston
  • Replaces
    89017577
  • Manufacturer
    General Motors
Make sure this part fits
$39.67 MSRP: $65.67
You Save: $26.00 (40%)
Ships in 1-2 Business Days
1
ADD TO CART
  • Related Parts
  • Product Specifications
  • Vehicle Fitment
  • Customer Questions & Expert Answers
  • Product Specifications

    BrandGenuine Cadillac
    Manufacturer Part Number89060486
    Part DescriptionPISTON, Engine Piston
    Other NamesPiston
    Item Dimensions5.2 x 4.4 x 4.5 inches
    Item Weight1.70 Pounds
    ConditionNew
    Fitment TypeDirect Replacement
    Replaces89017577
    ManufacturerGeneral Motors
    SKU89060486
    WarrantyThis genuine GM part is guaranteed by GM's factory warranty.
    Shipping & ReturnShipping Policy Return Policy
    Warning: California's Proposition 65
  • Vehicle Fitment

    Year Make Model Engine Important vehicle option details
    2005 Cadillac Escalade8 Cyl 5.3L1/2 TON, EXT 1/2 TON, YUKON/DENALI/ESCALADE
  • Customer Questions & Expert Answers

    Q:
    Do these parts fit my vehicle? Posted by GMPartsGiant Specialist
    A:
    You can Select Your Vehicle to check if 89060486 fits your vehicle.
    Posted by GMPartsGiant Specialist
    Q:
    What steps must be taken before removing the piston and connecting rod assemblies on Chevrolet Colorado? Posted by Customer
    A:
    Before the piston and connecting rod assemblies are to be remove the cylinder head and oil pan must be detached. Feel with your finger to see that there is no ridge at the top end of ring travel, which for most engines is ¼ inch below the top of each cylinder; as these would have formed due to carbon buildup or wear they should be filed using a reamer to avoid a piston to fail. After doing this, flip of the engine so the crankshaft is upright. Measure the connecting rod endplay with feeler gauges which should be within the limits of the service indication of 0.005 to 0.015 inch; if not, new connecting rod may be required. Paint or mark the location of the connecting rods and caps with paint or marker after that, removed the connecting rod cap bolts and without dropping the bearing insert, remove the first connecting rod cap and bearing insert. Remove the connecting rod /piston assembly by unscrewing the bolt and pushing the assembly out through the top of the engine if necessary use a wooden or a plastic hammer handle and do the same for the other cylinders. When withdrawing the connecting rod caps put the new bearing inserts in the corresponding rods while reinstalling the old inserts to avoid bending the rods. The pistons together with the connecting rods are now available for inspection and further servicing. Before fitting new piston rings there should always be an examination of the end gaps in relation to the piston ring side clearances. Position the piston/connecting rods on the bench or on the tables and set the new rings for pairing when assembly will be done. Place the first cylinder on the bench, the upper part of this thin ring is inserted into the channel of the cylinder and the ring should be aligned both perpendicularly to the cylinder's length and axially so feeler gauges could check the end gap; if the feeler was too big or too small-the ring has to be filed at the ends where its thickness is too big or too small. Do this for every ring and guarantee that there is the right setting of the oil control ring parts before the middle and finally the top rings. Therefore before installing ensure that the cylinder walls are free from grease and oil, the edges of the cylinder are chamfered and the crank shaft is fixed. Disassemble and clean bearing end metal and the newly provided upper bearing insert, should slide on without the application of grease. Ensure that the gaps of piston rings are equally spaced, at 90 degree intervals from each other, before lubing the piston and attendant rings or use pirson ring compressor while compressing them into place. Place the piston/connecting rod assembly in the cylinder such that the connecting rod will fit in the crankshaft journal. Using a tool called Plastigage measure the oil clearance of the connecting rod bearing, first wipe the surfaces to clear oil. Bear in mind that if the clearance is not as specified, check the bearing sizes and the journal diameter. After check, covering equally base of oil on the bearing faces, fastening and tighten new connecting rod cap bolts to the needed torque. Perform the same for the other assemblies, cleanliness and proper orientation should be observed at all times. After installation make some crankshaft rotated in order to check binding or not and similarly again checked the connecting rod end play with the acceptable tolerance.
    Posted by GMPartsGiant Specialist
    Q:
    What steps must be taken before removing the piston and connecting rod assemblies on Chevrolet Express? Posted by Customer
    A:
    Before these, one will have to strip down the cylinder heads and oil pan to get access to the piston and connecting rod assemblies. You should also occasionally look at the upper limit of ring travel, about 1/4 of an inch from the top of each cylinder, for any ridge; if there are ridges there due to carbon deposits or wear, they must be done away with using a ridge reamer to avoid causing the piston to break. Once the ridges have been taken off, position the engine in a way that the crankshaft is vertically upward. The other is to compare the connecting rod endplay as measured by feeler gauges with the service limit of 0.005-015 inch; if greater than this limit, it may require new connecting rods. Locate the connecting rods and caps easily so that they are not confused and when loosening the connecting rod cap bolts or nuts, it is done progressively such that they can be overstated by hand. Take out the first connecting rod cap and the bearing insert without the insert falling off and push the connecting rod and piston assembly out from the top of the engine use the wooden or plastic hammer handle if possible. Perform this to the rest of the cylinders replacing the old rod cap bolts, if any, with new ones. Because of the tension between the joint and the bearing, if the caps and bearing inserts are removed it is advisable to replace them in their original positions as re-creating tension could damage them. Pistons and connecting rods are now available for inspection and rebuilding or replacement if necessary. When new piston rings are to be fitted, measure the ring end gaps, to ensure that the side clearance of the piston ring is correct. Specify the location and orientation of the piston/connecting rod assemblies and the new rings in order to match them again for assembly. Place the top ring above the first cylinder, align with cylinder bore walls and do an end gap measurement using feeler gauges adjusting as necessary. Make sure you fit the oil control ring first then the middle and finally the top ring making sure you have the correct side up. Do not install nitrided cylinders if the cylinder walls are contaminated, the top edge of each cylinder bored is not chamfered, and the crankshaft is not inserted into the cylinder. Scrape off the bearing surfaces of the connecting rod and cap and fit the new upper bearing insert, that must be a tight fit, but not stick, without using oil. Adjust the position of the ring with reference to the cylinder and lubricate the piston and rings, to compress the piston ring use a piston ring compressor. Place the piston/connecting rod assembly into the cylinder bore such that the piston faces the right way and then gently drive in the piston until it hits the bottom of the cylinder bore while at the same time aligning the connecting rod with the crankshaft journal. Measure the oil clearance of the connecting rod bearing using Plastigage after which the bearing faces should be clean and grease or assembly lube applied before final assembly. This will be followed by the same process for the other four OTR assemblies and make sure they are clean and properly oriented. Following installation, turn the crankshaft to inspect the corresponding amount of tightness or recheck the connecting rod's end float then resize, if needed.
    Posted by GMPartsGiant Specialist
    Q:
    What steps must be taken before removing the piston and connecting rod assemblies on Chevrolet Impala? Posted by Customer
    A:
    Before the decomposition of the piston and connecting rod assemblies, the cylinder head and oil pan must be and removed. As for any ridges at the upper limit of ring travel they shall be removed with a ridge reamer presuming that failure to do so may lead to piston breakage, and you should attempt this with the flat part of your fingernail. Bolted some flanges Back, flipped the engine so that the crankshaft is upright again and then drilled off the remaining ridges. Measure the connecting rod endplay with feeler gauges before proceeding to remove the main bearing cap assembly and connecting rods and the same must meet factory standard endplay plus or minus a tolerable amount. Identify the connecting rods and their respective caps, then remove the connecting rod cap bolts and the first connecting rod cap together with the bearing insert-be careful not to let the bearing insert fall. Remove the connecting rod/piston assembly through the top of the engine, employing a wooden or plastic hammer handle, if you can. Do this for the rest of the cylinders, and put back the connecting rod caps and the bearing inserts in their prospective rods with the old inserts being left in place so as not to be damaged. The pistons and the connecting rods are now available for detailed assessment and for being serviced. Before fitting new piston rings also measure the ring end gaps and which piston rings should be fitted should be of the same brand as that of pistons. Piston /connecting rod assemblies and new ring sets need to be laid out in sets for easy installation. Place the top ring into the first cylinder and check its end gap using the feeler gauges because it should be as per prescribed standard. If the gap is too small, one should be very keen to start filing the ring ends to increase the size of the gap. Repeat the same to each ring and it is important that the rings, piston, and cylinders should be in set. Once the end gaps are right, then place the rings on the pistons starting with the oil control ring then the middle, and top rings in the right orientation. Don't install until the cylinder walls are clean, the edge has been chamfered and the crankshaft has been fitted. Remove old bearing inserts and thoroughly wash the connecting rod bearing cap surfaces and bearing bush surfaces and fit in the new bearings without applying any lubricant. Install the piston ring gaps facing in the appropriate directions, apply a suitable amount of piston/ring lubricant and make use of the piston ring compressor to safely place the piston into the cylinder. Verify the connecting rod bearing oil clearance with Plastigage, after the cleaning of the surfaces from the oil. In the case where the clearance is not as required, check on the bearing sizes and journal diameter. As in the previous step, it is checked, a layer of grease should be uniformly distributed on the bearing faces, the connecting rod and cap should be reinstalled with bolts tightened to the specified torque. Follow the same process to the other assemblies while maintaining high levels of cleanliness and proper orientation. Last, turn with the crankshaft to examine if there is binding, and see the bearing clearances of the con rod end, and adjust if the new components were fitted.
    Posted by GMPartsGiant Specialist
    Q:
    What steps must be taken before removing the piston and connecting rod assemblies on Chevrolet Monte Carlo? Posted by Customer
    A:
    Before the decomposition of the piston and connecting rod assemblies, the cylinder head and oil pan must be and removed. As for any ridges at the upper limit of ring travel they shall be removed with a ridge reamer presuming that failure to do so may lead to piston breakage, and you should attempt this with the flat part of your fingernail. Bolted some flanges Back, flipped the engine so that the crankshaft is upright again and then drilled off the remaining ridges. Measure the connecting rod endplay with feeler gauges before proceeding to remove the main bearing cap assembly and connecting rods and the same must meet factory standard endplay plus or minus a tolerable amount. Identify the connecting rods and their respective caps, then remove the connecting rod cap bolts and the first connecting rod cap together with the bearing insert-be careful not to let the bearing insert fall. Remove the connecting rod/piston assembly through the top of the engine, employing a wooden or plastic hammer handle, if you can. Do this for the rest of the cylinders, and put back the connecting rod caps and the bearing inserts in their prospective rods with the old inserts being left in place so as not to be damaged. The pistons and the connecting rods are now available for detailed assessment and for being serviced. Before fitting new piston rings also measure the ring end gaps and which piston rings should be fitted should be of the same brand as that of pistons. Piston /connecting rod assemblies and new ring sets need to be laid out in sets for easy installation. Place the top ring into the first cylinder and check its end gap using the feeler gauges because it should be as per prescribed standard. If the gap is too small, one should be very keen to start filing the ring ends to increase the size of the gap. Repeat the same to each ring and it is important that the rings, piston, and cylinders should be in set. Once the end gaps are right, then place the rings on the pistons starting with the oil control ring then the middle, and top rings in the right orientation. Don't install until the cylinder walls are clean, the edge has been chamfered and the crankshaft has been fitted. Remove old bearing inserts and thoroughly wash the connecting rod bearing cap surfaces and bearing bush surfaces and fit in the new bearings without applying any lubricant. Install the piston ring gaps facing in the appropriate directions, apply a suitable amount of piston/ring lubricant and make use of the piston ring compressor to safely place the piston into the cylinder. Verify the connecting rod bearing oil clearance with Plastigage, after the cleaning of the surfaces from the oil. In the case where the clearance is not as required, check on the bearing sizes and journal diameter. As in the previous step, it is checked, a layer of grease should be uniformly distributed on the bearing faces, the connecting rod and cap should be reinstalled with bolts tightened to the specified torque. Follow the same process to the other assemblies while maintaining high levels of cleanliness and proper orientation. Last, turn with the crankshaft to examine if there is binding, and see the bearing clearances of the con rod end, and adjust if the new components were fitted.
    Posted by GMPartsGiant Specialist
    Q:
    What steps must be taken before removing the piston and connecting rod assemblies on GMC Canyon? Posted by Customer
    A:
    Before the piston and connecting rod assemblies are to be remove the cylinder head and oil pan must be detached. Feel with your finger to see that there is no ridge at the top end of ring travel, which for most engines is ¼ inch below the top of each cylinder; as these would have formed due to carbon buildup or wear they should be filed using a reamer to avoid a piston to fail. After doing this, flip of the engine so the crankshaft is upright. Measure the connecting rod endplay with feeler gauges which should be within the limits of the service indication of 0.005 to 0.015 inch; if not, new connecting rod may be required. Paint or mark the location of the connecting rods and caps with paint or marker after that, removed the connecting rod cap bolts and without dropping the bearing insert, remove the first connecting rod cap and bearing insert. Remove the connecting rod /piston assembly by unscrewing the bolt and pushing the assembly out through the top of the engine if necessary use a wooden or a plastic hammer handle and do the same for the other cylinders. When withdrawing the connecting rod caps put the new bearing inserts in the corresponding rods while reinstalling the old inserts to avoid bending the rods. The pistons together with the connecting rods are now available for inspection and further servicing. Before fitting new piston rings there should always be an examination of the end gaps in relation to the piston ring side clearances. Position the piston/connecting rods on the bench or on the tables and set the new rings for pairing when assembly will be done. Place the first cylinder on the bench, the upper part of this thin ring is inserted into the channel of the cylinder and the ring should be aligned both perpendicularly to the cylinder's length and axially so feeler gauges could check the end gap; if the feeler was too big or too small-the ring has to be filed at the ends where its thickness is too big or too small. Do this for every ring and guarantee that there is the right setting of the oil control ring parts before the middle and finally the top rings. Therefore before installing ensure that the cylinder walls are free from grease and oil, the edges of the cylinder are chamfered and the crank shaft is fixed. Disassemble and clean bearing end metal and the newly provided upper bearing insert, should slide on without the application of grease. Ensure that the gaps of piston rings are equally spaced, at 90 degree intervals from each other, before lubing the piston and attendant rings or use pirson ring compressor while compressing them into place. Place the piston/connecting rod assembly in the cylinder such that the connecting rod will fit in the crankshaft journal. Using a tool called Plastigage measure the oil clearance of the connecting rod bearing, first wipe the surfaces to clear oil. Bear in mind that if the clearance is not as specified, check the bearing sizes and the journal diameter. After check, covering equally base of oil on the bearing faces, fastening and tighten new connecting rod cap bolts to the needed torque. Perform the same for the other assemblies, cleanliness and proper orientation should be observed at all times. After installation make some crankshaft rotated in order to check binding or not and similarly again checked the connecting rod end play with the acceptable tolerance.
    Posted by GMPartsGiant Specialist
    Q:
    How to remove and install piston/connecting rod assemblies on GMC Yukon? Posted by Customer
    A:
    When removing piston/connecting rod assemblies, start by checking for ridges at the upper limit of ring travel in each cylinder and remove them if present to avoid piston breakage. For verifying connecting rod endplay with feeler gauges, make sure that it does not exceed the service limit. The connecting rods and caps must be carefully labeled for proper reassembly. After removing the bearing insert, remove connecting rod cap fasteners and push the connecting rod/piston assembly out of the engine. To protect them, place the removed heads on blocks of wood. While installing piston rings, check and adjust ring end gaps so they are within specified limits and install rings correctly on each piston. Lubricate pistons, rings and cylinders with engine oil during installation and use a piston ring compressor. Make sure cylinder walls are clean when installing piston/connecting rod assemblies; apply engine oil to them; then guide each assembly into a cylinder being careful about its orientation. Verify connecting rod bearing oil clearance using Plastigage to ensure it meets specifications Apply grease or assembly lube to bearing faces before final installation of rod caps and bolts Repeat these steps for all piston/connecting rod assemblies; then rotate the crankshaft by hand checking for binding Finally, check correct connecting rod endplay, take rods for resizing if new components were installed.
    Posted by GMPartsGiant Specialist
    Q:
    What steps must be taken before removing the piston and connecting rod assemblies, and how should the installation of new piston rings be performed on Chevrolet Trailblazer? Posted by Customer
    A:
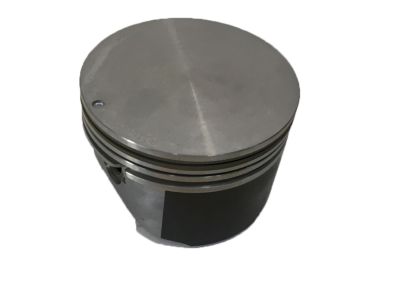
    Before being able to take out the piston and connecting rod assemblies they need to be disassembled by having to take off the cylinder head and the oil pan. Place a fingernail, index finger, to look for any ridges at the maximum of the ring travel, which are stripped off with a proper tool so as not to cause the piston to break. Once again flipping the engine over turn it so the crankshaft is oriented up after the method of removing the ridges mentioned above. Inspection of the connecting rod end play with a feeler gauge, should be done to see if it is within the service limit, if it is beyond this limit, then it may be necessary to replace the connecting rods. Label each of the connecting rods and their respective caps to tell apart them while loosening the cap bolts to the required torque level at which the bolts can be removed easily. Twist off the first connecting rod cap and the bearing insert should stay in place without falling out, push out the connecting rod / piston combination through the top of the engine. Do the same for the rest of the cylinders and tighten the caps and inserts as not to cause any misalignments. The pistons and connecting rods of the engines are now prepared for checks and refurbishment if necessary. When replacing the piston rings make sure that the ring end gaps are correct, as well as the piston ring side clearance. Arrange the cylinder/piston and connecting rods along with new rings in a manner according to matching of the piston/connecting rod assemblies. Put the top ring into the first cylinder with the end of the ring flush with the cylinder walls and then feel for the end gap with feeler gauges. If the gap is not right, then, erase it gradually by grinding the ring ends. Do this for each ring, to make sure that each one is matched up correctly with the pistons and cylinders. After adjustments of the above gaps, the rings must be fitted on the pistons, in the sequence of the oil control ring, followed by the middle and the upper ring, with the Vs facing upwards. It is also important to note that prior to installation cylinder walls should be clean, edges of the cylinder should be chamfered and the crankshaft fitted. Remove and discard the old bearing inserts with a clean anc clean tool and a small tap install the new bearing inserts into the connecting rod and cap without using any lubrication to ensure that the inserts are fitted properly. Align the piston ring gaps at 90 degrees interval and apply oil to the piston as well as all piston rings, for putting of this ring, a piston ring compressor is most appropriate. Place the piston/connecting rod assembly direct into the cylinder bore in the right formation with out any forceful means. Following the installation, it is required to measure the oil clearance of the connecting rod bearing by using Plastigage and ascertain the size and the condition of the bearing inserts. If the clearance is other than as specified, cleanliness and journal diameter should be checked before contemplating a rebore. Clean off the Plastigage and coat the bearing surfaces with fresh grease and place the rod cap complete with new bolts and tighten to manufacturers recommendation. This is done for the remaining assemblies, making sure that each of them does not have dirt, and is well oriented. Last, turn the crankshaft to see if there is any bind, or interference, and to check the connecting rod end play once more, in relation to the standard an.keras of tolerance.
    Posted by GMPartsGiant Specialist
    Q:
    What should be checked before removing piston/connecting rod assemblies for the 2009 Chevrolet Avalanche? Posted by Customer
    A:
    Before removing piston/connecting rod assemblies, you should check for ridges at the upper limit of ring travel in each cylinder and remove them if present to avoid piston breakage. You should also verify connecting rod endplay with feeler gauges and address any deviations to ensure it falls within the service limit.
    Posted by GMPartsGiant Specialist
    See expert answers on similar Piston
    Q:
    What should be checked before removing piston/connecting rod assemblies for the 2007 Chevrolet Tahoe? Posted by Customer
    A:
    Before removing piston/connecting rod assemblies, you should check for ridges at the upper limit of ring travel in each cylinder and remove them if present to avoid piston breakage. You should also verify connecting rod endplay with feeler gauges and address any deviations to ensure it falls within the service limit.
    Posted by GMPartsGiant Specialist
    See expert answers on similar Piston
    Q:
    What should be checked before removing piston/connecting rod assemblies for the 2007 Chevrolet Suburban? Posted by Customer
    A:
    Before removing piston/connecting rod assemblies, you should check for ridges at the upper limit of ring travel in each cylinder and remove them if present to avoid piston breakage. You should also verify connecting rod endplay with feeler gauges and address any deviations to ensure it falls within the service limit.
    Posted by GMPartsGiant Specialist
    See expert answers on similar Piston
    Q:
    What should be done during the installation of piston/connecting rod assemblies for the 2007 GMC Sierra? Posted by Customer
    A:
    When installing piston/connecting rod assemblies, you should ensure that the cylinder walls are clean and apply engine oil. Carefully guide each assembly into the cylinder while paying attention to proper orientation. It is also important to verify the connecting rod bearing oil clearance using Plastigage and ensure it falls within specifications. Before the final installation of rod caps and bolts, grease or assembly lube should be applied to the bearing faces.
    Posted by GMPartsGiant Specialist
    See expert answers on similar Piston
    Q:
    What should be done during piston ring installation for the 2007 Chevrolet Silverado? Posted by Customer
    A:
    During piston ring installation, you should check and adjust the ring end gaps to ensure they are within specified limits. The rings should be installed correctly on each piston. It is important to lubricate the pistons, rings, and cylinders with engine oil during installation. Additionally, a piston ring compressor should be used.
    Posted by GMPartsGiant Specialist
    See expert answers on similar Piston
    If you have any questions about this product, please don't hesitate to ask us. We will be happy to help you!

Genuine GM Part 89060486, the Right Choice

To ensure reliability, purchase GM part # 89060486 Piston Asm,(W/ Pinion). It is sometimes referred to as Cadillac Piston. Directly from GM, genuine parts are superb with regards to quality, longevity, and fit. Every single part passed stringent quality testing, so you can be sure that it's safe, durable, and built to perform like your original parts. This part fits specific Cadillac Escalade models.

GMPartsGiant.com is a leading supplier of genuine GM parts and accessories such as GM 89060486 Piston Asm,(W/ Pinion). You're certainly in the right place if you're searching for the great cost-effective OEM GM parts. Look no further than our vast inventory of genuine GM parts offered at unbeatable online prices, all of which are backed by the manufacturer's warranty. Not to forget, our hassle-free return policy and quick delivery service ensure a smooth shopping experience for you. For detailed Cadillac parts information, click here.

Why choose GM Parts Giant

  • Dedicated Service

    Your complete satisfaction is our #1 goal

  • Lowest Prices

    Best deals on genuine OE parts from dealerships

  • Fast Delivery

    Orders are processed and delivered promptly