Make sure this part fits

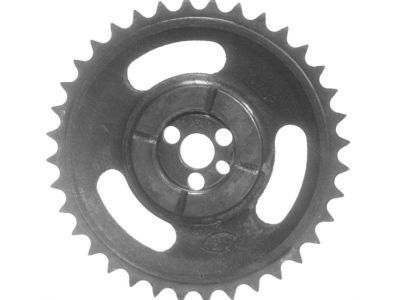
Cadillac 12552128 Sprocket, Camshaft

1990-2000 Cadillac

Customer Questions & Expert Answers (10)
GM 12552128 Sprocket, Camshaft
  • Part Description
    SPROCKET, Engine Camshaft
  • Manufacturer
    General Motors
Make sure this part fits
$103.70 MSRP: $209.12
You Save: $105.42 (51%)
Ships in 1-2 Business Days
1
ADD TO CART
  • Related Parts
  • Product Specifications
  • Vehicle Fitment
  • Customer Questions & Expert Answers
  • Product Specifications

    BrandGenuine Cadillac
    Manufacturer Part Number12552128
    Part DescriptionSPROCKET, Engine Camshaft
    Other NamesCamshaft Gear, Timing Gear Set
    Item Dimensions8.2 x 8.2 x 0.6 inches
    Item Weight1.90 Pounds
    ConditionNew
    Fitment TypeDirect Replacement
    ManufacturerGeneral Motors
    SKU12552128
    WarrantyThis genuine GM part is guaranteed by GM's factory warranty.
    Shipping & ReturnShipping Policy Return Policy
    Warning: California's Proposition 65
  • Vehicle Fitment

    Year Make Model Engine Important vehicle option details
    1990-1992 Cadillac Brougham8 Cyl 5.0L, 8 Cyl 5.7LBROUGHAM 4 DOOR
    1999-2000 Cadillac Escalade8 Cyl 5.7L1/2 TON, 4 DOOR 1/2 TON, CLASSIC 4 DOOR 1/2 TON, EXTENDED CAB 6'6" BOX 1/2 TON, YUKON/DENALI/ESCALADE
    1993 Cadillac Fleetwood8 Cyl 5.7LBROUGHAM 4 DOOR
  • Customer Questions & Expert Answers

    Q:
    I am wonder if this is complete and correct part for my vehicle. Posted by GMPartsGiant Specialist
    A:
    You can Select Your Vehicle to check if 12552128 fits your vehicle.
    Posted by GMPartsGiant Specialist
    Q:
    How to remove and install timing chain and Cam Gear on Cadillac Fleetwood? Posted by Customer
    A:
    To remove and install the timing chain and sprockets, begin by disconnecting the negative battery cable and removing the front cover. Take off the oil slinger from the crankshaft and rotate the engine to align the cam gear timing marks, ensuring the No. 1 cylinder is on the TDC of its compression stroke. From the camshaft, remove the camshaft thrust button and screw, and discard the thrust button. Slide out the cam gear, crankshaft sprocket, and timing chain as an assembly. To install, clean the gasket mounting surfaces and inspect all parts for wear or damage, replacing as necessary. Assemble the timing chain on the cam gear and crankshaft sprockets, align the timing marks on the sprockets to face each other, and align the dowel pin in the cam gear with the index hole in the sprocket; then slide the assembly onto the cam gear and install the sprocket-to-cam gear bolts, tightening it to 37 ft. lbs. Install the new thrust button and the oil slinger, followed by the front cover. Finally, connect the negative battery cable, refill the cooling system, start the engine, allow it to reach normal operating temperatures, and check for leaks.
    Posted by GMPartsGiant Specialist
    Q:
    How to remove and reinstall Timing Chain, Timing Cover and Variable Timing Sprocket in V6 engine on Chevrolet Astro? Posted by Customer
    A:
    To take out the water pump first disconnect, then unbolt and then disconnect the crankshaft drivebelt pulley from the vibration damper, using a six-point socket and breaker bar for the tight vibration damper bolt. Place the number four piston at TDC on the compression stroke, do not rotate the crankshaft until the timing chain and its sprockets are replaced. Finally, unscrew the bolt on the crankshaft front and unbolt the vibration damper employing a puller that places as force on the damper hub in order to prevent damage. For the 1995 and models remove the crankshaft position sensor located on the timing chain cover and pull the harness off. Move on to take off the oil pan further to take off the timing chain cover from the engine block using a putty knife or a flat head screwdriver if rust have bonded it. 1995 and later models only, check the timing chain cover if removed, clean the detent confronting face of the camshaft sprocket and measure the timing chain free play, if more than 5/8 inch replace the chain and sprockets. For 1995 and later models, also take the Crankshaft Position Sensor reluctor ring and, for 2004 and later models, the timing chain tensioner. Untighten and eliminate the bolts fastening the timing chain sprocket to the camshaft, then, take off the camshaft sprocket and timing chain as a single unit while paying attention to the relative positions of the timing marks. When withdrawing the crankshaft sprocket you should use a two or three jaw type gear puller; be careful not to scratch the crankshaft threads. For installation, the housing as well as metal cover should be clean and free from any dist or deformation and gasket surface of the cover should be restored as required. Just ensure that the balancer shaft gears are adjusted before fitting the camshaft sprocket and tighten the crankshaft timing chain sprocket making sure that the key is in the right position. If it is, turn crankshafts so that its timing mark is on the first horizontal position, feed the timing chain over the camshaft sprocket and then install the camshaft sprocket such that its timing mark comes into contact with that of the crankshaft one. For 1995 and later models, install the Crankshaft Position Sensor reluctor with the dished side facing out, use thread locking compound on the camshaft sprocket fasteners and use poly-graphite withe timing chain. For metal timing chain covers, you should smear RTV sealant on both faces of the gasket and for composites apply new cover and crankshaft front oil seal and smear RTV sealant on the mating surface. Put on the timing chain cover and fasten the bolts, then, engage the oil pan and Crankshaft Position Sensor using a new gasket. Clean and apply oil to the crankshaft front oil seal and the sealing surfaces of the vibration damper; fit the damper and replace the bolt with the right one and tighten to the recommended torque. Last but not the least, perform the rest of the steps of installation in the order of the steps of removal at the reverse sequence.
    Posted by GMPartsGiant Specialist
    Q:
    How to remove and reinstall the Cam Gear, Camshaft and Camshaft Bearing in four cylinder engine on Chevrolet Astro? Posted by Customer
    A:
    To verify camshaft lobe lift, and check for wear, begin by removing the rocker arm cover. Place the number one piston at the top dead center on the compression stroke. Screw a dial indicator on the engine so that the plunger of the indicator rests on the top surface of the first rocker directly below the push rod. Rotate the crankshaft in protractor clockwise so that you can bring dials indicator to zero and then continue until it reads in the opposite direction the maximum cam lobe lift. Measure this and then put the piston back to TDC and do the check on the next valve, taking a piston to TDC in the firing order, rotating the crank 180 for the next cylinder. carrying out the checks, it is possible to compare it with the specified norms; if lobe lift is lower than the established number, then, it is required to install a new camshaft. For removal preheat and remove the alt/front/brake spark plugs, intake manifold, carb, air cleaner, water pump, freon, heater valves, trans cooler bracket, throttle lever linkage, alt & generator front plate & brackets, lower valve cover, engine fan, alternator & brackets, dipstick tube, exhaust manifold, power steering pump & hoses, radiator, plumbing & all brackets, Intake manifold heater crossover, and drivebelts Disconnect the push rods and lifters, and take off the timing gear cover, distributor, and oil pump drive shaft, and the head light bezels, grille, and bumper filler panel. Remove the access panel and unbolt the air conditioning condenser baffles without having to disconnect the refrigerant lines. Place the camshaft so that the holes in the camshaft gear correspond to the drilled holes in the thrust plate, unscrew the bolts and slowly pull out the camshaft and gear out of the block supporting it not to damage the bearings. The crankshaft gear should come off with ease on the crankshaft. After camshaft cleaning, it is required to check the bearing journals to see if they have worn out; if they are worn out, both the camshaft and bearings will require replacement. Check the dimension and roundness of the bearing journals using micro meters and compare the clearance with required specifications. Check the camshaft lobes; if these have changed color or are worn then new lobes may be installed; otherwise the camshaft may be reused. Inspect the camshaft drive and the driven gears and if the camshaft is worn replace both the camshaft drive is well as the driven gears. It is possible to measure gear end clearance and estimate the need in the spacer ring or thrust plate replacement. Camshaft bearing replacement also needs professional tools and therefore transport the block to a machine shop. For installation, lubricate the camshaft journals and the tops of the camshaft lobs, next slide the camshaft into the engine and then install the gear onto the crankshaft sprocket, care must be taken to align the timing marks. Realignment of access holes and usage of Locktite on the threads before the application of thrust plate bolts to the require torque channel in the reverse sequence of the removal process.
    Posted by GMPartsGiant Specialist
    Q:
    How to remove and reinstall the front Timing Chain, Timing Cover and Variable Timing Sprocket on Chevrolet C1500? Posted by Customer
    A:
    If you are dealing with a vehicle manufactured from 1995 onwards, then the V6 and small block V8 models will have non-reusable plastic front cover, which must be discarded as it cannot be reused after being removed to prevent any oil leaks. In contrast, for 7.4L V8 engines produced after 1996, there is a reusable front cover gasket and front cover that might only require a gasket replacement if the original one becomes damaged. The first step in removing the timing belt is removing the water pump, followed by unbolted crankshaft drivebelt pulley from the vibration damper. Once the number one piston is at TDC on the compression stroke, rotate crankshaft an additional 360 degrees giving caution not to turn it until when installing timing chain and sprockets. On most engines there is usually a large bolt threaded into the nose of the crank shaft used to secure the vibration damper and this necessitates its removal with a puller designed to apply force strictly on the damper hub so as not to damage it. When taking out the timing cover on certain V6s and small block V8s it may become necessary to loosen and drop down oil pan, requiring replacement of its gasket should it crack in this operation. Any accessories that obstruct access to timing chain cover should be removed or pushed away while on big block engines further steps include cutting oil pan gasket and remove cover. For 1995-present models remove crankshaft position sensor reluctor ring and for 7.4L engines there is special tool that's required for this purpose after which it must be replaced. One way of testing for timing chain free play is checking whether such play exceeds or falls below half inch and if so replace gears also. Next comes removing camshaft sprocket with chain assembly as a single unit; ensure proper alignment especially in cases where V6s or small block V8s have oil pan gasket deteriorated and so replace it. When it comes to gasket removal and surface cleaning, see if the cover flange needs any correction. Followed by, installing new parts like crankshaft sprocket, camshaft sprocket and vibration damper should be carried out with emphasis on correct alignment of keyways. For some engine types an application of lube oil is required while others must have sealant applied. Finally, the rest of the process is reversing the order in which these steps were taken.
    Posted by GMPartsGiant Specialist
    Q:
    How to remove and install Timing Chain and Variable Timing Sprocket in V8 engine on Chevrolet Caprice? Posted by Customer
    A:
    In case the engine has been removed from the vehicle, then some of the steps, which follow may not be applicable. Among other works, there is a necessity of crankcase cover and torsional damper's removal in order to continue with the following works. Hold the engine until the markings made on the camshaft as well as the crankshaft sprockets align with each other; it is advisable not to take off either the sprocket or the chain before this is achieved. Third, turn the front crankshaft sprocket and remove the three 12mm camshaft sprocket retaining bolts that are connected to the camshaft sprocket and timing chain assembly. If the assembly does not lift off the front of the engine easily then use a soft-faced mallet to tap the camshaft sprocket. If it is necessary to remove the crankcase sprocket, apply a special puller for this goal. Centre the crankshaft sprocket on the crankshaft by engaging the key way in the sprocket to the key in the crank before securing with a bolt and washer from the puller set. Align the timing chain with the camshaft sprocket so that there is only tension connecting the crankshaft sprocket. With the timing marks aligned, get the chain over the crankshaft sprocket, and bring the camshaft sprocket in with three bolts, and make sure that a small hole in the sprocket hub aligns with the dowel pin on the end of the camshaft before tightening the bolts. Do not hit or pound the camshaft sprocket on to place as this may injure or displace the welch plug at the rear side of the engine. Then verify if the chain and both sprockets are there.Intention is to align the timing marks of both these sprockets, if not adjust in a manner that the same are aligned.Above step may also involve detaching the camshaft sprocket. Last but not least, give it a spray of the engine oil then begin to reinstall the components in the manner in which they were removed.
    Posted by GMPartsGiant Specialist
    Q:
    How to remove and install Timing Chain and Variable Timing Sprocket in V8 engine on Chevrolet El Camino? Posted by Customer
    A:
    If the engine has been removed from the car, disregard the following steps which do not apply. Begin by removing the torsional damper and crankcase. Turn the engine until the marks on the camshaft and crankshaft sprockets are in alignment, ensuring not to remove either sprocket or the chain until this is completed. Next, remove the three camshaft sprocket retaining bolts and lift the camshaft sprocket and timing chain together off the front of the engine, using a soft-faced mallet if necessary. If it becomes necessary to remove the crankcase sprocket, it can be pulled from the crankshaft using a puller designed for this purpose. Install the crankshaft sprocket to the crankshaft using a bolt and washer from the puller set. Then, install the timing chain over the camshaft sprocket, allowing slack in the chain to hang down over the crankshaft sprocket. With the timing marks aligned, slip the chain over the crankshaft sprocket and draw the camshaft sprocket into place with the three retaining bolts, avoiding any hammering or driving that could dislodge the welsh plug at the rear of the engine. After ensuring that the timing marks on both sprockets are perfectly aligned, if they are not, remove the camshaft sprocket and adjust until the marks align. Finally, lubricate the chain with engine oil and install the remaining components in the reverse order of removal.
    Posted by GMPartsGiant Specialist
    Q:
    How to remove and reinstall the front Timing Chain, Timing Cover and Variable Timing Sprocket on Chevrolet K1500? Posted by Customer
    A:
    If you are dealing with a vehicle manufactured from 1995 onwards, then the V6 and small block V8 models will have non-reusable plastic front cover, which must be discarded as it cannot be reused after being removed to prevent any oil leaks. In contrast, for 7.4L V8 engines produced after 1996, there is a reusable front cover gasket and front cover that might only require a gasket replacement if the original one becomes damaged. The first step in removing the timing belt is removing the water pump, followed by unbolted crankshaft drivebelt pulley from the vibration damper. Once the number one piston is at TDC on the compression stroke, rotate crankshaft an additional 360 degrees giving caution not to turn it until when installing timing chain and sprockets. On most engines there is usually a large bolt threaded into the nose of the crank shaft used to secure the vibration damper and this necessitates its removal with a puller designed to apply force strictly on the damper hub so as not to damage it. When taking out the timing cover on certain V6s and small block V8s it may become necessary to loosen and drop down oil pan, requiring replacement of its gasket should it crack in this operation. Any accessories that obstruct access to timing chain cover should be removed or pushed away while on big block engines further steps include cutting oil pan gasket and remove cover. For 1995-present models remove crankshaft position sensor reluctor ring and for 7.4L engines there is special tool that's required for this purpose after which it must be replaced. One way of testing for timing chain free play is checking whether such play exceeds or falls below half inch and if so replace gears also. Next comes removing camshaft sprocket with chain assembly as a single unit; ensure proper alignment especially in cases where V6s or small block V8s have oil pan gasket deteriorated and so replace it. When it comes to gasket removal and surface cleaning, see if the cover flange needs any correction. Followed by, installing new parts like crankshaft sprocket, camshaft sprocket and vibration damper should be carried out with emphasis on correct alignment of keyways. For some engine types an application of lube oil is required while others must have sealant applied. Finally, the rest of the process is reversing the order in which these steps were taken.
    Posted by GMPartsGiant Specialist
    Q:
    How to replace the Timing Chain and Variable Timing Sprocket in V6 engine on Pontiac Firebird? Posted by Customer
    A:
    Disconnect the cable from the negative battery terminal and remove the vibration damper. Next, take off the crankcase front cover. Before removing the chain and sprockets, visually inspect the teeth on the sprockets for signs of wear and check the chain for looseness, along with the condition of the timing chain tensioners. If either sprocket shows wear, such as non-square edges, bright or blue areas, chipping, or pitting, replace them. If the timing chain hasn't been replaced recently or if the engine has over 25,000 miles, it likely needs replacement to avoid erratic engine performance, loss of power, and reduced gas mileage. When one component requires replacement, all related components, including tensioners, should also be replaced. To replace timing components, rotate the crankshaft until the marks on the camshaft and crankshaft are aligned, ensuring the number one and four pistons are at top dead center with the number four piston in the firing position. Do not remove the sprockets or chain until this alignment is confirmed, and avoid turning the crankshaft or camshaft afterward. Remove the three camshaft sprocket retaining bolts and lift the camshaft sprocket and timing chain off the engine, using a soft-faced hammer if necessary. If the crankshaft sprocket needs removal, use a special puller. Attach the crankshaft sprocket to the crankshaft with a bolt and washer from the puller set. Lubricate the thrust surface of the camshaft sprocket with moly-based grease or engine assembly lube, then install the timing chain over the camshaft sprocket with slack hanging over the crankshaft sprocket. With the timing marks aligned, slip the chain over the crankshaft sprocket and draw the camshaft sprocket into place with the retaining bolts, avoiding any hammering that could dislodge the Welch plug. After ensuring the timing marks are properly aligned, lubricate the chain with engine oil and reinstall the remaining components in reverse order.
    Posted by GMPartsGiant Specialist
    Q:
    What should be inspected for wear during the process for the 1998 Chevrolet Express? Posted by Customer
    A:
    Inspect the timing chain tensioner and sprockets for wear.
    Posted by GMPartsGiant Specialist
    See expert answers on similar Variable Timing Sprocket
    If you have any questions about this product, please don't hesitate to ask us. We will be happy to help you!

Genuine GM Part 12552128, the Right Choice

To ensure reliability, purchase GM part # 12552128 Sprocket, Camshaft. It is sometimes referred to as Cadillac Cam Gear, Cadillac Variable Timing Sprocket. Directly from GM, genuine parts are superb with regards to quality, longevity, and fit. Every single part passed stringent quality testing, so you can be sure that it's safe, durable, and built to perform like your original parts. This part fits specific Cadillac Brougham, Escalade, Fleetwood models.

GMPartsGiant.com is a leading supplier of genuine GM parts and accessories such as GM 12552128 Sprocket, Camshaft. You're certainly in the right place if you're searching for the great cost-effective OEM GM parts. Look no further than our vast inventory of genuine GM parts offered at unbeatable online prices, all of which are backed by the manufacturer's warranty. Not to forget, our hassle-free return policy and quick delivery service ensure a smooth shopping experience for you. For detailed Cadillac parts information, click here.

Why choose GM Parts Giant

  • Dedicated Service

    Your complete satisfaction is our #1 goal

  • Lowest Prices

    Best deals on genuine OE parts from dealerships

  • Fast Delivery

    Orders are processed and delivered promptly