Make sure this part fits

Cadillac 1990116 Switch,Ignition & Start

1982-1996 Cadillac

Customer Questions & Expert Answers (13)
GM 1990116 Switch,Ignition & Start
  • Part Description
    SWITCH, Ignition Switch
  • Manufacturer
    General Motors
  • Manufacturer's Notes
    This part is discontinued.
Make sure this part fits
  • Related Parts
  • Product Specifications
  • Vehicle Fitment
  • Customer Questions & Expert Answers
  • Product Specifications

    BrandGenuine Cadillac
    Manufacturer Part Number1990116
    Part DescriptionSWITCH, Ignition Switch
    Other NamesIgnition Switch
    Item Dimensions5.8 x 2.8 x 2.0 inches
    Item Weight0.60 Pounds
    ConditionNew
    Fitment TypeDirect Replacement
    ManufacturerGeneral Motors
    SKU1990116
    WarrantyThis genuine GM part is guaranteed by GM's factory warranty.
    Shipping & ReturnShipping Policy Return Policy
    Warning: California's Proposition 65
  • Vehicle Fitment

    Year Make Model Engine Important vehicle option details
    1991-1992, 1987-1989 Cadillac Brougham8 Cyl 5.0L, 8 Cyl 5.7LBROUGHAM 4 DOOR, BROUGHAM 4 DOOR RWD
    1982-1988 Cadillac Cimarron4 Cyl 1.8L, 4 Cyl 2.0L, 6 Cyl 2.8LCIMARRON
    1982-1985 Cadillac Commercial Chassis8 Cyl 4.1L, 8 Cyl 6.0LCOMMERCIAL CHASSIS
    1982-1987 Cadillac Deville6 Cyl 4.1L, 6 Cyl 4.3L Diesel, 8 Cyl 4.1L, 8 Cyl 5.7L Diesel2 DOOR, 4 DOOR, 60 SPECIAL 4 DOOR, BROUGHAM 2 DOOR, BROUGHAM 2 DOOR FWD, BROUGHAM 4 DOOR, BROUGHAM 4 DOOR FWD, FORMAL LIMOUSINE, FUNERAL COACH, LIMOUSINE, LIMOUSINE 4 DOOR, LIMOUSINE 4 DOOR CTR PART
    1982-1985 Cadillac Eldorado6 Cyl 4.1L, 8 Cyl 4.1L, 8 Cyl 5.7L DieselBIARRITZ, COMMERCIAL CHASSIS, ELDORADO
    1993-1996, 1982-1987 Cadillac Fleetwood6 Cyl 4.1L, 6 Cyl 4.3L Diesel, 8 Cyl 4.1L, 8 Cyl 5.0L, 8 Cyl 5.7L, 8 Cyl 5.7L Diesel, 8 Cyl 6.0L2 DOOR, 4 DOOR, 60 SPECIAL 4 DOOR, BROUGHAM, BROUGHAM 2 DOOR, BROUGHAM 2 DOOR FWD, BROUGHAM 2 DOOR RWD, BROUGHAM 4 DOOR, BROUGHAM 4 DOOR FWD, BROUGHAM 4 DOOR RWD, FORMAL LIMOUSINE, FUNERAL COACH, LIMOUSINE, LIMOUSINE 4 DOOR, LIMOUSINE 4 DOOR CTR PART
    1982-1985 Cadillac Seville6 Cyl 4.1L, 8 Cyl 4.1L, 8 Cyl 5.7L DieselSEVILLE
  • Customer Questions & Expert Answers

    Q:
    I am wonder if this is complete and correct part for my vehicle. Posted by GMPartsGiant Specialist
    A:
    You can Select Your Vehicle to check if 1990116 fits your vehicle.
    Posted by GMPartsGiant Specialist
    Q:
    How to remove the ignition switch on Buick Skylark? Posted by Customer
    A:
    Proceed with removing the ignition switch by disconnecting the two wiring leads, starting with the one farthest from the steering wheel. Remove the stud and screw securing the switch to the column, and lift off the switch, making sure to pull it up from the column due to the protruding ignition actuator rod. Before installing the new switch, use a flat-head screwdriver to move the slider inside the switch to the 'Accessory' position on the extreme right, then slide it two detents to the left to the 'off/unlock' position. This position is necessary for installation. Place the switch on the column, guiding the actuator rod into the slider recess. Install the stud and screw, tightening them to specifications. Finally, connect the two wiring leads to the switch and reverse the procedure.
    Posted by GMPartsGiant Specialist
    Q:
    How is the ignition switch removed and installed on Chevrolet Caprice? Posted by Customer
    A:
    As a precaution against theft of the vehicle, the ignition switch is located inside the channel section of the brake pedal support and is remotely controlled by a rod and rack assembly from the ignition lock cylinder. To remove the ignition switch, the steering column must either be removed or lowered and well supported, without the need to remove the steering wheel. Before removing the switch, which is secured by two screws, it should be set to the 'LOCK' position. If the lock cylinder and actuating rod have already been removed, the 'LOCK' position can be determined by inserting a screwdriver in the actuating rod slot, moving the switch slide up until a definite stop is felt, and then moving it down one detent. Installation is a reversal of removal, ensuring the switch is in the 'LOCK' position and using original or identical type securing screws, as longer or thicker screws could render the collapsible design of the steering column inoperative. For models from 1977 to 1981, the switch should be set to the 'OFF-UNLOCKED' position before removal. If the lock cylinder has already been removed, the switch actuating rod should be pulled up until a definite stop is felt and then pushed down two detents. Before installing the switch, it should be set to the 'OFF-UNLOCK' position with the gearshift lever in neutral. This involves moving the switch slider two positions to the right from 'ACCESSORY' to 'OFF/UNLOCK', fitting the actuator rod into the slider hole, and assembling it to the steering column using two screws, with only the lower one tightened to 35 in-lb torque.
    Posted by GMPartsGiant Specialist
    Q:
    How to remove and install Ignition Switch on Cadillac Fleetwood? Posted by Customer
    A:
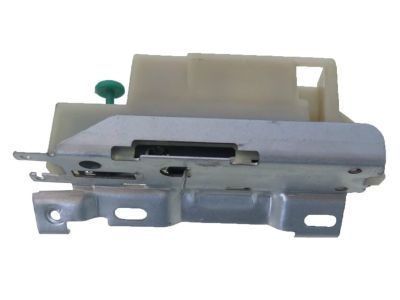
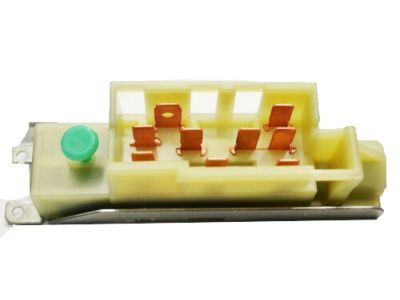
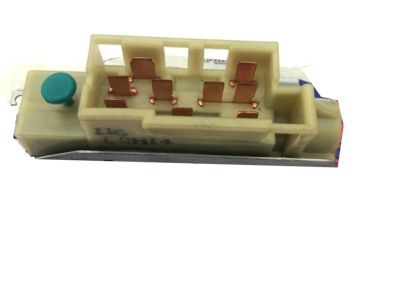
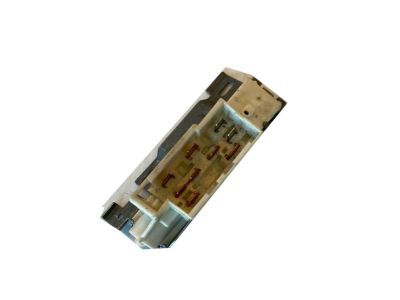
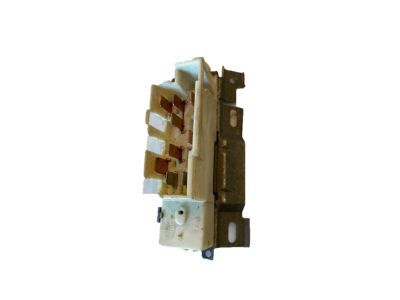
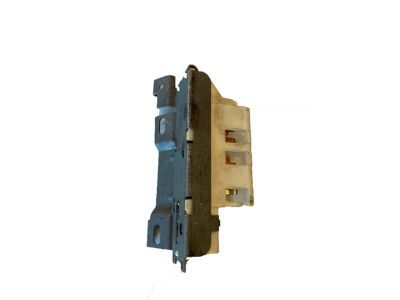
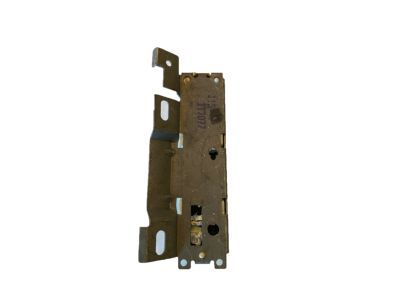
    When working on the Cadillac DeVille and Fleetwood models, you should disable the Supplemental Inflatable Restraint (SIR) system to prevent accidental airbag deployment or injuries. To do this, turn off the ignition switch as well as disconnecting the negative battery cable. Remove the specified SIR fuse from the fuse panel, and in some models eliminate lower left sound insulator. Next, detach the Connector Position Assurance (CPA) and disconnect the yellow 2-way connector at the base of the steering column. This will enable you to lower and support the steering column for better access. Remove the screw and washer that retain ignition switch and dimmer switch along with ground wire. Afterward, remove dimmer switch from rod as well as ignition switch mounting stud. Go ahead to take out ignition switch from its actuator on ignition switch, detaching any electrical connectors necessary. When installing ignition switch ensure it is in OFF-LOCK position secure by mounting stud. Re-enable SIR system by connecting yellow 2-way connector, installing SIR fuse, connect negative battery cable then check functioning of "INFLATABLE RESTRAINT" indicator light after completing installation. For early Eldorado and Seville models, follow similar steps to above mentioned ones when disabling SIR system. Take out SIR fuse No. 19 from fuse panel, left side sound insulator, and CPA including a 2-screw center trim plate followed by knee bolster held by five screws together with four screws attaching instrument panel steering column reinforcement plate to dash structure as well as a protective covering for wiring of an ignition switch plus retaining screws disconnected where necessary among others are parts remaining connected such that when installed in an OFF-LOCK position it will be secured with retaining screws only. Then reconnect turn signal harness connectors for both switches; also include any other harness connectors except for instrument panel harness connectors through which you could have attached these wires but that you did not attach to the wires when you installed the new instrument panel. Reinstall wiring protector and assemble components together. What to do in order to enable the SIR system, Connect the yellow 2-way connector, SIR fuse must be installed and then negative battery cable should be connected with the "INFLATABLE RESTRAINT" indicator light checked for proper functioning. Late Eldorado and Seville models are disabled by turning off the ignition switch and disconnecting the negative battery cable; remove specific SIR fuse, left side sound insulator, CPA as well as yellow 2-way connector at base of steering column. The knee bolster comes next along with an instrument panel steering column reinforcement plate, lower support bracket, upper column support bolts that can be removed after unscrewing them. Move down on that steering column and remove its wiring protector while retaining screw is provided for ignition switch; nut is also kept for this device that holds it firm till the installation is finished with connectors disconnected where necessary among other parts remaining connected such that when installed in an OFF-LOCK position it will be secured with retaining screws only. Next, reconnect turn signal harness connectors for both switches; also include any other harness connectors except for instrument panel harness connectors through which you could have attached these wires but that you did not attach to the wires when you installed the new instrument panel. Thereafter, install this wiring protector type onto steering column then ensure both upper and lower column support bolts are tightened thus raising a steering column using two supports available in order to align these supports near opening inside instrument panel once again before tightening them so as to complete a task on reassembling all of such remaining components whereby after connecting yellow 2-way connector, installing SIR fuse, connect negative battery cable then check functioning of "INFLATABLE RESTRAINT" indicator light.
    Posted by GMPartsGiant Specialist
    Q:
    How to disconnect the cable from the negative terminal of the battery and remove the ignition switch from the steering column on Chevrolet Astro? Posted by Customer
    A:
    Disconnect the cable from the negative terminal of the battery, ensuring to disable the anti-theft feature on models with an anti-theft audio system before disrupting power. Place the ignition switch in the LOCK position, and if the key lock cylinder has been removed, pull the actuating rod up until a stop is felt, then move it back down one detent. Remove the driver's side knee bolster, and for models with an analog instrument cluster, take out the retaining screw and disconnect the shift indicator cable from the steering column shroud. Remove the two nuts securing the steering column to the instrument panel while supporting it, then lower the column onto the driver's seat. Take out the two bolts securing the switch to the steering column, withdraw the actuating rod, and remove it from the vehicle. Before installation, ensure the ignition switch is in the LOCK position; if a new switch is being installed, it will be pinned in the LOCK position with a plastic pin that should be removed after tightening the switch mounting bolts. Insert the actuator rod, position the switch on the steering column, and secure it with the retaining bolts. After installation, check for proper switch operation and reposition if necessary, with the remaining installation steps being the reverse of removal, ensuring the steering column support nuts are securely tightened.
    Posted by GMPartsGiant Specialist
    Q:
    How is the ignition switch removed and installed on Chevrolet El Camino? Posted by Customer
    A:
    As a precaution against theft of the vehicle, the ignition switch is located inside the channel section of the brake pedal support and is remotely controlled by a rod and rack assembly from the ignition lock cylinder. For models from 1969 to 1976, to remove the ignition switch, the steering column must either be removed or lowered and well supported, without the need to remove the steering wheel. Before removing the switch, which is secured by two screws, it should be set to the 'LOCK' position. If the lock cylinder and actuating rod have already been removed, the 'LOCK' position can be determined by inserting a screwdriver in the actuating rod slot, moving the switch slide up until a definite stop is felt, and then moving it down one detent. Installation is a reversal of removal, ensuring the switch is in the 'LOCK' position and using original or identical type securing screws, as longer or thicker screws could render the collapsible design of the steering column inoperative. For models from 1977 to 1980, the switch should be set to the 'OFF-UNLOCKED' position before removal. If the lock cylinder has already been removed, the switch actuating rod should be pulled up until a definite stop is felt and then pushed down two detents. Before installing the switch, it should be set to the 'OFF-UNLOCK' position with the gearshift lever in neutral. The switch slider should be moved two positions to the right from 'ACCESSORY' to 'OFF/UNLOCK', after which the actuator rod can be fitted into the slider hole and assembled to the steering column using two screws, with only the lower one tightened to 35 lbf in torque.
    Posted by GMPartsGiant Specialist
    Q:
    How to remove the ignition switch on Oldsmobile Omega? Posted by Customer
    A:
    Proceed with removing the ignition switch by disconnecting the two wiring leads, starting with the one farthest from the steering wheel. Remove the stud and screw securing the switch to the column, and lift off the switch, making sure to pull it up from the column due to the protruding ignition actuator rod. Before installing the new switch, use a flat-head screwdriver to move the slider inside the switch to the 'Accessory' position on the extreme right, then slide it two detents to the left to the 'off/unlock' position. This position is necessary for installation. Place the switch on the column, guiding the actuator rod into the slider recess. Install the stud and screw, tightening them to specifications. Finally, connect the two wiring leads to the switch and reverse the procedure.
    Posted by GMPartsGiant Specialist
    Q:
    How to remove the ignition switch on Pontiac Phoenix? Posted by Customer
    A:
    Proceed with removing the ignition switch by disconnecting the two wiring leads, starting with the one farthest from the steering wheel. Remove the stud and screw securing the switch to the column, and lift off the switch, making sure to pull it up from the column due to the protruding ignition actuator rod. Before installing the new switch, use a flat-head screwdriver to move the slider inside the switch to the 'Accessory' position on the extreme right, then slide it two detents to the left to the 'off/unlock' position. This position is necessary for installation. Place the switch on the column, guiding the actuator rod into the slider recess. Install the stud and screw, tightening them to specifications. Finally, connect the two wiring leads to the switch and reverse the procedure.
    Posted by GMPartsGiant Specialist
    Q:
    What is the process for installing the switch for the 1983 Buick Century? Posted by Customer
    A:
    The activating rod should be installed into the switch, followed by assembling the switch onto the column and tightening the mounting screws.
    Posted by GMPartsGiant Specialist
    See expert answers on similar Ignition Switch
    Q:
    What is the final step after installing the switch for the 1986 Buick Regal? Posted by Customer
    A:
    The steering column should be reinstalled.
    Posted by GMPartsGiant Specialist
    See expert answers on similar Ignition Switch
    Q:
    What are the steps to remove the headlight dimmer switch on the 1989 Chevrolet C1500? Posted by Customer
    A:
    To remove the headlight dimmer switch on 1988 through 1994 models, you should remove the steering column support bracket bolts and nuts, lower the steering column, disconnect the dimmer switch electrical connector, and remove the retaining bolts.
    Posted by GMPartsGiant Specialist
    See expert answers on similar Ignition Switch
    Q:
    What are the steps to remove the headlight dimmer switch on the 1990 Chevrolet K1500? Posted by Customer
    A:
    To remove the headlight dimmer switch on 1988 through 1994 models, you should remove the steering column support bracket bolts and nuts, lower the steering column, disconnect the dimmer switch electrical connector, and remove the retaining bolts.
    Posted by GMPartsGiant Specialist
    See expert answers on similar Ignition Switch
    Q:
    How can the 'LOCK' position be determined if the lock cylinder and actuating rod have been removed for the 1987 Oldsmobile Cutlass? Posted by Customer
    A:
    The 'LOCK' position can be determined by inserting a screwdriver in the actuating rod slot and moving the switch slide until a definite stop is felt, then moving it down one detent.
    Posted by GMPartsGiant Specialist
    See expert answers on similar Ignition Switch
    If you have any questions about this product, please don't hesitate to ask us. We will be happy to help you!

Genuine GM Part 1990116, the Right Choice

To ensure reliability, purchase GM part # 1990116 Switch,Ignition & Start. It is sometimes referred to as Cadillac Ignition Switch. Directly from GM, genuine parts are superb with regards to quality, longevity, and fit. Every single part passed stringent quality testing, so you can be sure that it's safe, durable, and built to perform like your original parts. This part fits specific Cadillac Brougham, Deville, Fleetwood models.

GMPartsGiant.com is a leading supplier of genuine GM parts and accessories such as GM 1990116 Switch,Ignition & Start. You're certainly in the right place if you're searching for the great cost-effective OEM GM parts. Look no further than our vast inventory of genuine GM parts offered at unbeatable online prices, all of which are backed by the manufacturer's warranty. Not to forget, our hassle-free return policy and quick delivery service ensure a smooth shopping experience for you. For detailed Cadillac parts information, click here.

Why choose GM Parts Giant

  • Dedicated Service

    Your complete satisfaction is our #1 goal

  • Lowest Prices

    Best deals on genuine OE parts from dealerships

  • Fast Delivery

    Orders are processed and delivered promptly