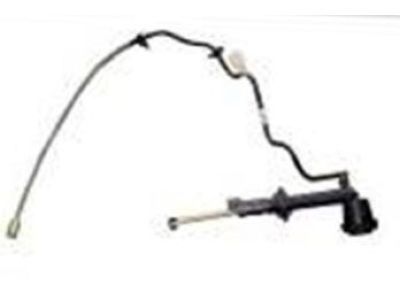
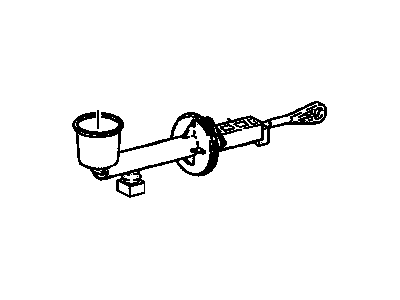
It is wise to find out from local parts stores and dealer service departments if it would be better to purchase a rebuild kit or a new master cylinder based on parts availability and cost before commencing this process. In case you decide to go for rebuilding the cylinder, ensure that you check its bore for any damage. The first step in removing the master cylinder is to disconnect the negative battery cable. Then take off the steering column covers and lower left air conditioning duct (if present) under the dashboard; also detach the pushrod from the top of the clutch pedal, secured with a spring clip. Depending on whether it is 1988-1992 or later models, remove the hydraulic line from the master cylinder, detach release cylinder from transmission or remove hydraulic line from release cylinder using special tool (for 1996 & later models). For 1988 through 1992 models, remove two nuts that secure master cylinder to firewall and carefully extract cylinder without allowing brake fluid to touch vehicle's paint. For 1993 through 1995 models, disconnect nuts and brackets that hold tubing to firewall and take out both cylinders as well as tubing with one unit. In case of 1996 and subsequent years, rotate master cylinders 45 degrees clockwise and pull them away from the fire wall along with tubing attached thereto. These are steps in overhauling a master cylinder: drain fluid if reservoir is on cyl, then pull reservoir off by prying it away; where remote, remove adapter and seal. Pull back dust cover on push rod & take off snap ring. Remove retaining washer with push rod from cyl bore . Tap repeatedly onto wooden block until piston assembly comes out of bore . Separate spring from piston and finally remove spring support (also known as cup), seal plus shim which was on push rod. Carefully remove sealexternal link opens in new window that connects plunger to bore external link opens in new window. If the cylinder bore has any roughness, it must be smooth to touch otherwise replace the master cylinder. When rebuilding, all parts in kit should be new; any reused items ought to be cleaned using brake system solvent, denatured alcohol or clean brake fluid (do not use petroleum-based solvents). Insert plunger seal with sealing lips away from push rod end. On other end of plunger, assemble shim, spring support and spring. Lubricate with fresh brake fluid (DOT 3) both the cylinder bore and seals. Carefully lower piston assembly into bore without damaging seals, first end being spring end. Position push rod & washer in bore, compress spring and replace snap ring. Apply ample rubber grease or equivalent to inside of dust cover then install it on the master cylinder pushing seal and reservoir (or adapter) into it at the same time. Fasten master cylinder to firewall for installation purposes. For 1988 through 1992 models connect with hydraulic line being careful not to cross thread fitting OR attach hose if equipped with remote reservoir. On 1993 through 1995 models, attach hydraulic line brackets during release cylinder installation. Connect hydraulic line quick-connect fitting onto release cylinder by pressing until it snaps into place for 1996 & later models. Finally reassemble components removed from under dash for access purposes and attach master cylinder push rod on clutch pedal. Fill master cylinder reservoir with brake fluid (DOT 3) before starting bleeding process for clutch hydraulic system.