Make sure this part fits

Chevrolet 12597151 Pan,Oil

1998-2005 Chevrolet

Customer Questions & Expert Answers (8)
GM 12597151 Pan,Oil
  • Part Description
    PAN, Engine Oil
  • Replaces
    12556541
  • Manufacturer
    General Motors
Make sure this part fits
$253.39 MSRP: $343.77
You Save: $90.38 (27%)
Ships in 1-2 Business Days
1
ADD TO CART
  • Related Parts
  • Product Specifications
  • Vehicle Fitment
  • Customer Questions & Expert Answers
  • Product Specifications

    BrandGenuine Chevrolet
    Manufacturer Part Number12597151
    Part DescriptionPAN, Engine Oil
    Other NamesOil Pan
    Item Dimensions18.4 x 19.4 x 12.6 inches
    Item Weight17.40 Pounds
    ConditionNew
    Fitment TypeDirect Replacement
    Replaces12556541
    ManufacturerGeneral Motors
    SKU12597151
    Shipping & ReturnShipping Policy Return Policy
    Warning: California's Proposition 65
  • Vehicle Fitment

    Year Make Model Engine Important vehicle option details
    1999-2005 Chevrolet Astro6 Cyl 4.3LVAN ASTRO
    1998-2005 Chevrolet Blazer6 Cyl 4.3L2 DOOR, 4 DOOR
    1998-2004 Chevrolet S106 Cyl 4.3LCREW CAB, PICKUP, PICKUP EXTENDED CAB
  • Customer Questions & Expert Answers

    Q:
    I am wonder if this is complete and correct part for my vehicle. Posted by GMPartsGiant Specialist
    A:
    You can Select Your Vehicle to check if 12597151 fits your vehicle.
    Posted by GMPartsGiant Specialist
    Q:
    How to properly disconnect and reinstall the oil pan in four cylinder engine on Chevrolet Astro? Posted by Customer
    A:
    Disconnect the cable from the negative battery terminal, ensuring to disable the anti-theft feature on models equipped with such systems before disconnecting the battery. Raise the vehicle and support it securely on jackstands. Drain the engine oil and remove the oil filter. Disconnect the exhaust pipe at the manifold and hangers, tying the system aside. Remove the starter and the bell housing dust cover. Detach the oil pan by removing the bolts, taking care not to pry between the block and pan to avoid damaging the sealing surfaces, which could lead to oil leaks; if the pan is stuck, use a block of wood and a hammer to dislodge it. Use a scraper to remove all traces of sealant from the pan and block, then clean the mating surfaces with lacquer thinner or acetone. Apply a 3/16-inch wide by 118-inch thick bead of RTV sealant to the oil pan flange, making the bead 3/8-inch wide by 3/16-inch thick between the bolt holes at the rear end of the pan, and a 1/8-inch bead of sealant to the block at the rear main bearing cap joints and the timing gear cover joints. Install the oil pan and tighten the mounting bolts to the specified torque, starting at the center of the pan and working out toward the ends in a spiral pattern. Reinstall the bell housing dust cover and the starter, then reconnect the exhaust pipe to the manifold and hanger brackets. Lower the vehicle, install a new filter, and add oil to the engine. Reconnect the negative battery cable, start the engine, and check for leaks.
    Posted by GMPartsGiant Specialist
    Q:
    How to remove and reinstall the oil pan in V6 engine on Chevrolet Astro? Posted by Customer
    A:
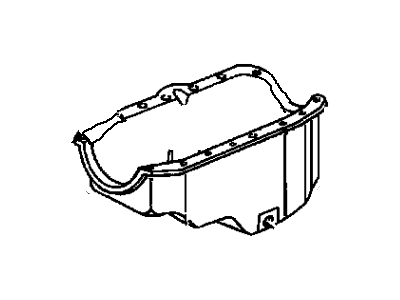
    Lubricants and fluids used on your vehicle are hazardous waste and must be disposed of properly; when disposal is required, place the waste into a sealable container and deliver it to a service station, auto parts store, or other facility that accepts hazardous waste for recycling. Begin by disconnecting the cable from the negative terminal of the battery, ensuring to disable the anti-theft feature on models equipped with an anti-theft audio system. Raise the vehicle and support it securely on jackstands, then drain the engine oil and remove the oil filter. If necessary for clearance, detach the exhaust pipes from the exhaust manifolds using penetrating oil spray to ease nut removal. Remove strut rods if the engine is equipped with them, then take off the bellhousing lower cover from the transmission and the starter motor and shield if equipped. Rotate the crankshaft clockwise using the vibration damper bolt until the timing mark is in the 6 o'clock position, disconnect the transmission oil cooler lines or engine oil cooler lines from the oil pan and adapter, capping the lines to prevent contamination and leakage. For 1996 and later models, remove the oil filter adapter and rubber bellhousing plugs, and if applicable, remove and discard the oil level sensor and the crankshaft position sensor wiring harness from the retainer. Remove the oil pan bolts, nuts, and studs, noting their locations, and carefully separate the oil pan from the block without prying between them to avoid damaging the sealing surfaces. Clean the gasket sealing surfaces with lacquer thinner or acetone, ensuring the bolt holes are clean, and check the flanges for distortion on steel-type oil pans. For models from 1985 to 1995, apply RTV sealant to the corners of the semi-circular cutouts at both ends of the pan before installing the new gasket, while for 1996 and later models, apply a bead of RTV sealant to the block-to-timing chain cover joint and the rear main seal-to-block joint before installing the new gasket onto the oil pan. Position the oil pan against the engine block and install the fasteners finger tight, then tighten the oil pan bolts/nuts in three equal steps to the specified torque, starting at the center and working outwards in a spiral pattern for older models. For models equipped with an oil level sensor, install a new sensor and tighten securely. Ensure the oil pan is aligned correctly as it serves as structural reinforcement between the engine and transmission, tightening the bolts/nuts in three steps to the specified torque while verifying the gap between the oil pan and the transmission bell housing is 0.010 inch or less. The remaining installation steps are the reverse of removal, and remember to refill the engine with oil before starting the engine and checking for leaks around the oil pan.
    Posted by GMPartsGiant Specialist
    Q:
    How to remove and install the oil pan on 4.3L V6 engine on Chevrolet Blazer? Posted by Customer
    A:
    In order to remove and install the oil pan, the procedure is different for each model year as well as the drivetrain. To start with 1994 and 1995 4WD models, you should disconnect negative battery cable and drain oil. Starter motor needs to be removed as well as two engine-to-bellhousing braces and lower part of bellhousing cover. Exhaust pipes must be separated from the manifolds. Oil pan mounting bolts/nuts are removed carefully noting location of studs and brackets. Slowly separate pan from block without prying so as not to damage sealing surfaces. Sealing surface distortion on oil pan flange can also be checked if any. New gasket is attached to pan with RTV sealant applied after cleaning gasket surfaces and carefully positioning it against block. Bolts/nuts are tightened in three steps starting at center and following a spiral pattern outwards. Engine removal may be needed for 2WD models (especially those with cast-aluminum oil pans) while 4WD models can use raised engine, which could mean that they will need to remove the engine first before accessing it fully in case there is a cast-aluminum oil pan involved. After removing bolts separate the pan carefully without using a pry tool, clean gasket surfaces, apply RTV sealant. Aligning the pan properly with the block, checking clearances when necessary then tightening of the bolts/studs holding it down in sequence. Complete remaining steps in reverse order; start engine; check for leakages at the pan before engaging gear.
    Posted by GMPartsGiant Specialist
    Q:
    How to remove and reinstall the oil pan on 2.2L four cylinder engine on Chevrolet S10? Posted by Customer
    A:
    The manufacturer recommends that the oil pan only be removed with the engine out of the vehicle. Remove the bolts and detach the oil pan. Don't pry between the block and pan or damage to the sealing surfaces may result and oil leaks could develop. If the pan is stuck, dislodge it with a block of wood and a hammer. Note: Some of the fasteners are studs. Before removing them, make a mark on the pan to indicate their location for reassembly. Use a scraper to remove all traces of sealant from the pan and block, then clean the mating surfaces with lacquer thinner or acetone. Install a new rubber half-circle seal to the rear main bearing cap. Apply a thin coat of RTV sealant to the ends of the rubber seal, where it fits into the main bearing cap. Apply a 3/16-inch wide by 1/8-inch thick bead of RTV sealant around the oil pan flange and the front circle of the pan, where it contacts the timing chain cover. Install the oil pan and tighten the mounting bolts. Start at the center of the pan and work out toward the ends in a spiral pattern. The remainder of installation is reverse of removal. Reinstall the engine and lower the vehicle. Install a new filter and add oil to the engine, then start the engine and check for leaks.
    Posted by GMPartsGiant Specialist
    Q:
    How to remove and install the oil pan on 4.3L V6 engine on GMC Jimmy? Posted by Customer
    A:
    In order to remove and install the oil pan, the procedure is different for each model year as well as the drivetrain. To start with 1994 and 1995 4WD models, you should disconnect negative battery cable and drain oil. Starter motor needs to be removed as well as two engine-to-bellhousing braces and lower part of bellhousing cover. Exhaust pipes must be separated from the manifolds. Oil pan mounting bolts/nuts are removed carefully noting location of studs and brackets. Slowly separate pan from block without prying so as not to damage sealing surfaces. Sealing surface distortion on oil pan flange can also be checked if any. New gasket is attached to pan with RTV sealant applied after cleaning gasket surfaces and carefully positioning it against block. Bolts/nuts are tightened in three steps starting at center and following a spiral pattern outwards. Engine removal may be needed for 2WD models (especially those with cast-aluminum oil pans) while 4WD models can use raised engine, which could mean that they will need to remove the engine first before accessing it fully in case there is a cast-aluminum oil pan involved. After removing bolts separate the pan carefully without using a pry tool, clean gasket surfaces, apply RTV sealant. Aligning the pan properly with the block, checking clearances when necessary then tightening of the bolts/studs holding it down in sequence. Complete remaining steps in reverse order; start engine; check for leakages at the pan before engaging gear.
    Posted by GMPartsGiant Specialist
    Q:
    How to remove and install the oil pan on 4.3L V6 engine on GMC Sonoma? Posted by Customer
    A:
    In order to remove and install the oil pan, the procedure is different for each model year as well as the drivetrain. To start with 1994 and 1995 4WD models, you should disconnect negative battery cable and drain oil. Starter motor needs to be removed as well as two engine-to-bellhousing braces and lower part of bellhousing cover. Exhaust pipes must be separated from the manifolds. Oil pan mounting bolts/nuts are removed carefully noting location of studs and brackets. Slowly separate pan from block without prying so as not to damage sealing surfaces. Sealing surface distortion on oil pan flange can also be checked if any. New gasket is attached to pan with RTV sealant applied after cleaning gasket surfaces and carefully positioning it against block. Bolts/nuts are tightened in three steps starting at center and following a spiral pattern outwards. Engine removal may be needed for 2WD models (especially those with cast-aluminum oil pans) while 4WD models can use raised engine, which could mean that they will need to remove the engine first before accessing it fully in case there is a cast-aluminum oil pan involved. After removing bolts separate the pan carefully without using a pry tool, clean gasket surfaces, apply RTV sealant. Aligning the pan properly with the block, checking clearances when necessary then tightening of the bolts/studs holding it down in sequence. Complete remaining steps in reverse order; start engine; check for leakages at the pan before engaging gear.
    Posted by GMPartsGiant Specialist
    Q:
    What is the recommended approach for tightening the oil pan bolts/studs during installation for the 2003 Chevrolet S10? Posted by Customer
    A:
    During installation, the oil pan bolts/studs should be tightened in sequence to ensure proper alignment and sealing.
    Posted by GMPartsGiant Specialist
    See expert answers on similar Oil Pan
    If you have any questions about this product, please don't hesitate to ask us. We will be happy to help you!

Genuine GM Part 12597151, the Right Choice

To ensure reliability, purchase GM part # 12597151 Pan,Oil. It is sometimes referred to as Chevrolet Oil Pan. Directly from GM, genuine parts are superb with regards to quality, longevity, and fit. Every single part passed stringent quality testing, so you can be sure that it's safe, durable, and built to perform like your original parts. This part fits specific Chevrolet Astro, Blazer, S10 models.

GMPartsGiant.com is a leading supplier of genuine GM parts and accessories such as GM 12597151 Pan,Oil. You're certainly in the right place if you're searching for the great cost-effective OEM GM parts. Look no further than our vast inventory of genuine GM parts offered at unbeatable online prices, all of which are backed by the manufacturer's warranty. Not to forget, our hassle-free return policy and quick delivery service ensure a smooth shopping experience for you. For detailed Chevrolet parts information, click here.

Why choose GM Parts Giant

  • Dedicated Service

    Your complete satisfaction is our #1 goal

  • Lowest Prices

    Best deals on genuine OE parts from dealerships

  • Fast Delivery

    Orders are processed and delivered promptly