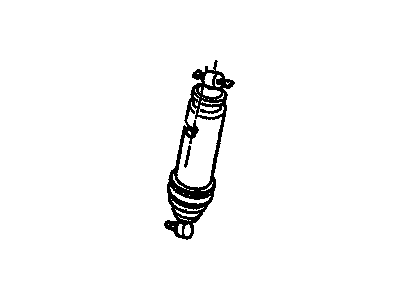
Unbolt the car's battery terminal, lift the vehicle by its frame, and keep it secure when the suspension's knuckles are dangling loose. Then take off both wheels and tires. To dismantle the strut from Deville and Fleetwood models, start by loosening the tie bar bolt at both bar ends, then taking out the nuts holding the strut top to the body. To remove the wheel speed sensor, disconnect it from anti-lock brake models, then take off the sensor bracket placed on the strut. Carefully remove the brake line bracket from the strut. Next, unscrew the bolts holding the strut to the knuckle, and lift out the strut. Secure the knuckle with wire to keep the ball joint and halfshaft from being damaged. First, slot the strut bolts through the knuckle and attach the nuts. After that, place the strut on the car body and feed its bolts through, making sure to have the washer and tie bar positioned before tightening the strut-to-body nuts. If your car has anti-lock brakes, install its brake sensor assembly and fit it to the shaft. Secure the nuts to these components with these torque values: strut-bolt: 140 ft-lbs; body-nut: 18 ft-lbs; link-nut: 48 ft-lbs; and tie bar through-bolt: 20 ft-lbs. Replace the wheel and tires, then carefully lower your vehicle; check and adjust your front-wheel alignment. When replacing the strut, place it in a machine that compresses springs, turn the screw until the spring squeezes down slightly, and hold the strut shaft stable while removing the top nut using a T-50 Torx bit. Twist the compressor screw slowly as you pull the shaft out, and release the strut when the spring can come with it. You'll need to put the strut into the strut compressor tool, engaging a clamping tool to keep the strut shaft secure, then putting the spring on top of the strut with the flat of the spring seat facing straight out from the direction that runs down the center of the vehicle. Thread the strut shaft through the top of the strut assembly while using the compressor screw to compress the spring. When the threads appear, put on the washer and secure the nut. Loosen the clamp holding the strut shaft and tighten the gasket-nut pair to 55 ft lbs, as you use a T-50 socket to keep the strut shaft from moving. Then pull the strut off the tensioner device.


")