My Garage
My Account
Cart
This part fits
2008 Buick Lucerne
Check another vehicle- Fitting Vehicle Options: H
GM 84446208 Block Assembly, Rear Body Fuse
2008-2011 GM
Customer Questions & Expert Answers (10)
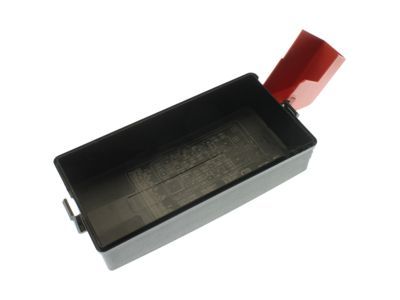
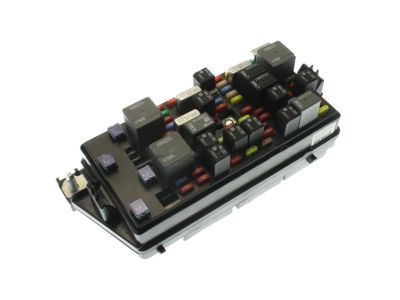
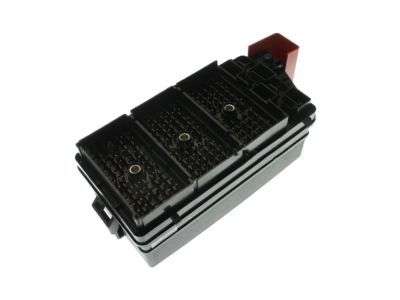
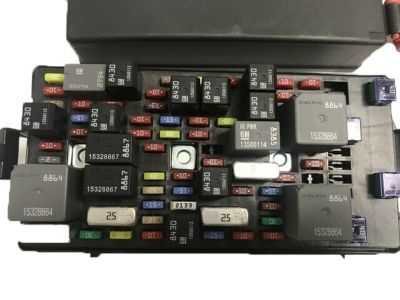
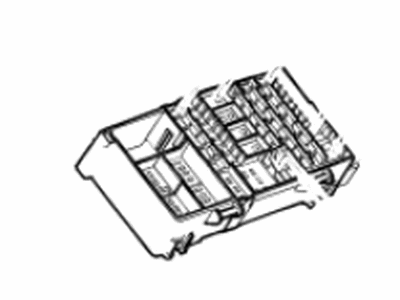
- Part DescriptionBlock Assembly, Rear Body Fuse
- PositionRear
- Replaces
- ManufacturerGeneral Motors
This part fits
2008 Buick Lucerne
Check another vehicle- Fitting Vehicle Options: H
$534.30 MSRP: $842.19
You Save: $307.89 (37%)
Currently UnavailableDue to manufacturer supply shortage, this item isn't currently available for ordering.
- Related Parts
- Specifications
- Q&A
Product Specifications
Brand Genuine GM Manufacturer Part Number 84446208 Part Description Block Assembly, Rear Body Fuse Item Dimensions 11.7 x 9.1 x 5.1 inches Item Weight 5.40 Pounds Position Rear Condition New Fitment Type Direct Replacement Replaces 20777935 Manufacturer General Motors SKU 84446208 Warranty This genuine GM part is guaranteed by GM's factory warranty. Shipping & Return Shipping Policy Return Policy Warning: California's Proposition 65Customer Questions & Expert Answers
- Q:Do these parts fit my vehicle? Posted by GMPartsGiant Specialist
- A:You can Select Your Vehicle to check if 84446208 fits your vehicle.Posted by GMPartsGiant Specialist
- Installation and Repair Tips by AI Expert
- Removal steps 1. Park on level ground, set the parking brake, remove the key, and put on safety glasses and gloves. 2. Open the access area (engine compartment or passenger footwell) and remove any trim or covers that block access to the fuse box; designs vary so proceed according to the vehicle's access. 3. Disconnect the negative battery cable first and move it aside so it cannot contact the terminal; if the vehicle has a secondary battery or additional power source, isolate those as well. 4. Remove the fuse box cover and document the fuse/relay layout with photos or labels for reassembly. 5. Label or mark each wiring connector and take photos so you can restore original routing and connections. 6. Release and disconnect all wiring harness connectors and grounding straps from the fuse box, using the connector release tabs and a small pry tool if needed. 7. Remove the fasteners or clips that secure the fuse box to its mounting bracket or support (fastener type and count vary by design). 8. Carefully lift the fuse box assembly free, supporting wiring to avoid pulling or bending terminals. 9. Inspect the harness ends, terminals, and mounting surfaces for corrosion or damage and clean or repair as required. 10. Store the removed unit and small hardware in a labeled container to keep parts organized. Installation steps 1. Verify the replacement fuse box matches the original in connector arrangement and fuse/relay positions before beginning. 2. Position the fuse box onto its mounting bracket and align it without forcing wiring; confirm harness routing matches your photos or labels. 3. Reinstall mounting fasteners and secure the fuse box so it seats properly; tighten hardware snugly but do not use specified torque here. 4. Reconnect all wiring harness connectors and ground straps, ensuring each connector fully seats and any locking tabs engage. 5. Reinstall relays and fuses into their original locations using your reference photos; replace any fuses that appear damaged and always use correct amperage ratings. 6. Refit the fuse box cover and any trim pieces that were removed for access. 7. Reconnect the negative battery cable (and any secondary battery connections) and ensure terminal clamps are secure. 8. Turn the ignition to accessory and verify operation of a few electrical circuits (lighting, horn, power accessories) and confirm no new warning lights are present. 9. Scan for diagnostic trouble codes and clear or record them as needed, then perform a brief functional test or short road test to confirm reliability. 10. Perform a final visual check for secure mounting, proper wire routing, and absence of loose tools or debris. Repair tip: Keep photos and labeled tape for each connector - that saves time and prevents miswiring; use dielectric grease on corroded terminals after cleaning.
- Q:Will the Gm 84446208 replace of fit the Gm 13599107 Posted by Customer: 2008 Buick Lucerne
- A:Hello, Yes 84446208 is the current part number, 13599107 is the old part number.Posted by GMPartsGiant Specialist 20/9/2023
- Q:could i connect it to the old harness? Posted by Customer: 2008 Buick Lucerne
- A:YES IT WILL...Posted by GMPartsGiant Specialist 1/8/2023
- Q:Does it come with the low profile fuel pump relay or the original tall one that causes the terminal issue? Posted by Customer: 2008 Buick Lucerne
- A:NO IT DOES NOT..Posted by GMPartsGiant Specialist 18/1/2023
- Q:Does this assembly come with the relays? If not, what is the relay for the fuel pump? Posted by Customer: 2008 Buick Lucerne
- A:PART COME WITH RELAYS AND FUSES...Posted by GMPartsGiant Specialist 20/12/2022
- Q:Does this block come with the harness? If not where can I find one? Posted by Customer: 2010 Buick Lucerne
- A:THE HARNESS IS SOLD SEPERATELY. THE BODY HARNESS IS WHAT CONNECTS TO THAT FUSE BLOCK. THAT HARNESS IS PART# 25996941Posted by GMPartsGiant Specialist 6/9/2022
- Q:Is this part the short replacement fuse box or the original one with the seat problem? Posted by Customer: 2010 Buick Lucerne
- A:the replacementPosted by GMPartsGiant Specialist 4/2/2022
- Q:Does this part come with the original fuses and relays? Posted by Customer: 2008 Buick Lucerne
- A:YES IT DOESPosted by GMPartsGiant Specialist 26/7/2021
- Q:Is this part for the rear or under the hood Posted by Customer: 2010 Cadillac DTS
- A:rearPosted by GMPartsGiant Specialist 24/5/2021
- Q:
Why choose GM Parts Giant
- Dedicated Service
Your complete satisfaction is our #1 goal
- Lowest Prices
Best deals on genuine OE parts from dealerships
- Fast Delivery
Orders are processed and delivered promptly