
My Garage
My Account
Cart
Additional information needed to check if this part fits
2006 Cadillac CTS
Check another vehicle- The location this part fits: Passenger Side
- Fitting Vehicle Options: D(69)(LP1,LY7,M82,MV1)
GM 25740814 Engine Mount Bracket
2004-2007 Cadillac CTS
Customer Questions & Expert Answers (5)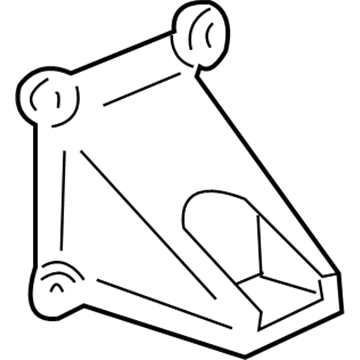
- Part DescriptionBRACKET, Engine Mounting
- ManufacturerGeneral Motors
Additional information needed to check if this part fits
2006 Cadillac CTS
Check another vehicle- The location this part fits: Passenger Side
- Fitting Vehicle Options: D(69)(LP1,LY7,M82,MV1)
$15.38 MSRP: $94.30
You Save: $78.92 (84%)
Ships in 1-2 Business Days
1
- Related Parts
- Specifications
- Q&A
Product Specifications
Brand Genuine GM Manufacturer Part Number 25740814 Part Description BRACKET, Engine Mounting Other Names Mount Bracket Item Dimensions 7.0 x 6.6 x 4.0 inches Item Weight 1.30 Pounds Condition New Fitment Type Direct Replacement Manufacturer General Motors SKU 25740814 Shipping & Return Shipping Policy Return Policy Warning: California's Proposition 65Customer Questions & Expert Answers
- Q:I would like to confirm if this is the correct part number for my vehicle. Please advise. Thank you. Posted by GMPartsGiant Specialist
- A:You can Select Your Vehicle to check if 25740814 fits your vehicle.Posted by GMPartsGiant Specialist
Installation and Repair Tips- Q:Do engine mounts seldom require attention, and should broken or deteriorated mounts be replaced immediately to prevent damage to driveline components in 5.7L,6.0L,6.2L V8 engine on Cadillac CTS? Posted by Customer
- A:Engine mounts seldom require attention, but broken or deteriorated mounts should be replaced immediately to prevent damage to driveline components. During the check, the engine must be raised slightly to remove the weight from the mounts. Raise the vehicle and support it securely on jackstands, then position the jack under the engine oil pan with a large block of wood between the jack head and the oil pan, carefully raising the engine just enough to relieve the weight from the mounts without using the jack to support the entire weight of the engine. Inspect the mounts for cracked, hardened rubber or separation from the metal plates, noting that rubber may split down the center. Applying rubber preservative or WD-40 can help slow deterioration. Check for relative movement between the mount plates and the engine or frame using a large screwdriver or prybar; if movement is noted, check the tightness of the mount fasteners before condemning the mounts, as broken mounts typically allow the engine to move easily when pried or under load. Disconnect the cable from the negative battery terminal before proceeding with the removal of the air filter housing and air intake resonator. For the driver's side mount, remove the engine mount heat shield; for the passenger's side mount, disconnect the oil level sensor electrical connector, remove the starter, and disconnect the negative battery cable from the engine block. Attach an engine hoist to the top of the engine for lifting, avoiding the use of a jack under the oil pan to prevent damage to the oil pump pick-up. Remove the engine mount bracket-to-engine block bolts from below, then the engine mount bracket-to-subframe bolts from above, followed by the engine mount bracket-to-subframe nuts and unscrewing the studs from the bracket. Raise the engine slightly until the engine mount can be removed, and installation is the reverse of removal, using non-hardening thread-locking compound on the mount bolts and tightening them to the specified torque. For 6.2L engines, have the air conditioning refrigerant discharged at a dealer service department or air conditioning shop, remove the shock tower crossbrace, and the air conditioning lines to access the mount top nut. Working below the vehicle, remove the engine mount-to-front suspension subframe nut and the engine mount-to-engine bracket nut. Attach an engine holding fixture or engine hoist to the top of the engine for lifting, and raise the engine slightly until the engine mount can be moved by hand. Unbolt the engine bracket from the engine block, remove it along with the engine mount, and separate the mount from the engine bracket. Installation is the reverse of removal, ensuring all bolts and nuts are tightened to the specified torque, and have the air conditioning system evacuated, recharged, and leak tested by the shop that discharged it.Posted by GMPartsGiant Specialist
- Q:Should engine mounts be replaced immediately if they are broken or deteriorated in 3.2L V6 engine on Cadillac CTS? Posted by Customer
- A:Engine mounts seldom require attention, but broken or deteriorated mounts should be replaced immediately to prevent damage or wear on driveline components. During the check, the engine must be raised slightly to remove the weight from the mounts. Raise the vehicle and support it securely on jackstands, then position a jack under the engine oil pan with a large wood block between the jack head and the oil pan to prevent damage. Carefully raise the engine just enough to take the weight off the mounts, ensuring no part of your body is under the engine when it's supported only by a jack. Inspect the mounts for cracked, hardened rubber, separation from the bushing, or leaking anti-freeze fluid. Check for relative movement between the mount and the engine or chassis using a large screwdriver or prybar; if movement is noted, lower the engine and tighten the mount fasteners. Disconnect the cable from the negative terminal of the battery, then raise the vehicle and support it securely on jackstands if not already done. Place a floor jack under the engine with a wood block between the jack head and oil pan, raising the engine slightly to relieve the weight from the mounts. Remove the fasteners and detach the mount from the frame and engine bracket, taking care not to disconnect more than one mount at a time unless during engine removal. It may be necessary to lower the exhaust system to access the right side engine mount nut. Installation is the reverse of removal; use thread-locking compound on the mount nuts and ensure they are tightened securely.Posted by GMPartsGiant Specialist
- Q:Should engine mounts be replaced immediately if they are broken or deteriorated to prevent damage to driveline components in 2.8L,3.0L,3.6L V6 engine on Cadillac CTS? Posted by Customer
- A:Engine mounts seldom require attention, but broken or deteriorated mounts should be replaced immediately to prevent damage to driveline components. During the check, the engine must be raised slightly to remove the weight from the mounts. Raise the vehicle and support it securely on jackstands, then position the jack under the engine oil pan with a large block of wood between the jack head and the oil pan, carefully raising the engine just enough to relieve the weight on the mounts without using the jack to support the entire weight of the engine. Inspect the mounts for cracked, hardened rubber or separation from the metal plates, noting that the rubber may split down the center. Check for relative movement between the mount plates and the engine or subframe using a large screwdriver or pry bar; if movement is noted, check the tightness of the mount fasteners before condemning the mounts, as broken engine mounts typically allow the engine to move easily when pried or under load. Have the air conditioning refrigerant discharged at a dealer service department or air conditioning shop, then disconnect the cable from the negative battery terminal. Remove the shock tower crossbrace and the air conditioning lines to the compressor to access the mount top nut. Working below the vehicle, remove the engine mount to front suspension subframe nut and then the engine mount to engine bracket nut. Attach an engine holding fixture or engine hoist to the top of the engine for lifting, avoiding the use of a jack under the oil pan to prevent damage to the oil pump pick-up. Raise the engine slightly until the engine mount can be moved by hand, then unbolt the engine bracket from the engine block and remove it along with the engine mount from the vehicle, separating the mount from the engine bracket. Installation is the reverse of removal, ensuring all fasteners are tightened to the specified torque.Posted by GMPartsGiant Specialist
- Additional Installation and Repair Tips by AI Expert
- Removal steps 1. Park on level ground, set parking brake, block wheels and wear eye and hand protection. 2. Disconnect the negative battery cable to prevent electrical shorts and inadvertent cranking. 3. Support the engine with an appropriate tool (engine hoist, support bar, or jack with a wood block under the oil pan) - use the method appropriate for the vehicle design. 4. Remove any engine covers, splash shields or accessory components that restrict access to the mount; which items must be removed varies by design. 5. Loosen and remove the fasteners that attach the mount to the engine and to the body/subframe; access direction and fastener locations commonly differ between designs. 6. Carefully relieve the support and transfer the load so the engine is fully supported by the hoist/support before removing the last mount fastener. 7. Remove the mount assembly and inspect surrounding brackets, rubber/isolation elements, and fasteners for wear or damage. 8. Clean mounting surfaces and prepare new mount; discard or set aside old hardware if it is stretched or damaged. Installation steps 1. Position the new mount in the correct orientation, matching the original mount location and alignment. 2. Install mount fasteners by hand to start, ensuring threads engage smoothly and components are seated. 3. Slowly lower the engine onto the mount while keeping it supported so the mount carries the load evenly; final alignment may require slight adjustment. 4. Tighten fasteners snugly by hand, then tighten to manufacturer torque specifications using a torque wrench (do not guess torque values). 5. Reinstall any components or shields that were removed for access. 6. Reconnect the negative battery cable. 7. Start the engine and check for unusual noises, excessive vibration, or movement at the mount with the engine at idle and during a few controlled throttle blips. 8. Perform a short road test to verify normal operation and recheck fasteners after the test. 9. Repair tip: take photos and mark mount orientation before removal, replace worn or stretched fasteners, and use the proper support under the oil pan to avoid damaging the pan or mount during service.
- Q:
Why choose GM Parts Giant
- Dedicated Service
Your complete satisfaction is our #1 goal
- Lowest Prices
Best deals on genuine OE parts from dealerships
- Fast Delivery
Orders are processed and delivered promptly