Make sure this part fits

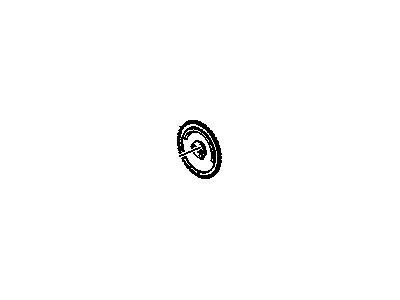
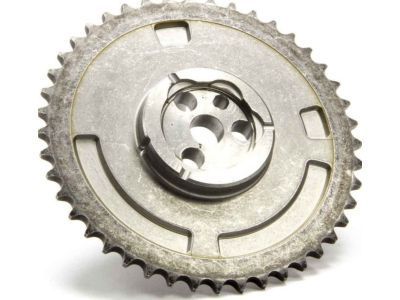
GM 12586481 Sprocket, Camshaft

2006-2015 GM

Customer Questions & Expert Answers (6)
GM 12586481 Sprocket, Camshaft
  • Part Description
    SPROCKET, Engine Camshaft
  • Manufacturer
    General Motors
Make sure this part fits
$32.49 MSRP: $53.78
You Save: $21.29 (40%)
Ships in 1-3 Business Days
1
ADD TO CART
  • Related Parts
  • Product Specifications
  • Vehicle Fitment
  • Customer Questions & Expert Answers
  • Product Specifications

    BrandGenuine GM
    Manufacturer Part Number12586481
    Part DescriptionSPROCKET, Engine Camshaft
    Other NamesCamshaft Gear, Timing Gear
    Item Dimensions6.1 x 6.1 x 0.6 inches
    Item Weight1.30 Pounds
    ConditionNew
    Fitment TypeDirect Replacement
    ManufacturerGeneral Motors
    SKU12586481
    WarrantyThis genuine GM part is guaranteed by GM's factory warranty.
    Shipping & ReturnShipping Policy Return Policy
    Warning: California's Proposition 65
  • Vehicle Fitment

    Year Make Model Engine Important vehicle option details
    2006 Cadillac CTS8 Cyl 6.0LV 4 DOOR
    2014-2015 Chevrolet Camaro8 Cyl 7.0LSS 2 DOOR COUPE
    2006-2013 Chevrolet Corvette8 Cyl 6.0L, 8 Cyl 6.2L, 8 Cyl 7.0L2 DOOR, 2 DOOR SPECIAL, CONVERTIBLE
    2007 Chevrolet Impala8 Cyl 5.3LLS, LT, SS
    2007 Chevrolet Monte Carlo8 Cyl 5.3LLS, LT, SS
  • Customer Questions & Expert Answers

    Q:
    I am wonder if this is complete and correct part for my vehicle. Posted by GMPartsGiant Specialist
    A:
    You can Select Your Vehicle to check if 12586481 fits your vehicle.
    Posted by GMPartsGiant Specialist
    Q:
    How to remove and install Cam Gear and Timing Chain in 2.8L,3.0L,3.6L V6 engine on Cadillac CTS? Posted by Customer
    A:
    Some of the timing system can be quite difficult to manipulate and it is very easy to cause further damage to the engine if any wrong step is taken, thus it is highly recommended that only those who have considerable experience in such repairs attempt it; in any case, they should consult a professional. Recheck all work and make sure all are right before start the engine. Special tools are required to lock the camshafts on each cylinder head into position, with two designs for the sprockets and chains: The first models, from 2005 to mid-2007, employ Design 1, which involves using camshaft locking tools EN-46105-1 and EN-46105-2, while the later ones, from mid-2007 to 2014, use the tools EN-48383-1, EN-48383-2, and EN-48383-3 and comes with 'inverted tooth' chains for less First, you have to take off the timing chain cover and for models of 2005 and half of 2007, rotate the crankshaft to the position with the mark on the oil pump housing vertical in the nine o'clock position while the flat backlash on the ridge of each camshaft on the right-hand cylinder head faces upwards. Attention should be paid to the installation of the special tools to the camshafts, then unscrew the fixing bolts for the timing chain tensioner for the right-side cylinder head and, having removed it along with the gasket, carefully put it aside. Move on to the removal of the right side cylinder head timing chain guides and the chain then do the same thing on the left side of the cylinder head. If required, one can take off the idler sprockets and locate the position of the camshaft sprockets and the camshaft before taking off the sprocket bolt. As for the mid 2007 and onward models, there is a similar process that must be carried out, but the crankshaft comes to a specific position and proper locking tools used. Check the timing chain cover for damage, scrub all components and look for such signs of wear or damage as on guides and sprockets. Remove tension from the tensioners and make sure that they are to be kept in a compact mode. When positioning of the crankshaft sprocket, woodruff key should be fitted with the timing marks visible and aligned before fitting the timing chains and the guides with the bolts tightened to the stipulated torque. Once more tighten all the timing marks appropriately, briefly turn the crankshaft to check for drag-which will signify a problem-before unlocking the tools.
    Posted by GMPartsGiant Specialist
    Q:
    How to properly install a Timing Belt, Timing Cover and Variable Timing Sprocket in 3.2L V6 engine on Cadillac CTS? Posted by Customer
    A:
    First of all, unplug the negative cable and unbolt being the intake air resonator and the intake plenum. However, the following are the removal procedures; First, the drivebelt and the drivebelt tensioner must be removed, then, the water pump pulley mounting bolts have to be removed as well as the pulley. Counter-loosen all the bolts that are holding the power steering pump on the bracket and then remove the pump from the bracket. As far as timing belt is concerned the coupling and the belt has to be changed Pull out all the mounting fasteners of Timing Cover and pull the cover away from the engine. When working on the timing belt and sprockets do not turn the crankshaft or camshafts individually with the belt out of the system to avoid straining the valves. Make sure that you have the special tools called for on the job before proceeding. Take off the timing cover belt, crankshaft pulley and turn the crankshaft so that Cylinder #1 reaches Top Dead Center on the compression stroke that gets the meshing timing marks of the camshaft gears and crankshaft sprocket in one straight line. Place bolts to lock the crankshaft from any movement, insert other bolts between the camshaft gears and release the tension on the timing belt tensioner. Roll the idler pulley and the timing belt out, and do not twist them frequently or sharply. Check the timing belt for signs of wear or contamination and replace it if it reached the 60k, or any other appropriate time. For installation include aligning all the marks on the camshaft sprockets and the crankshaft sprocket, looping the timing belt around the said crankshaft sprocket and the other necessary pulleys. After the lower idler pulley has been fitted all marked will have to be aligned, and the tension of the timing belt set. Rotate the crankshaft to get some resistance to see some problem and confirm all the marks matching and tighten the timing cover. Some changes may be made to match the camshaft sprockets to the special tools and if the sprockets get out of alignment, change the upper idler pulley eccentric. An additional step is to make sure that the alignment and tension are appropriate, please complete the installation.
    Posted by GMPartsGiant Specialist
    Q:
    How to Remove and Install Cam Gear and Timing Chain in V6 engine on Chevrolet Camaro? Posted by Customer
    A:
    It is however important to note that before disturbing the timing chain(s) from the sprocket(s) all the sprockets on the chain should be fitted with timing marks. In a car, it is necessary to rotate the engine as certain degrees just in order to match all these timing marks. This procedure requires three special tools to lock the camshafts on each cylinder head: tool numbers including EN48383-1, EN 48383-2 as well as EN 48383-3. Start by removing the cable from the negative terminal and also removing the cover of the timing chain. Bolt on the crankshaft pulley and turn the crankshaft clockwise until the mark on the primary timing chain sprocket lines up with the mark as shown on the oil pump housing in the 5 o'clock position for the stage one. Timing pointer position settings: if overhauling the right-side chain only, turn the timing mark to the 9 'clock position. Check to make sure that the flat segment on the rear of each camshaft on the left side cylinder head is up and parallel with the valve cover mating surface; if not turn the crankshaft clockwise 360 degrees and recheck the timing marks. Place the special tool to the left side camshafts Remove both timing chain tensioner bolts of the right side cylinder head, followed by removing the tensioner and discarding the gasket. Take off the right side cylinder head timing chain and its guides and do the same with the left side cylinder head. If so desired, undo the bolts that hold the idler sprockets and the sprockets in place. Fit identification marks on the camshaft sprockets and their respective camshafts, and while holding the camshaft correctly fitted, slacken and remove the camshaft sprocket bolt. Check for damages on timing chain cover, wash all related parts and ascertain that the guides/timing chain sprockets are worn out or damaged. Release the tension of the cables and thereafter make sure they remain in their position in case of any tension build up. The fact is that before starting the engine, the crankshaft should be turned by hand no less than two times checking its perspectively. Find the Woodruff key which fits onto the crankshaft and position it so that the planed crank face is adjacent to the cylinder head and indexed marks are easily seen. Insert the special retaining tool onto the left side camshafts, then place left side secondary chain over the sprocket on the gear, ordering the timing links. Go on and thread the chain over both of the camshaft actuator sprockets while maintaining the correct orientation. Finally fit the left side timing chain tensioner, timing chain guides and the similarly the right side timing chain idler and the primary timing chain must all be positioned in such a way that the timing mark lines up properly. Place the tensioner and compare the alignment marks on it. Turn the crankshaft to the nine position and fit the two special locking tools on the two cylinder heads. Subsequent to this, place the over head camshaft timing right-side timing chain in the right position at the camshaft sprockets and thereafter assemble the timing chain guides and the tensioner. Scrape off all the prior contour sealants from the block and the timing chain cover, besides that, take out all the special locking tools from the camshafts. The rest of the installation also works in the process of dismantling, step by step starting from the top part of the installation.
    Posted by GMPartsGiant Specialist
    Q:
    How to remove and install Timing Chain and Variable Timing Sprocket in V6 engine on Chevrolet Monte Carlo? Posted by Customer
    A:
    To the above we add, To eradicate these parts, one should first unplug the wire from the doormat negative terminal followed by draining coolant. Subsequently, the drivebelt and tensioner must be taken off, the engine oil pan and the crankshaft balancer pulley must also be taken off. Remove the camshaft position actuator magnet and its O-ring, remove the thermostat and the water pump. Remove the bolts between the timing chain cover and the engine block, and then release the connected sections by applying a soft face hammer in case of possible rigidity. For the same purpose tighten the crankshaft pulley bolt for some time and rotate the crankshaft until the timing mark of the crankshaft sprocket is brought in line with the chain tensioner plate and at the same time the hole on the camshaft sprocket is at the 6 o'clock position. If you are PF or have a TCI solenoid, use a TORX PLUS socket to loosen and remove the camshaft sprocket bolt(s) without rotating the camshaft. Loosen the variable camshaft timing sprocket from the camshaft dowel pin and take the timing chain and a camshaft sprocket away from the engine. Check the timing chain worn, damaged or showing more freeplay than permissible limit, also check the sprockets of the timing chain and replace them both as pairs. The step of alignment during the installation is the matching of key in the crankshaft to the keyway in the sprocket, pay attention to the wear and defects of the timing chain tensioner, and wash the parts. Recut and clean the mating surface of the cover and remove the old gasket material on the engine block, put the tensioner plate into the engine block and align the dowel pin of the camshaft and also against 3 o'clock before mating the timing chain with the sprockets of the camshaft and crankshaft. Bolt the variable camshaft timing sprocket, apply oil on the chain and sprocket then, remove the tensioner locking pin. Use of the anaerobic sealant to stick the new gasket into place and the cover fitted and tightening the bolts in the star pattern. Last of all, pour the oil and the coolant; switch on the engine; look for any signs of leakage.
    Posted by GMPartsGiant Specialist
    Q:
    How to remove and install Timing Chain and Variable Timing Sprocket in V6 engine on Chevrolet Impala? Posted by Customer
    A:
    To the above we add, To eradicate these parts, one should first unplug the wire from the doormat negative terminal followed by draining coolant. Subsequently, the drivebelt and tensioner must be taken off, the engine oil pan and the crankshaft balancer pulley must also be taken off. Remove the camshaft position actuator magnet and its O-ring, remove the thermostat and the water pump. Remove the bolts between the timing chain cover and the engine block, and then release the connected sections by applying a soft face hammer in case of possible rigidity. For the same purpose tighten the crankshaft pulley bolt for some time and rotate the crankshaft until the timing mark of the crankshaft sprocket is brought in line with the chain tensioner plate and at the same time the hole on the camshaft sprocket is at the 6 o'clock position. If you are PF or have a TCI solenoid, use a TORX PLUS socket to loosen and remove the camshaft sprocket bolt(s) without rotating the camshaft. Loosen the variable camshaft timing sprocket from the camshaft dowel pin and take the timing chain and a camshaft sprocket away from the engine. Check the timing chain worn, damaged or showing more freeplay than permissible limit, also check the sprockets of the timing chain and replace them both as pairs. The step of alignment during the installation is the matching of key in the crankshaft to the keyway in the sprocket, pay attention to the wear and defects of the timing chain tensioner, and wash the parts. Recut and clean the mating surface of the cover and remove the old gasket material on the engine block, put the tensioner plate into the engine block and align the dowel pin of the camshaft and also against 3 o'clock before mating the timing chain with the sprockets of the camshaft and crankshaft. Bolt the variable camshaft timing sprocket, apply oil on the chain and sprocket then, remove the tensioner locking pin. Use of the anaerobic sealant to stick the new gasket into place and the cover fitted and tightening the bolts in the star pattern. Last of all, pour the oil and the coolant; switch on the engine; look for any signs of leakage.
    Posted by GMPartsGiant Specialist
    If you have any questions about this product, please don't hesitate to ask us. We will be happy to help you!

Genuine GM Part 12586481, the Right Choice

To ensure reliability, purchase GM part # 12586481 Sprocket, Camshaft. It is sometimes referred to as GM Cam Gear, GM Variable Timing Sprocket. Directly from GM, genuine parts are superb with regards to quality, longevity, and fit. Every single part passed stringent quality testing, so you can be sure that it's safe, durable, and built to perform like your original parts. This part fits specific Cadillac CTS models. It fits Chevrolet Camaro, Impala, Monte Carlo.

GMPartsGiant.com is a leading supplier of genuine GM parts and accessories such as GM 12586481 Sprocket, Camshaft. You're certainly in the right place if you're searching for the great cost-effective OEM GM parts. Look no further than our vast inventory of genuine GM parts offered at unbeatable online prices, all of which are backed by the manufacturer's warranty. Not to forget, our hassle-free return policy and quick delivery service ensure a smooth shopping experience for you. For detailed Chevrolet parts information, click here.

Why choose GM Parts Giant

  • Dedicated Service

    Your complete satisfaction is our #1 goal

  • Lowest Prices

    Best deals on genuine OE parts from dealerships

  • Fast Delivery

    Orders are processed and delivered promptly