Make sure this part fits

Hummer 12640746 Pan Assembly, Oil

2008-2009 Hummer H2

Customer Questions & Expert Answers (12)
GM 12640746 Pan Assembly, Oil
  • Part Description
    PAN, Engine Oil
  • Replaces
    12627903, 12619776
  • Manufacturer
    General Motors
Make sure this part fits
$219.64 MSRP: $375.60
You Save: $155.96 (42%)
Ships in 1-2 Business Days
1
ADD TO CART
  • Related Parts
  • Product Specifications
  • Vehicle Fitment
  • Customer Questions & Expert Answers
  • Product Specifications

    BrandGenuine Hummer
    Manufacturer Part Number12640746
    Part DescriptionPAN, Engine Oil
    Other NamesOil Pan
    Item Dimensions25.4 x 12.2 x 12.5 inches
    Item Weight5.10 Pounds
    ConditionNew
    Fitment TypeDirect Replacement
    Replaces12627903, 12619776
    ManufacturerGeneral Motors
    SKU12640746
    WarrantyThis genuine GM part is guaranteed by GM's factory warranty.
    Shipping & ReturnShipping Policy Return Policy
    Warning: California's Proposition 65
  • Vehicle Fitment

    Year Make Model Engine Important vehicle option details
    2008-2009 Hummer H28 Cyl 6.2L, 8 Cyl 6.2L FlexPICKUP, SUV
  • Customer Questions & Expert Answers

    Q:
    I am wonder if this is complete and correct part for my vehicle. Posted by GMPartsGiant Specialist
    A:
    You can Select Your Vehicle to check if 12640746 fits your vehicle.
    Posted by GMPartsGiant Specialist
    Q:
    How to remove and install an oil pan in 4.8L,5.3L,6.0L V8 engine on Chevrolet Express? Posted by Customer
    A:
    To remove the oil pan, start by and unscrew the connection of the cable on the negative terminal of the battery. Lift the car properly with jackstands and drain the engine oil and the oil filter also. After that you will proceed to removing the lower control arm crossmember by pulling it out from below the oil pan using the bolts. Remove the front exhaust pipes by unbolting them from the exhaust manifold and taking them off since they will also interfere with the oil pan. Take off the starter motor and in the case of having, the transmission side covers. Remove the wiring harness bracket from the front of the oil pan and the bracket on the passengers side that secures the transmission oil cooler lines and the wiring to the starter motor. Loosen the bolt which connects the electrical connector to the oil level sensor installed on the lower side of the oil pan on the passenger compartment. Take off the transmission to oil pan bolts. If fitted with an engine oil cooler, then you need to remove the cooler lines and the adapter from the driver's side of oil pan. On models with the 4L80-E automatic transmission, unscrew the torque converter cover bolts and on those that use the 4L60-E automatic transmission dispense with the stud and bolt on the right side. Remove all oil pan bolts, after which the pan has to be lowered from the engine; if necessary it should be banged gently with a rubber mallet to free the gasket and check whether all the bolts are out. For the installation, one has to drill out the rivets that were holding the previous gasket in place and clean the oil pan with solvent. Remove oil pan and clean the mounting surfaces of the oil pan and engine block Using a bead of RTV sealant, treat the mating surfaces of the front and rear covers with the engine block. Operate them to engage and interface the new gasket to the pan, then fit and progressively tighten the bolts affording correct orientation of the oil gallery passages. Check the gap, being the distance of the rear face of the pan to the front face of the transmission bellhousing and if it is satisfactory then tighten the pan bolts/studs in a sequence to the torque setting. If not, secure the two lower oil pan to bell housing bolts and tighten them to lightly in order to pull the oil pan close to the bell housing. Finally, it is necessary to carry out the installation in the reverse sequence, subsequently tightening the oil pan bolts, putting the correct type and amount of oil, starting the engine and checking the damages before returning the car to the operational state.
    Posted by GMPartsGiant Specialist
    Q:
    How to remove and install the oil pan in 4.3L V6 and 5.0L,5.7L,7.4L V8 engine on Chevrolet Express? Posted by Customer
    A:
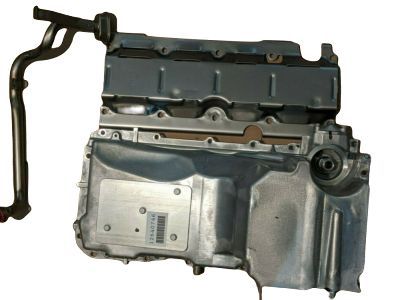
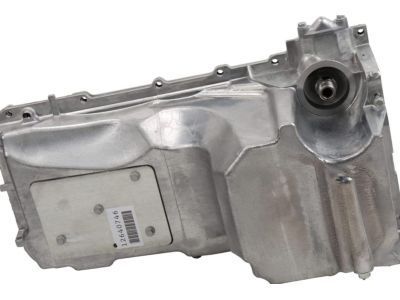
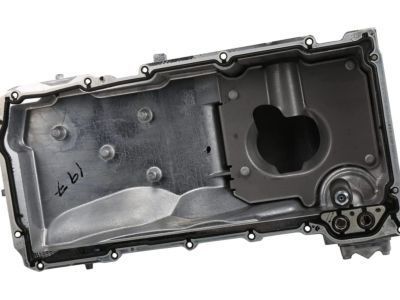
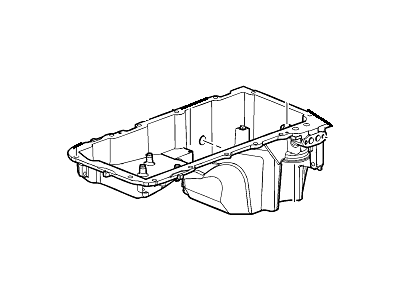
    To remove the oil pan, first disconnect the cable from the negative terminal of the battery. Raise the vehicle and support it securely on jackstands, then drain the engine oil and remove the oil filter along with the engine cover. Next, take out the oil dipstick tube and the starter, followed by the plastic bellhousing side covers and torque converter cover from the transmission. Remove the oil pan nut and bracket retaining the transmission oil cooler lines. For 2014 and earlier models, install an engine support fixture, disconnect the exhaust pipes from the exhaust manifolds and the rear portion of the exhaust system, and remove it from the vehicle to facilitate oil pan removal. On 7.4L engines, remove the engine mounts while ensuring the engine remains in a fixed position, possibly raising it slightly for additional clearance. For 2018 and later models, disconnect the engine wiring harness at the front of the oil pan, the remaining wiring harness brackets around the perimeter, and the electrical connector from the oil level sensor if equipped. Remove the transmission-to-oil pan bolts, followed by the oil pan bolts and nuts, and the oil pan reinforcements on each side. Lower the pan from the engine, striking it with a rubber mallet if necessary to break the gasket seal, and carefully slide it out to the rear, possibly turning the crankshaft slightly for clearance. For installation, wash out the oil pan with solvent and clean the mounting surfaces of old gasket material and sealer. Apply a bead of RTV sealant to the corners where the front cover meets the block and at the rear where the rear main oil seal retainer meets the block, then attach the new gasket to the pan, install it, and tighten the bolts/studs finger-tight. For 2014 and earlier 4.3L V6 engines, ensure the alignment of the rear face of the aluminum pan to the rear of the block is correct, measuring the gap between the rear face of the pan and the front face of the transmission bellhousing. Tighten the oil pan bolts using a criss-cross pattern, following the recommended bolt tightening sequence for V6 models. Complete the installation in reverse order of removal, add the proper type and quantity of oil, start the engine, and check for leaks before placing the vehicle back in service.
    Posted by GMPartsGiant Specialist
    Q:
    How to remove and replace the oil pan on V8 engine on Chevrolet Suburban? Posted by Customer
    A:
    Disconnect the cable from the negative terminal of the battery. Raise the vehicle and support it securely on jackstands, drain the engine oil, and remove the oil filler. Remove the oil pan skid plate, if equipped. Unbolt the steering rack and allow it to hang out of the way. On 4WD vehicles, remove the front differential carrier. Remove the transmission bell housing covers from the rear of the engine block. Remove the crossmember. Remove the lower transmission-to-engine bolt(s). These bolts vary depending on the model of transmission used but all screw into the oil pan. Disconnect the wiring from the engine oil level sensor. Disconnect the wiring harness retainers from the oil pan. Disconnect the oil cooler lines from the oil pan on models with automatic transmissions. Remove all the oil pan bolts, then lower the pan from the engine. The pan will probably stick to the engine, so strike the pan with a rubber mallet until it breaks the gasket seal. Drill out the rivets securing the oil pan gasket to the oil pan and remove the old gasket. Wash out the oil pan with solvent. Thoroughly clean the mounting surfaces of the oil pan and engine block of old gasket material and sealant. Wipe the gasket surfaces clean with a rag soaked in brake system cleaner. Apply a 3/16-inch wide, one-inch long bead of ATV sealant to the corners of the block where the front cover and the rear cover meet the engine block. The gasket tabs protrude at these points and must have sealant around them. Attach the new gasket to the pan, install the pan, and tighten the bolts finger-tight. Be sure the oil gallery passages in the pan and the gasket are aligned properly. Install all of the oil pan mounting bolts snugly. Install the lower transmission mounting bolts snugly. Tighten the oil pan bolts and the transmission bolts to the correct torque specifications. The remainder of installation is the reverse of removal. Add the proper type and quantity of oil, start the engine, and check for leaks before placing the vehicle back in service.
    Posted by GMPartsGiant Specialist
    Q:
    How to remove and replace the oil pan on V8 engine on GMC Yukon? Posted by Customer
    A:
    Disconnect the cable from the negative terminal of the battery. Raise the vehicle and support it securely on jackstands, drain the engine oil, and remove the oil filler. Remove the oil pan skid plate, if equipped. Unbolt the steering rack and allow it to hang out of the way. On 4WD vehicles, remove the front differential carrier. Remove the transmission bell housing covers from the rear of the engine block. Remove the crossmember. Remove the lower transmission-to-engine bolt(s). These bolts vary depending on the model of transmission used but all screw into the oil pan. Disconnect the wiring from the engine oil level sensor. Disconnect the wiring harness retainers from the oil pan. Disconnect the oil cooler lines from the oil pan on models with automatic transmissions. Remove all the oil pan bolts, then lower the pan from the engine. The pan will probably stick to the engine, so strike the pan with a rubber mallet until it breaks the gasket seal. Drill out the rivets securing the oil pan gasket to the oil pan and remove the old gasket. Wash out the oil pan with solvent. Thoroughly clean the mounting surfaces of the oil pan and engine block of old gasket material and sealant. Wipe the gasket surfaces clean with a rag soaked in brake system cleaner. Apply a 3/16-inch wide, one-inch long bead of ATV sealant to the corners of the block where the front cover and the rear cover meet the engine block. The gasket tabs protrude at these points and must have sealant around them. Attach the new gasket to the pan, install the pan, and tighten the bolts finger-tight. Be sure the oil gallery passages in the pan and the gasket are aligned properly. Install all of the oil pan mounting bolts snugly. Install the lower transmission mounting bolts snugly. Tighten the oil pan bolts and the transmission bolts to the correct torque specifications. The remainder of installation is the reverse of removal. Add the proper type and quantity of oil, start the engine, and check for leaks before placing the vehicle back in service.
    Posted by GMPartsGiant Specialist
    Q:
    How to remove and replace the oil pan on V8 engine on GMC Sierra? Posted by Customer
    A:
    Disconnect the cable from the negative terminal of the battery. Raise the vehicle and support it securely on jackstands, drain the engine oil, and remove the oil filler. Remove the oil pan skid plate, if equipped. Unbolt the steering rack and allow it to hang out of the way. On 4WD vehicles, remove the front differential carrier. Remove the transmission bell housing covers from the rear of the engine block. Remove the crossmember. Remove the lower transmission-to-engine bolt(s). These bolts vary depending on the model of transmission used but all screw into the oil pan. Disconnect the wiring from the engine oil level sensor. Disconnect the wiring harness retainers from the oil pan. Disconnect the oil cooler lines from the oil pan on models with automatic transmissions. Remove all the oil pan bolts, then lower the pan from the engine. The pan will probably stick to the engine, so strike the pan with a rubber mallet until it breaks the gasket seal. Drill out the rivets securing the oil pan gasket to the oil pan and remove the old gasket. Wash out the oil pan with solvent. Thoroughly clean the mounting surfaces of the oil pan and engine block of old gasket material and sealant. Wipe the gasket surfaces clean with a rag soaked in brake system cleaner. Apply a 3/16-inch wide, one-inch long bead of ATV sealant to the corners of the block where the front cover and the rear cover meet the engine block. The gasket tabs protrude at these points and must have sealant around them. Attach the new gasket to the pan, install the pan, and tighten the bolts finger-tight. Be sure the oil gallery passages in the pan and the gasket are aligned properly. Install all of the oil pan mounting bolts snugly. Install the lower transmission mounting bolts snugly. Tighten the oil pan bolts and the transmission bolts to the correct torque specifications. The remainder of installation is the reverse of removal. Add the proper type and quantity of oil, start the engine, and check for leaks before placing the vehicle back in service.
    Posted by GMPartsGiant Specialist
    Q:
    What should be done after removing the oil pan for the 2008 Chevrolet Avalanche? Posted by Customer
    A:
    Wash out the oil pan with solvent.
    Posted by GMPartsGiant Specialist
    See expert answers on similar Oil Pan
    Q:
    What's the next step after disconnecting components for the 2011 Chevrolet Silverado? Posted by Customer
    A:
    Remove the transmission-to-engine mounting bolts.
    Posted by GMPartsGiant Specialist
    See expert answers on similar Oil Pan
    Q:
    What wiring components need to be disconnected for the 2008 Chevrolet Silverado? Posted by Customer
    A:
    You should disconnect the wiring from the engine oil level sensor and the wiring harness retainers from the oil pan.
    Posted by GMPartsGiant Specialist
    See expert answers on similar Oil Pan
    Q:
    What should be done with the front differential carrier on the 2011 Chevrolet Tahoe? Posted by Customer
    A:
    On 4WD vehicles, you should remove the front differential carrier.
    Posted by GMPartsGiant Specialist
    See expert answers on similar Oil Pan
    Q:
    Does the oil pick up tube come with Posted by Customer: 2008 Light Truck Silverado / Sierra / Cheyenne - 03, 43, 53 Bodystyle (2WD)
    A:
    It does not. Part number for "oil pump w/ suc pipe" is 12608579.
    Posted by GMPartsGiant Specialist 1/2/2024
    Q:
    Quick Question, does this also come with the oil pan gasket and what about the o-ring fitting where the oil pick up tube mates up to the oil pump? Thanks Posted by Customer: 2015 Light Truck Silverado / Sierra / Cheyenne - 03, 43, 53 Bodystyle (4WD / AWD)
    A:
    YES IT DOES...
    Posted by GMPartsGiant Specialist 27/9/2022
    If you have any questions about this product, please don't hesitate to ask us. We will be happy to help you!

Genuine GM Part 12640746, the Right Choice

To ensure reliability, purchase GM part # 12640746 Pan Assembly, Oil. It is sometimes referred to as Hummer Oil Pan. Directly from GM, genuine parts are superb with regards to quality, longevity, and fit. Every single part passed stringent quality testing, so you can be sure that it's safe, durable, and built to perform like your original parts. This part fits specific Hummer H2 models.

GMPartsGiant.com is a leading supplier of genuine GM parts and accessories such as GM 12640746 Pan Assembly, Oil. You're certainly in the right place if you're searching for the great cost-effective OEM GM parts. Look no further than our vast inventory of genuine GM parts offered at unbeatable online prices, all of which are backed by the manufacturer's warranty. Not to forget, our hassle-free return policy and quick delivery service ensure a smooth shopping experience for you. For detailed Hummer parts information, click here.

Why choose GM Parts Giant

  • Dedicated Service

    Your complete satisfaction is our #1 goal

  • Lowest Prices

    Best deals on genuine OE parts from dealerships

  • Fast Delivery

    Orders are processed and delivered promptly