Make sure this part fits

Cadillac 25812725 Front Upper Control Arm Assembly

2007-2016 Cadillac Escalade

Customer Questions & Expert Answers (10)
GM 25812725 Front Upper Control Arm Assembly
  • Part Description
    Arm Assembly, Front Upper Control ; Arm, Steering Knuckle Upper & Lower Control
  • Position
    Front Upper
  • Replaces
    15096197
  • Manufacturer
    General Motors
Make sure this part fits
$182.91 MSRP: $308.14
You Save: $125.23 (41%)
Ships in 1-2 Business Days
1
ADD TO CART
  • Related Parts
  • Product Specifications
  • Vehicle Fitment
  • Customer Questions & Expert Answers
  • Product Specifications

    BrandGenuine Cadillac
    Manufacturer Part Number25812725
    Part DescriptionArm Assembly, Front Upper Control ; Arm, Steering Knuckle Upper & Lower Control
    Other NamesUpper Control Arm
    Item Dimensions4.3 x 14.3 x 13.8 inches
    Item Weight6.90 Pounds
    PositionFront Upper
    ConditionNew
    Fitment TypeDirect Replacement
    Replaces15096197
    ManufacturerGeneral Motors
    SKU25812725
    WarrantyThis genuine GM part is guaranteed by GM's factory warranty.
    Shipping & ReturnShipping Policy Return Policy
    Warning: California's Proposition 65
  • Vehicle Fitment

    Year Make Model Engine Important vehicle option details
    2007-2016 Cadillac Escalade8 Cyl 6.0L, 8 Cyl 6.0L Flex, 8 Cyl 6.2L, 8 Cyl 6.2L Flex1/2 TON, 1500 4 DOOR, 1500 4 DOOR SUV, 1500 4 DOOR UTILITY, 1500 CREW CAB, 1500 CREW CAB STANDARD BOX, 4 DOOR 1/2 TON, CLASSIC 1500 CREW CAB LONG BOX, CLASSIC 1500 EXTENDED CAB STANDARD BOX, CLASSIC 1500 REGULAR CAB LONG BOX, EXT 1/2 TON, YUKON XL/DENALI XL/ESCALADE ESV, YUKON/DENALI/ESCALADE
  • Customer Questions & Expert Answers

    Q:
    I would like to confirm if this is the correct part number for my vehicle. Please advise. Thank you. Posted by GMPartsGiant Specialist
    A:
    You can Select Your Vehicle to check if 25812725 fits your vehicle.
    Posted by GMPartsGiant Specialist
    Q:
    How to remove and install the upper control arm on Cadillac Escalade? Posted by Customer
    A:
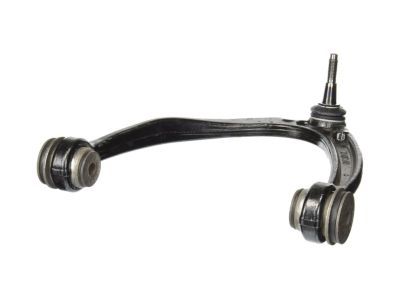
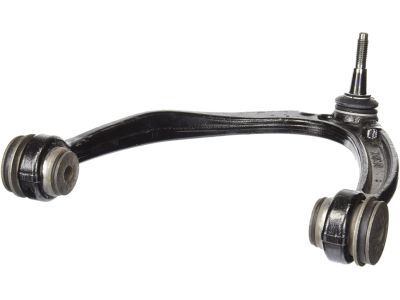
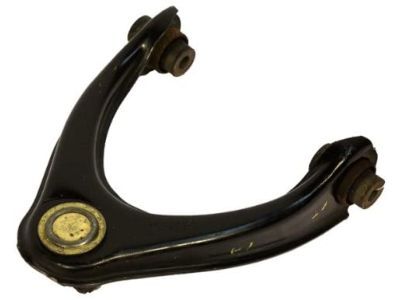
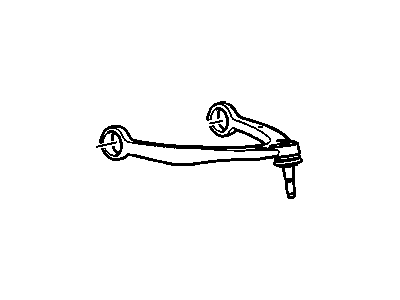
    To remove the upper control arm, first loosen the wheel lug nuts, raise the front of the vehicle, and support it securely on jackstands before removing the wheel. Position a floor jack under the lower control arm near the ball joint and raise it slightly to relieve spring pressure on the upper control arm. Mark the relationship of the adjusting cams to the frame brackets. Remove the shock/coil spring, then unbolt the brake hose/wheel speed sensor bracket from the upper control arm, noting the position of the pivot bolts, and also remove the wheel speed sensor while detaching the wiring harness bracket from the steering knuckle. For 4WD models, remove the driveaxle, although using a pickle fork type ball joint separator may eliminate the need for this step. Loosen the upper ball joint nut a few turns without removing it, then use a ball joint puller or pickle fork to separate the ball joint from the knuckle before removing the nut. If lacking the proper tool, a hammer and drift can sometimes be used, but a pickle fork may damage the ball joint boot. It is recommended to replace the ball joint nut with a new one after removal. Next, remove the upper control arm pivot bolts and nuts, taking note of their installation direction, and then take out the control arm. For installation, position the arm in the frame brackets and install the bolts and nuts without tightening them yet. Attach the ball joint to the steering knuckle, install a new nut, and tighten it to the specified torque. The remaining installation steps are the reverse of removal; ensure the previously made marks are aligned before tightening the nuts to the specified torque. The pivot bolt nuts should be tightened with the vehicle at normal ride height, which can be achieved after lowering the vehicle or by raising the lower control arm with a floor jack. Finally, tighten the wheel lug nuts to the proper torque settings and have the front end alignment checked and adjusted if necessary.
    Posted by GMPartsGiant Specialist
    Q:
    How to remove the upper control arm on Chevrolet Suburban? Posted by Customer
    A:
    To remove the upper control arm on a vehicle, first loosen the wheel lug nuts, raise the front of the vehicle, and support it securely on jackstands. Remove the wheel and position a floor jack under the lower control arm to take the spring pressure off the upper control arm. Mark the relationship of the adjusting cams to the brackets on the frame and unbolt the brake hose/wheel speed sensor bracket from the upper control arm. If working on a 4WD model, remove the driveaxle. To disconnect the upper control arm from the steering knuckle, loosen the upper balljoint nut a few turns, install a puller or ball joint separator, and break the ball joint loose from the knuckle. Remove the nut and upper control arm pivot bolts and nuts, noting which way the bolts are installed. To install the new upper control arm, position the arm in the frame brackets and install the bolts and nuts, but don't tighten them yet. Attach the ball joint to the steering knuckle, install a new nut, and tighten it to the torque specifications. The remainder of installation is the reverse of removal. Make sure the marks made prior to disassembly are aligned, then tighten the nuts to the torque specifications. Finally, tighten the wheel lug nuts to the torque specifications and have the front-end alignment checked and, if necessary, adjusted.
    Posted by GMPartsGiant Specialist
    Q:
    How to remove the upper control arm on Chevrolet Silverado? Posted by Customer
    A:
    To remove the upper control arm on a vehicle, first loosen the wheel lug nuts, raise the front of the vehicle, and support it securely on jackstands. Remove the wheel and position a floor jack under the lower control arm to take the spring pressure off the upper control arm. Mark the relationship of the adjusting cams to the brackets on the frame and unbolt the brake hose/wheel speed sensor bracket from the upper control arm. If working on a 4WD model, remove the driveaxle. To disconnect the upper control arm from the steering knuckle, loosen the upper balljoint nut a few turns, install a puller or ball joint separator, and break the ball joint loose from the knuckle. Remove the nut and upper control arm pivot bolts and nuts, noting which way the bolts are installed. To install the new upper control arm, position the arm in the frame brackets and install the bolts and nuts, but don't tighten them yet. Attach the ball joint to the steering knuckle, install a new nut, and tighten it to the torque specifications. The remainder of installation is the reverse of removal. Make sure the marks made prior to disassembly are aligned, then tighten the nuts to the torque specifications. Finally, tighten the wheel lug nuts to the torque specifications and have the front-end alignment checked and, if necessary, adjusted.
    Posted by GMPartsGiant Specialist
    Q:
    How to remove the upper control arm on Chevrolet Tahoe? Posted by Customer
    A:
    To remove the upper control arm on a vehicle, first loosen the wheel lug nuts, raise the front of the vehicle, and support it securely on jackstands. Remove the wheel and position a floor jack under the lower control arm to take the spring pressure off the upper control arm. Mark the relationship of the adjusting cams to the brackets on the frame and unbolt the brake hose/wheel speed sensor bracket from the upper control arm. If working on a 4WD model, remove the driveaxle. To disconnect the upper control arm from the steering knuckle, loosen the upper balljoint nut a few turns, install a puller or ball joint separator, and break the ball joint loose from the knuckle. Remove the nut and upper control arm pivot bolts and nuts, noting which way the bolts are installed. To install the new upper control arm, position the arm in the frame brackets and install the bolts and nuts, but don't tighten them yet. Attach the ball joint to the steering knuckle, install a new nut, and tighten it to the torque specifications. The remainder of installation is the reverse of removal. Make sure the marks made prior to disassembly are aligned, then tighten the nuts to the torque specifications. Finally, tighten the wheel lug nuts to the torque specifications and have the front-end alignment checked and, if necessary, adjusted.
    Posted by GMPartsGiant Specialist
    Q:
    What should be done after removing the wheel for the 2015 Cadillac Escalade? Posted by Customer
    A:
    Next, disconnect the stabilizer bar link from the control arm and remove the shock absorber lower mounting fasteners.
    Posted by GMPartsGiant Specialist
    See expert answers on similar Control Arm
    Q:
    How do you disconnect the lower control arm from the steering knuckle for the 2011 Chevrolet Avalanche? Posted by Customer
    A:
    To disconnect the lower control arm from the steering knuckle, follow these steps: Loosen the ball joint nut a few turns. Install a ball joint separator and break the ball joint loose from the knuckle. Remove the nut.
    Posted by GMPartsGiant Specialist
    See expert answers on similar Control Arm
    Q:
    How do you disconnect the upper control arm from the steering knuckle for the 2011 GMC Yukon? Posted by Customer
    A:
    To disconnect the upper control arm from the steering knuckle, follow these steps:Loosen the upper ball joint nut a few turns.Install a puller or ball joint separator.Use the puller or separator to break the ball joint loose from the knuckle.Remove the nut and upper control arm pivot bolts and nuts, noting which way the bolts are installed.
    Posted by GMPartsGiant Specialist
    See expert answers on similar Control Arm
    Q:
    How do you install the new upper control arm for the 2011 GMC Sierra? Posted by Customer
    A:
    To install the new upper control arm, follow these steps:Position the arm in the frame brackets and install the bolts and nuts, but don't tighten them yet.Attach the ball joint to the steering knuckle.Install a new nut on the ball joint and tighten it to the torque specifications.
    Posted by GMPartsGiant Specialist
    See expert answers on similar Control Arm
    Q:
    How do you install the new lower control arm for the 2013 Chevrolet Tahoe? Posted by Customer
    A:
    To install the new lower control arm, follow these steps: Position the arm in the frame brackets and install the bolts and nuts, but don't tighten them yet. Attach the ball joint to the steering knuckle. Install a new nut on the ball joint and tighten it to the torque specifications.
    Posted by GMPartsGiant Specialist
    See expert answers on similar Control Arm
    If you have any questions about this product, please don't hesitate to ask us. We will be happy to help you!

Genuine GM Part 25812725, the Right Choice

To ensure reliability, purchase GM part # 25812725 Front Upper Control Arm Assembly. It is sometimes referred to as Cadillac Control Arm. Directly from GM, genuine parts are superb with regards to quality, longevity, and fit. Every single part passed stringent quality testing, so you can be sure that it's safe, durable, and built to perform like your original parts. This part fits specific Cadillac Escalade models.

GMPartsGiant.com is a leading supplier of genuine GM parts and accessories such as GM 25812725 Front Upper Control Arm Assembly. You're certainly in the right place if you're searching for the great cost-effective OEM GM parts. Look no further than our vast inventory of genuine GM parts offered at unbeatable online prices, all of which are backed by the manufacturer's warranty. Not to forget, our hassle-free return policy and quick delivery service ensure a smooth shopping experience for you. For detailed Cadillac parts information, click here.

Why choose GM Parts Giant

  • Dedicated Service

    Your complete satisfaction is our #1 goal

  • Lowest Prices

    Best deals on genuine OE parts from dealerships

  • Fast Delivery

    Orders are processed and delivered promptly