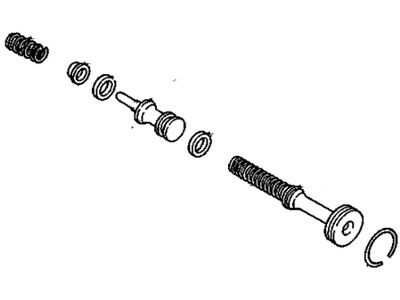
Make sure this part fits your vehicle

Cadillac 18007935 Repair Kit, Brake Mast Cyl

1982-1993 Cadillac

GM 18007935 Repair Kit, Brake Mast Cyl
  • Part Description
    CYLINDER KIT, Brake Master Cylinder
  • Manufacturer
    General Motors
  • Manufacturer's Notes
    This part is discontinued.
Customer Questions & Answers
  • Product Specifications

    BrandGenuine Cadillac
    Manufacturer Part Number18007935
    Part DescriptionCYLINDER KIT, Brake Master Cylinder
    Other NamesMaster Cylinder Repair Kit, Overhaul Kit
    Item Dimensions5.5 x 1.9 x 1.8 inches
    Item Weight0.50 Pounds
    ConditionNew
    Fitment TypeDirect Replacement
    ManufacturerGeneral Motors
    SKU18007935
    WarrantyThis genuine GM part is guaranteed by GM's factory warranty.
    Shipping & ReturnShipping Policy Return Policy
    Warning: California’s Proposition 65
  • Vehicle Fitment

    Year Make Model Engine Important vehicle option details
    1991-1992 Cadillac Brougham8 Cyl 5.0L, 8 Cyl 5.7LBROUGHAM 4 DOOR
    1982-1984 Cadillac Commercial Chassis8 Cyl 6.0LCOMMERCIAL CHASSIS
    1982-1985 Cadillac Deville6 Cyl 4.1L, 6 Cyl 4.3L Diesel, 8 Cyl 4.1L, 8 Cyl 5.7L Diesel2 DOOR, 4 DOOR, BROUGHAM 2 DOOR, BROUGHAM 2 DOOR FWD, BROUGHAM 4 DOOR, BROUGHAM 4 DOOR FWD, FORMAL LIMOUSINE, FUNERAL COACH, LIMOUSINE, LIMOUSINE 4 DOOR, LIMOUSINE 4 DOOR CTR PART
    1982-1984 Cadillac Eldorado6 Cyl 4.1L, 8 Cyl 4.1L, 8 Cyl 5.7L DieselBIARRITZ, ELDORADO
    1993, 1982-1985 Cadillac Fleetwood6 Cyl 4.1L, 6 Cyl 4.3L Diesel, 8 Cyl 4.1L, 8 Cyl 5.7L, 8 Cyl 5.7L Diesel, 8 Cyl 6.0L2 DOOR, 4 DOOR, BROUGHAM 2 DOOR, BROUGHAM 2 DOOR FWD, BROUGHAM 4 DOOR, BROUGHAM 4 DOOR FWD, FORMAL LIMOUSINE, FUNERAL COACH, LIMOUSINE, LIMOUSINE 4 DOOR, LIMOUSINE 4 DOOR CTR PART
    1982-1984 Cadillac Seville6 Cyl 4.1L, 8 Cyl 4.1L, 8 Cyl 5.7L DieselSEVILLE

Customer Questions & Answers

Q:
I am wonder if this is complete and correct part for my vehicle. Posted by GMPartsGiant Specialist
A:
You can Select Your Vehicle to check if 18007935 fits your vehicle.
Posted by GMPartsGiant Specialist
Q:
How can you remove the secondary piston, spring, and retainer for the 1985 Buick Century? Posted by Customer
A:
Use compressed air to force out the secondary piston, spring, and retainer.
Posted by GMPartsGiant Specialist
See expert answers on similar Brake Master Cylinder
Q:
Where is the brake master cylinder located for the 1977 Buick Century? Posted by Customer
A:
The brake master cylinder is located under the hood, in the left rear section of the engine compartment.
Posted by GMPartsGiant Specialist
See expert answers on similar Brake Master Cylinder
Q:
How should you proceed with reassembly during overhaul of the 1983 Buick Regal? Posted by Customer
A:
Assemble primary and secondary seals along with the protector. Insert the assembly into the cylinder and seat the spring against the bore.
Posted by GMPartsGiant Specialist
See expert answers on similar Brake Master Cylinder
Q:
What precaution should be taken while handling brake fluid for the 1977 Buick Regal? Posted by Customer
A:
Care should be taken not to spill any brake fluid on painted surfaces, as it can eat paint.
Posted by GMPartsGiant Specialist
See expert answers on similar Brake Master Cylinder
Q:
What are the steps involved in the disassembly of the master cylinder for the 1982 Buick Skylark? Posted by Customer
A:
Remove the brake failure warning switch and the two proportioner valves, noting their respective positions as they are different. Place the master cylinder in a vice with blocks of wood on either side to avoid overstressing the aluminum body. Use an Allen wrench to remove the switch piston plug and extract the switch piston assembly from the bore. Remove the primary piston retaining ring and then the primary and secondary piston assemblies. Also, remove the plastic reservoir and the quick take-up valve retaining ring.
Posted by GMPartsGiant Specialist
See expert answers on similar Brake Master Cylinder
Q:
How do you overhaul and install the master cylinder for the 1993 Chevrolet C1500? Posted by Customer
A:
To overhaul and install the master cylinder, mount it in a padded vise and remove the primary piston lock-ring by depressing the piston and prying the ring out. Then, remove the primary and secondary piston assemblies, as well as the reservoir and grommets. Inspect the cylinder bore for damage, and if found, replace the master cylinder body. Lubricate and press the new reservoir grommets into place, then attach the master cylinder body to the reservoir using a rocking motion.
Posted by GMPartsGiant Specialist
See expert answers on similar Brake Master Cylinder
Q:
What steps are involved in removing the master cylinder for the 1993 Chevrolet K1500? Posted by Customer
A:
Unbolt the isolation/dump valve and RWAL module mounting bracket, then plug the brake line ends to prevent contamination. Remove the two master cylinder mounting nuts and move the bracket aside slightly, taking care not to kink the hydraulic lines. Finally, remove the master cylinder from the vehicle and discard any remaining fluid in the reservoir after removing the reservoir cover and diaphragm.
Posted by GMPartsGiant Specialist
See expert answers on similar Brake Master Cylinder
Q:
How to overhaul a master cylinder for Buick Skylark,Oldsmobile Omega and Pontiac Phoenix? Posted by Customer
A:
Before dismantling, it is advisable to purchase a Brake Master Cylinder overhaul kit that includes all the necessary replacement parts, particularly the rubber seals, to ensure proper fluid control within the Brake Master Cylinder. During the rebuild procedure, be cautious not to allow grease or mineral-based solvents to contact the rubber parts. To protect painted surfaces from brake fluid spills, cover the front fender and cowling area of the car. Start by disconnecting the electrical lead from the brake failure warning switch and then disconnect the brake line connections, using rags or newspapers to soak up the fluid that will drain out. For manual brake setups, disconnect the Brake Master Cylinder pushrod from the brake pedal inside the car. Remove the two Brake Master Cylinder mounting nuts, take out the Brake Master Cylinder from the car, and drain any remaining fluid. Remove the brake failure warning switch and the two proportioner valves, noting their respective positions as they are different. For further disassembly, it is helpful to place the Brake Master Cylinder in a vice with blocks of wood on either side to avoid overstressing the aluminum body. Use an Allen wrench to remove the switch piston plug and extract the switch piston assembly from the bore. Next, remove the primary piston retaining ring and then the primary and secondary piston assemblies. Also, remove the plastic reservoir and the quick take-up valve retaining ring, and clean all parts in denatured alcohol, avoiding gasoline or mineral-based solvents that could damage the rubber seals. Inspect the cylinder bore for any imperfections and use crocus cloth if needed, rinsing the bore with clean brake fluid afterward. Replace the old seals with new ones, lubricate the bore with brake fluid, and reassemble the primary piston assembly. Similarly, disassemble and install new 0-rings and retainers for the switch piston assembly before putting it back into the cylinder. Install new 0-rings on the proportioner valves and the failure warning switch, and insert the quick take-up valve into the cylinder body with its retaining ring. Press new reservoir grommets into the cylinder body, place the reservoir top down on a flat surface, and press the cylinder body onto it with a rocking motion. Install the cylinder on its mounting studs and reconnect the Brake Master Cylinder pushrod (for manual brake setups) and the brake line connections, torquing them to specs. Reconnect the electrical lead to the failure warning switch. Fill the Brake Master Cylinder reservoir with brake fluid and bleed the brake system. Finally, install the reservoir diaphragm and cover, and test drive the car while checking for proper braking performance and leaks.
Posted by GMPartsGiant Specialist
Q:
Why is it advisable to purchase a master cylinder overhaul kit before dismantling the master cylinder for the 1983 Oldsmobile Omega? Posted by Customer
A:
Purchasing a master cylinder overhaul kit is important as it includes all the necessary replacement parts, particularly the rubber seals, to ensure proper fluid control within the master cylinder during the rebuild procedure.
Posted by GMPartsGiant Specialist
See expert answers on similar Brake Master Cylinder
If you have any questions about this product, please don't hesitate to ask us. We will be happy to help you!

Genuine GM Part 18007935, the Right Choice

Your vehicle deserves only genuine OEM GM parts and accessories. To ensure reliability, purchase GM part # 18007935 Repair Kit, Brake Mast Cyl. It is sometimes referred to as Cadillac Brake Master Cylinder. Our GM parts and accessories are expedited directly from authorized GM dealers strategically located all across the U.S. and are backed by the manufacturer's 12 month, 12,000 mile warranty. OEM GM parts are the best for restoring your vehicle to factory condition performance. This part fits specific Cadillac Brougham, Deville, Fleetwood models.

Affordable, reliable and built to last, GM part # 18007935 Repair Kit, Brake Mast Cyl stands out as the smart option. GMPartsGiant.com is your prime online source with the biggest and best selection of genuine GM parts and accessories at giant discounted prices. We have the OEM GM parts and accessories you need at the wholesale prices. GMPartsGiant.com has you covered no matter what type of GM vehicle you drive. For detailed Cadillac parts information, click here.

Why choose GM Parts Giant

  • Dedicated Service

    Your complete satisfaction is our #1 goal

  • Lowest Prices

    Best deals on genuine OE parts from dealerships

  • Fast Delivery

    Orders are processed and delivered promptly