Make sure this part fits your vehicle

GM 17122490 Lifter,Valve

1986-2014 GM

GM 17122490 Lifter,Valve
  • Part Description
    LIFTER, Engine Valve Lifter
  • Replaces
    5234670, 05234670
  • Manufacturer
    General Motors
Customer Questions & Answers
$35.62 MSRP: $58.94
You Save: $23.32 (40%)
1
ADD TO CART
Ships in 1-2 Business Days
  • Product Specifications

    BrandGenuine GM
    Manufacturer Part Number17122490
    Part DescriptionLIFTER, Engine Valve Lifter
    Other NamesValve Lifters
    Item Dimensions8.8 x 3.1 x 1.1 inches
    Item Weight2.20 Pounds
    ConditionNew
    Fitment TypeDirect Replacement
    Replaces5234670, 05234670
    ManufacturerGeneral Motors
    SKU17122490
    WarrantyThis genuine GM part is guaranteed by GM's factory warranty.
    Shipping & ReturnShipping Policy Return Policy
    Warning: California’s Proposition 65
  • Vehicle Fitment

    Year Make Model Engine Important vehicle option details
    2005-2009 Buick Allure6 Cyl 3.8L, 8 Cyl 5.3LCX (US)/ALLURE CX (CAN), CX 4 DOOR, CXL 4 DOOR, CXL(US)/ALLURE CXL(CAN), CXS 4 DOOR, CXS(US)/Allure CXS(CAN), SUPER SERIES 4 DOOR
    1986-1993 Buick Century6 Cyl 3.3LCUSTOM 2 DOOR, CUSTOM 4 DOOR, CUSTOM STATION WAGON, LIMITED 2 DOOR, LIMITED 4 DOOR, SPECIAL 4 DOOR, SPECIAL STATION WAGON
    1986-1990 Buick Electra6 Cyl 3.8L2 DOOR, 4 DOOR, COUPE 2 DOOR, LIMITED 2 DOOR, LIMITED 4 DOOR, SEDAN 4 DOOR, T-TYPE COUPE 2 DOOR, T-TYPE SEDAN 4 DOOR, ULTRA SEDAN 4 DOOR
    2005-2009 Buick LaCrosse6 Cyl 3.8L, 8 Cyl 5.3LCX (US)/ALLURE CX (CAN), CX 4 DOOR, CXL 4 DOOR, CXL(US)/ALLURE CXL(CAN), CXS 4 DOOR, CXS(US)/Allure CXS(CAN), SUPER SERIES 4 DOOR
    1998-2005, 1988-1995, 1986 Buick Lesabre6 Cyl 3.8L2 DOOR, CUSTOM, CUSTOM 2 DOOR, CUSTOM 4 DOOR, LIMITED, LIMITED 2 DOOR, LIMITED 4 DOOR
    2006-2008 Buick Lucerne6 Cyl 3.8LCX 4 DOOR, CXL, CXL 4 DOOR, CXS
    1998-2005, 1991-1995 Buick Park Avenue6 Cyl 3.8LPARK AVENUE, ULTRA
    2005-2007 Buick Rainier8 Cyl 5.3L4 DOOR
    1988-1991 Buick Reatta6 Cyl 3.8L2 DOOR, CONVERTIBLE, REATTA, RIVIERA, T TYPE
    1998-2004, 1990-1995 Buick Regal6 Cyl 3.8L2 DOOR, 4 DOOR, CUSTOM, CUSTOM 2 DOOR, CUSTOM 4 DOOR, GRAN SPORT 2 DOOR, GRAN SPORT 4 DOOR, GS, LIMITED, LIMITED 2 DOOR, LIMITED 4 DOOR, LS
    View More

Customer Questions & Answers

Q:
I am wonder if this is complete and correct part for my vehicle. Posted by GMPartsGiant Specialist
A:
You can Select Your Vehicle to check if 17122490 fits your vehicle.
Posted by GMPartsGiant Specialist
Q:
How to keep lifters and pushrods in order during installation for Buick Century and Regal? Posted by Customer
A:
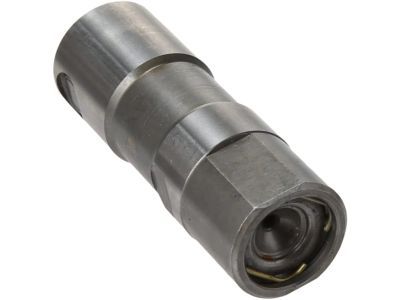
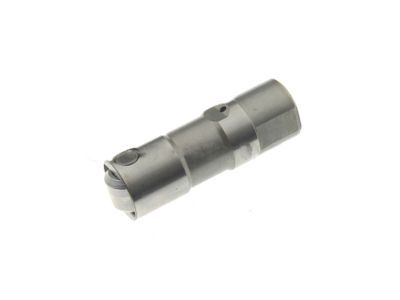
Keep lifters and pushrods in order! This is absolutely necessary for installation, since these parts have differences which could result in engine damage if not installed in their original positions! Remove intake manifold, valve covers, rocker arm assemblies and pushrods. Remove the valve lifter guide retainer bolts, the retainer guides and valve lifters. Disassemble by removing the retainer ring with a small screwdriver, pushrod seat and oil metering valve, plunger and plunger spring, and check valve retainer from plunger, then remove valve and spring. After lifters are disassembled, all parts should be cleaned in clean solvent. A small particle of foreign material under the check valve will cause malfunctioning of the lifter. Close inspection should be made for nicks, burrs or scoring of parts. If either the roller body or plunger is defective, replace with a new lifter assembly. Whenever lifters are removed, check as follows: Roller should rotate freely, but without excessive play. Check for missing or broken needle bearings. Roller should be free of pits or roughness. If present, check camshaft for similar condition. If pits or roughness are evident replace lifter and camshaft. Assemble by coating all lifter parts with a coating of clean kerosene or diesel fuel. Assemble the ball check, spring and retainer into the plunger. Install plunger spring over check retainer. Hold plunger with spring up and insert into lifter body. Hold plunger vertically to prevent cocking spring. Submerge the lifter in clean kerosene or diesel fuel. Install oil metering valve and pushrod seat into lifter and install retaining ring. Prime new lifters by working lifter plunger while submerged in clean kerosene or diesel fuel. Lifter could be damaged when starting engine if dry. When a rocker arm is loosened or removed, valve lifter bleed down is required. Lifters must be bled down as possible valve to piston interference due to the close tolerances could exist. Before installing a new or used lifter in the engine, lubricate the roller and bearings of the lifter with No. 1052365 lubricant or equivalent. Install lifters and pushrods into original position in cylinder block. Install manifold gaskets and manifold. Position rocker arms, pivots and bolts on cylinder head. Install valve covers. Install intake manifold assembly.
Posted by GMPartsGiant Specialist
Q:
How to remove the camshaft and Lash Adjuster on 4.3L V6 engine for Chevrolet Avalanche,Silverado,Suburban,Tahoe,GMC Sierra,Yukon,Yukon Denali and Yukon XL? Posted by Customer
A:
To remove the camshaft, start by removing the intake manifold, rocker arms, pushrods, timing chain, camshaft sprocket, and balance shaft drive gear. Also remove the fan, radiator, and condenser. Store the lash adjusters in a labeled box and remove the lifter retainer. Use a special tool, magnet, or your fingers to extract the lash adjusters from the bores. Remove the camshaft retainer plate and use three 6-inch long, 5/16-18 bolts as a handle to remove the camshaft from the block. During inspection, clean the lash adjuster and camshaft with solvent and check for wear and damage. Measure the journals and cam lobes for wear. If the camshaft and bearings are damaged, they will need to be replaced. For installation, lubricate the camshaft bearing journals and cam lobes with assembly lube and slide the camshaft into the engine. Install the camshaft thrust plate, balance shaft drive gear, timing chain, and sprockets. Lubricate the lash adjusters with clean engine oil and install them in the block. The remainder of installation is the reverse of removal. Finally, refill the cooling system, change the engine oil and filter, start the engine and check for leaks.
Posted by GMPartsGiant Specialist
Q:
How do you remove the camshaft and Lash Adjuster on V8 engine for Chevrolet Avalanche,Silverado,Suburban,Tahoe,GMC Sierra,Yukon,Yukon Denali,Yukon XL? Posted by Customer
A:
To remove the camshaft, start by disconnecting the cable from the negative battery terminal and relieving the fuel system pressure. Then, remove the radiator, auxiliary automatic transmission fluid cooler (if equipped), power steering cooler, air conditioning condenser, valve covers, intake manifold, rocker arms, pushrods, timing chain and sprockets, and cylinder heads. Before removing the lash adjusters, arrange to store them in a clearly labeled box. Remove the lash adjusters and camshaft retainer plate, and use a bolt as a handle to carefully pull out the camshaft. To inspect the camshaft, measure the lobe height and base circle to determine the lobe lift. Compare the results to the specifications and replace the camshaft if necessary. Inspect the camshaft bearing journals for wear and damage, and measure them with a micrometer. Check the camshaft lobes for discoloration, score marks, chipped areas, and uneven wear. Clean and inspect the lash adjusters for damage, wear, and proper function. Install the camshaft by lubricating the bearing journals and lobes with assembly lube, sliding it into the engine, and securing it with the camshaft thrust plate. Install the timing chain and sprockets, camshaft position sensor, and lash adjusters. Finally, refill the cooling system, change the oil, and install a new oil filter before starting and running the engine.
Posted by GMPartsGiant Specialist
Q:
How to remove and install Camshaft and Lash Adjuster on 4.3L V6 engine on Chevrolet Blazer,S10,GMC Jimmy and Sonoma? Posted by Customer
A:
To check Lash Adjuster before removal, start by removing the valve covers and loosening the rocker arm nuts to pivot the rocker arms for access to the pushrods. Mount a dial indicator on the engine, positioning the plunger directly above the first pushrod. Ensure the engine's electrical connectors from the distributor are disconnected. Slowly turn the engine until the pushrod is at its lowest point (base circle of the camshaft lobe), then zero the dial indicator. Rotate the crankshaft in the normal direction until the indicator needle reaches its peak and begins moving in the opposite direction, marking maximum cam lobe lift. Record this measurement and repeat the check for all lobes, comparing the results. If cam lobe lift is 0.003 inches less than specified, cam lobe wear has occurred, necessitating a new camshaft installation. Also, remove the fan shrouds, fan, radiator, and condenser if applicable. Ensure proper labeling and storage of the lifters before removing them, and remove the lifter retainer. Take care not to attempt camshaft withdrawal with the lifters in place. Various methods can be used to extract the lifters from the bores. Afterward, remove the camshaft retainer plate by removing the two Torx bolts, taking note of the correct orientation. Thread three 6-inch long, 5/16-18 bolts into the camshaft sprocket bolt holes for handling when pulling the camshaft straight out, avoiding damage to the bearings. During inspection, visually examine the cam lobes and bearing journals for wear, scoring, pitting, galling, overheating evidence (discoloration), and flaking of the hardened surface. Measure the diameter of each camshaft journal and the lift of each camshaft lobe using a micrometer and compare the measurements with the specifications. If any journal diameter falls below the specified value, replace the camshaft. For camshaft bearing replacement, it's advisable to seek assistance from an automotive machine shop, as it involves specialized tools and expertise. For installation, lubricate the camshaft bearing journals and cam lobes with Lash Adjuster assembly lube, then carefully slide the camshaft into the engine while supporting it near the block to prevent damage to the bearings. Turn the camshaft until the dowel pin is at 3 o'clock and install the camshaft thrust plate, tightening the bolts. Install the balance shaft drive gear, aligning the dowel pin and ensuring proper alignment of the balance shaft timing marks. Proceed to install the timing chain and sprockets. Lubricate the lifters with clean engine oil and install them in the block, making sure to return them to their original locations if reusing the original lifters. If a new camshaft is installed, use new lifters as well. Finally, complete the remaining installation steps in reverse order, and before starting the engine, change the oil and install a new oil filter.
Posted by GMPartsGiant Specialist
Q:
What components need to be removed to take out the camshaft for the 1997 Chevrolet Blazer? Posted by Customer
A:
To remove the camshaft, you need to remove the front cover, timing chain, and sprockets. Unbolt and remove the oil pump drive and the camshaft thrust plate. Carefully pull the camshaft out of the block.
Posted by GMPartsGiant Specialist
See expert answers on similar Lash Adjuster
Q:
How to remove and install Camshaft Bearing,Camshaft and Lash Adjuster for Chevrolet C1500 and K1500? Posted by Customer
A:
To determine the extent of cam lobe wear, check the lobe lift before removing the camshaft. Position the number one piston at TDC on the compression stroke. Loosen the rocker arm nuts and pivot the rocker arms sideways. Mount a dial indicator on the engine and position the plunger against the top of the first pushrod. Zero the dial indicator and slowly turn the crankshaft in the normal direction of rotation until the indicator needle stops and begins to move in the opposite direction. Record this figure and repeat the check for each valve. If the cam lobe lift is less than specified, install a new camshaft. Remove the camshaft and remove the intake manifold, rocker arms, pushrods, timing chain, and camshaft sprocket. Remove the balancer shaft drive and driven gears if applicable. Pull the camshaft out carefully, supporting it near the block. After removing the camshaft, inspect the bearing journals for wear and damage. Measure the bearing journals with a micrometer to check for excessive wear or out-of-round conditions. Check the camshaft lobes for discoloration, score marks, chipped areas, and uneven wear. Clean the lash adjusters and check for scuffing, score marks, and uneven wear. If the lash adjusters are worn or damaged, replace them along with the camshaft. For roller lash adjusters, check the rollers for wear and damage. Lubricate the camshaft bearing journals and lobes with moly-base grease or engine assembly lube. Slide the camshaft into the engine, being careful not to scrape or nick the bearings. Install the balancer shaft drive and driven gears if applicable. Install the timing chain and sprockets. Lubricate the lash adjusters with clean engine oil and install them in the block. Finally, change the oil and install a new oil filter before starting and running the engine.
Posted by GMPartsGiant Specialist
Q:
What are the final steps after camshaft installation for the 1994 Chevrolet K1500? Posted by Customer
A:
After installing the camshaft, install the timing chain and sprockets. Lubricate the lifters with clean engine oil and install them in the block. Finally, change the oil and install a new oil filter before starting and running the engine.
Posted by GMPartsGiant Specialist
See expert answers on similar Lash Adjuster
Q:
What are the steps for installing the camshaft for the 2011 Chevrolet Silverado? Posted by Customer
A:
The steps for installing the camshaft are as follows:1. Lubricate the camshaft bearing journals and cam lobes with assembly lube.2. Slide the camshaft into the engine.3. Install the camshaft thrust plate.4. Install the balance shaft drive gear.5. Install the timing chain and sprockets.6. Lubricate the lifters with clean engine oil.7. Install the lifters in the block.8. Complete the installation in reverse order of removal.
Posted by GMPartsGiant Specialist
See expert answers on similar Lash Adjuster
Q:
What components need to be removed before removing the camshaft for the 2008 Chevrolet Tahoe? Posted by Customer
A:
Before removing the camshaft, the radiator, auxiliary automatic transmission fluid cooler (if equipped), power steering cooler, air conditioning condenser, valve covers, intake manifold, rocker arms, pushrods, timing chain and sprockets, and cylinder heads need to be removed.
Posted by GMPartsGiant Specialist
See expert answers on similar Lash Adjuster
Q:
What are the steps to remove the camshaft for the 2007 Chevrolet Suburban? Posted by Customer
A:
The steps to remove the camshaft are as follows:1. Remove the intake manifold.2. Remove the rocker arms.3. Remove the pushrods.4. Remove the timing chain.5. Remove the camshaft sprocket.6. Remove the balance shaft drive gear.7. Remove the fan, radiator, and condenser.8. Store the lifters in a labeled box.9. Remove the lifter retainer.10. Extract the lifters from the bores using a special tool, magnet, or your fingers.11. Remove the camshaft retainer plate.12. Use three 6-inch long, 5/16-18 bolts as a handle to remove the camshaft from the block.
Posted by GMPartsGiant Specialist
See expert answers on similar Lash Adjuster
Q:
What components should be installed after the camshaft for the 2001 GMC Jimmy? Posted by Customer
A:
After installing the camshaft, you should install the thrust plate and tighten the bolts. Reinstall the oil pump drive.
Posted by GMPartsGiant Specialist
See expert answers on similar Lash Adjuster
Q:
What action should be taken if any camshaft journal diameter falls below the specified value for the 1994 Chevrolet S10? Posted by Customer
A:
If any camshaft journal diameter falls below the specified value, it is necessary to replace the camshaft.
Posted by GMPartsGiant Specialist
See expert answers on similar Lash Adjuster
Q:
How can the camshaft be removed for the 2013 Chevrolet Silverado? Posted by Customer
A:
The camshaft can be removed by removing the lifters and camshaft retainer plate, and using a bolt as a handle to carefully pull it out.
Posted by GMPartsGiant Specialist
See expert answers on similar Lash Adjuster
Q:
How should the lifters be stored before removing them for the 2011 Chevrolet Suburban? Posted by Customer
A:
The lifters should be stored in a clearly labeled box before removing them.
Posted by GMPartsGiant Specialist
See expert answers on similar Lash Adjuster
Q:
How to remove and install the Camshaft and Lash Adjuster on 2.2L four cylinder engine on Chevrolet Blazer,S10,GMC Jimmy and Sonoma? Posted by Customer
A:
To determine the extent of cam lobe wear, check the lobe lift before removing the camshaft. Position the number one piston at TDC on the compression stroke. Remove the valve cover and loosen the rocker arm nuts to access the pushrods. Mount a dial indicator on the engine and position the plunger against the top of the first pushrod. Zero the dial indicator and slowly turn the crankshaft in the normal direction of rotation until the indicator needle stops and moves in the opposite direction, indicating maximum cam lobe lift. Record this figure and repeat the check for each valve. If the cam lobe lift is less than specified, install a new camshaft. To check for a noisy valve lash adjuster, use a mechanics stethoscope or a length of hose near each valve while listening for excessive clearance in the valvetrain. If a lash adjuster is defective, it will be evident from the noise. Removing the lash adjusters requires removing the cylinder head. Remove the lash adjuster guides and extract the lash adjusters using a special removal tool, magnet, or scribe. Clean the lash adjusters and inspect them for scuffing, score marks, and uneven wear. Check the rollers for wear and damage. Replace the lash adjusters if necessary. To remove the camshaft, remove the front cover, timing chain, and sprockets. Unbolt and remove the oil pump drive and the camshaft thrust plate. Carefully pull the camshaft out of the block. Clean and inspect the bearing journals for damage. Measure the bearing journals and camshaft lobes. Check the lobes for discoloration, score marks, chipped areas, pitting, and uneven wear. If the lobes are in good condition and the measurements are as specified, the camshaft can be reused. Lubricate the camshaft bearing journals and lobes with assembly lube and slide the camshaft into the engine. Install the thrust plate and tighten the bolts. Reinstall the oil pump drive. If reusing the lash adjusters, install them in their original bores and coat them with assembly lube. Lubricate the lash adjuster bores with engine oil and install the lash adjusters. Install the lash adjuster guides and reinstalling the cylinder head. Install the pushrods, pushrod guides, rocker arms, and rocker arm retaining nuts. Tighten the rocker arm nuts.
Posted by GMPartsGiant Specialist
Q:
What components of the camshaft should be visually examined during inspection for the 1997 GMC Sonoma? Posted by Customer
A:
During inspection, visually examine the cam lobes and bearing journals for wear, scoring, pitting, galling, overheating evidence (discoloration), and flaking of the hardened surface.
Posted by GMPartsGiant Specialist
See expert answers on similar Lash Adjuster
Q:
What should you do if the cam lobe lift is less than specified for the 1996 GMC Sonoma? Posted by Customer
A:
If the cam lobe lift is less than specified, you should install a new camshaft.
Posted by GMPartsGiant Specialist
See expert answers on similar Lash Adjuster
Q:
What are the steps to remove the camshaft for the 2013 GMC Sierra? Posted by Customer
A:
The steps to remove the camshaft are as follows: 1. Remove the intake manifold. 2. Remove the rocker arms. 3. Remove the pushrods. 4. Remove the timing chain. 5. Remove the camshaft sprocket. 6. Remove the balance shaft drive gear. 7. Remove the fan, radiator, and condenser. 8. Store the lifters in a labeled box. 9. Remove the lifter retainer. 10. Extract the lifters from the bores using a special tool, magnet, or your fingers. 11. Remove the camshaft retainer plate. 12. Use three 6-inch long, 5/16-18 bolts as a handle to remove the camshaft from the block.
Posted by GMPartsGiant Specialist
See expert answers on similar Lash Adjuster
Q:
How can the camshaft be removed for the 2013 GMC Yukon? Posted by Customer
A:
The camshaft can be removed by removing the lifters and camshaft retainer plate, and using a bolt as a handle to carefully pull it out.
Posted by GMPartsGiant Specialist
See expert answers on similar Lash Adjuster
Q:
Are these lifters AC Delco? Posted by Customer
A:
Yes, these are AC Delco
Posted by GMPartsGiant Specialist 5/12/2020
Q:
How many lifters come in 1 order? Posted by Customer
A:
These are sold individually, so only 1 lifter per order
Posted by GMPartsGiant Specialist 4/12/2020
If you have any questions about this product, please don't hesitate to ask us. We will be happy to help you!

Genuine GM Part 17122490, the Right Choice

Your vehicle deserves only genuine OEM GM parts and accessories. To ensure reliability, purchase GM part # 17122490 Lifter,Valve. It is sometimes referred to as GM Lash Adjuster. Our GM parts and accessories are expedited directly from authorized GM dealers strategically located all across the U.S. and are backed by the manufacturer's 12 month, 12,000 mile warranty. OEM GM parts are the best for restoring your vehicle to factory condition performance. This part fits specific Buick Allure, Century, Lesabre models. It fits Cadillac CTS, Escalade. It also fits Chevrolet Camaro, Silverado, Tahoe. This also fits GMC Sierra, Suburban, Yukon.

Affordable, reliable and built to last, GM part # 17122490 Lifter,Valve stands out as the smart option. GMPartsGiant.com is your prime online source with the biggest and best selection of genuine GM parts and accessories at giant discounted prices. We have the OEM GM parts and accessories you need at the wholesale prices. GMPartsGiant.com has you covered no matter what type of GM vehicle you drive. For detailed GMC parts information, click here.

Why choose GM Parts Giant

  • Dedicated Service

    Your complete satisfaction is our #1 goal

  • Lowest Prices

    Best deals on genuine OE parts from dealerships

  • Fast Delivery

    Orders are processed and delivered promptly