Make sure this part fits

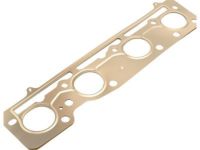
GM 12557767 Engine Exhaust Manifold Assembly

2000-2011 GM

Customer Questions & Expert Answers (3)
GM 12557767 Engine Exhaust Manifold Assembly
  • Part Description
    Manifold Assembly, Exhaust, Rh ; Manifold, Engine Exhaust Manifold
  • Manufacturer
    General Motors
  • Manufacturer's Notes
    This part is discontinued.
Make sure this part fits
  • Related Parts
  • Product Specifications
  • Vehicle Fitment
  • Customer Questions & Expert Answers
  • Product Specifications

    BrandGenuine GM
    Manufacturer Part Number12557767
    Part DescriptionManifold Assembly, Exhaust, Rh ; Manifold, Engine Exhaust Manifold
    Other NamesExhaust Manifold, Manifold
    Item Dimensions15.8 x 8.5 x 6.7 inches
    Item Weight9.00 Pounds
    ConditionNew
    Fitment TypeDirect Replacement
    ManufacturerGeneral Motors
    SKU12557767
    WarrantyThis genuine GM part is guaranteed by GM's factory warranty.
    Shipping & ReturnShipping Policy Return Policy
    Warning: California's Proposition 65
  • Vehicle Fitment

    Year Make Model Engine Important vehicle option details
    2006-2011 Buick Lucerne8 Cyl 4.6LCX 4 DOOR, CXL, CXL 4 DOOR, CXS, V6 CX/CXL 4 DOOR, V8 CXL/SUPER 4 DOOR, V8 SUPER SERIES 4 DOOR
    2006-2011 Cadillac DTS8 Cyl 4.6L4 DOOR, FUNERAL COACH, LIMOUSINE
    2000-2005 Cadillac Deville8 Cyl 4.6LDEVILLE, FUNERAL COACH, HIGH LUXURY, LIMOUSINE, SEVILLE, SLS, STS, TOURING 4 DOOR, TOURING SEDAN
    2000-2004 Cadillac Seville8 Cyl 4.6LDEVILLE, HIGH LUXURY, SEVILLE, SLS, STS, TOURING 4 DOOR
    2001-2003 Oldsmobile Aurora8 Cyl 4.0LAURORA
    2004-2005 Pontiac Bonneville8 Cyl 4.6LGXP 4 DOOR, SE 4 DOOR, SLE 4 DOOR
  • Customer Questions & Expert Answers

    Q:
    I am wonder if this is complete and correct part for my vehicle. Posted by GMPartsGiant Specialist
    A:
    You can Select Your Vehicle to check if 12557767 fits your vehicle.
    Posted by GMPartsGiant Specialist
    Q:
    How to remove and install the front and rear exhaust manifolds in 4.6L V8 engine on Cadillac DTS? Posted by Customer
    A:
    Pull the cable off the negative battery terminal. Lift the car up, then find places to support it with jackstands. Take off the pan that guards against water damage below the car's engine compartment front. Remove the engine cooling fans and the radiator. Take the front oxygen sensor and EGR pipe off the parts connecting the coolant housing with the exhaust housing and exhaust tube. Change the EGR pipe because its crush seal can't be reused after taking it apart. Remove the air tube that runs to the exhaust manifold, take off the air valve and the bracket connected to it. Take off the exhaust crossover pipe from three places: the exhaust manifold, the left side coolant heater (if your car has one), and the oil dipstick tube. Put penetrating oil in and around the front exhaust manifold's connecting fasteners. Allow the oil to soak for a while before removing the manifold from the cylinder head. Unplug the connector that supplies electricity to any rear oxygen sensor into the car's engine. Place jackstands under the vehicle, lift it, and make sure it stays stable. Take out both the exhaust Y-pipe from the catalytic converter and exhaust crossover pipe. caretakerspraying penetrating oil on both the right side coolant heater and the exhaust manifolds that hold them to the cylinder heads. Look for breaks or harm in the manifolds and their attached parts before installation. Scrub the manifolds and cylinder head with a scraper to eliminate coat of old gasket material and carbon buildup. Ask an automotive machine shop to test the manifolds for unevenness, and let them fix them if they need it. Put fresh gaskets onto the screws that connect the cylinder head to the engine. Steadily place the manifolds and put their mounting nuts onto each one by hand. Start your tightening process from the middle of the nut, and twist to the recommended torque. Install the front engine mount and bracket. First put the radiator back, followed by the engine cooling fans, then fill your car's cooling system. Reinsert all parts backward, putting fresh gaskets in between exhaust connections during assembly. Run the engine and check for exhaust leaks. Connect the Y-pipe of the exhaust to the catalytic converter. Put the shaft that connects the steering gear with the steering system in place. Put back all other parts by undoing how you took them out first, replace exhaust gaskets with new ones when linking the pipes together. Reput your cooling fluid, start the car, and make sure there are no exhaust dripping out.
    Posted by GMPartsGiant Specialist
    Q:
    How to remove and install the front and rear exhaust manifolds in 4.6L V8 engine on Cadillac DeVille? Posted by Customer
    A:
    Before critically removing the front exhaust manifold one has to disconnect the cable of the negative terminal from the battery. Lift the car and snugly put jackstands under the car then, Pop the lower splash pan if it is located below the front of the engine compartment, remove the engine cooling fans, the radiator. Before any procedure for the 1999 models, disconnect the air filter housing, left and right torque struts and the front engine mount nuts while there is a support from the floor jacks of the engine/transaxle subframe. The front engine mount brace has to be removed by lifting the engine/transaxle assembly carefully. Soak the exhaust manifold and exhaust flange bolts with penetrating oil and let it to set in, than unscrew the exhaust Y-pipe and separate it from the catalytic converter as well as remove the front oxygen sensor. Take off the rear alternator bracket, and exhaust flange nuts from the exhaust manifold, the exhaust crossover pipe also needs to be unbolted from the exhaust manifold from the cylinder head. For 2000 and later models, also remove the front oxygen sensor and the EGR pipe from the coolant crossover housing and exhaust crossover pipe, and note that the EGR pipe has a crush seal which must be replaced. If equipped, disconnect the left side coolant heater assembly, the oil dipstick tube, then spray the penetrating oil on the front exhaust manifold and un bolt it. Trim the rear exhaust manifold and unplug the connector for the rear oxygen sensor; lift the vehicle and safely support it on jack stands. For 1999 models remove exhaust Y-pipe from the catalytic converter, and suspension position sensor; also remove intermediate shaft of power steering gear and rear transaxle mount. Place the front part of the subframe on blocks, and set up the rear part of the engine/transaxle assembly subframe on a floor jack then unscrew the four subframe bolts to allow the lowering of the unit to reveal the rear exhaust manifold. Place the assembly on a jackstand, disconnect the exhaust Y-pipe from the exhaust manifold and then loosen the bolts joining the exhaust manifold to the cylinder head. Again for the 2000 and later models, you need to also take out the exhaust crossover pipe and the right side coolant heater assembly if there is and then remove the exhaust manifolds by unbolting them from the cylinder head. During installation, the manifolds and the fasteners must be checked for cracks and damages; the surface of the manifolds has to be scraped clean of old gasket material and carbon deposits; the new gaskets should be fitted over the cylinder head studs; and the manifolds properly installed, the mounting nuts to be tightened starting from the inside out to the recommended torque. Replace and bolt in the front engine mount and bracket, the radiator, the engine cooling fans, and fill the cooling system, start the engine and inspect for exhaust leaks. The following is the process of assembling the car; bolt the exhaust Y-pipe to the rear exhaust manifold, the intermediate shaft to the steering gear, others would be the reverse order of how they were removed but replace the gaskets when joining the exhaust pipes, fill the cooling system, start the car and check exhaust manifold gasket.
    Posted by GMPartsGiant Specialist
    If you have any questions about this product, please don't hesitate to ask us. We will be happy to help you!

Genuine GM Part 12557767, the Right Choice

To ensure reliability, purchase GM part # 12557767 Engine Exhaust Manifold Assembly. It is sometimes referred to as GM Exhaust Manifold. Directly from GM, genuine parts are superb with regards to quality, longevity, and fit. Every single part passed stringent quality testing, so you can be sure that it's safe, durable, and built to perform like your original parts. This part fits specific Buick Lucerne models. It fits Cadillac DTS, Deville, Seville. It also fits Oldsmobile Aurora. This also fits Pontiac Bonneville.

GMPartsGiant.com is a leading supplier of genuine GM parts and accessories such as GM 12557767 Engine Exhaust Manifold Assembly. You're certainly in the right place if you're searching for the great cost-effective OEM GM parts. Look no further than our vast inventory of genuine GM parts offered at unbeatable online prices, all of which are backed by the manufacturer's warranty. Not to forget, our hassle-free return policy and quick delivery service ensure a smooth shopping experience for you. For detailed Cadillac parts information, click here.

Why choose GM Parts Giant

  • Dedicated Service

    Your complete satisfaction is our #1 goal

  • Lowest Prices

    Best deals on genuine OE parts from dealerships

  • Fast Delivery

    Orders are processed and delivered promptly