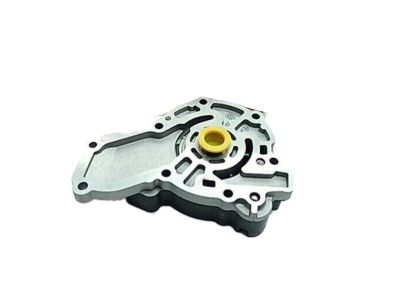
Make sure this part fits

GM 24231142 Pump,Automatic Transmission Fluid

1995-2011 GM

Customer Questions & Expert Answers (14)
GM 24231142 Pump,Automatic Transmission Fluid
  • Part Description
    PUMP, Transmission Oil Pump
  • Manufacturer
    General Motors
  • Manufacturer's Notes
    This part is discontinued.
Make sure this part fits
  • Related Parts
  • Product Specifications
  • Vehicle Fitment
  • Customer Questions & Expert Answers
  • Product Specifications

    BrandGenuine GM
    Manufacturer Part Number24231142
    Part DescriptionPUMP, Transmission Oil Pump
    Item Dimensions7.9 x 7.4 x 3.3 inches
    Item Weight4.70 Pounds
    ConditionNew
    Fitment TypeDirect Replacement
    ManufacturerGeneral Motors
    SKU24231142
    WarrantyThis genuine GM part is guaranteed by GM's factory warranty.
    Shipping & ReturnShipping Policy Return Policy
    Warning: California's Proposition 65
  • Vehicle Fitment

    Year Make Model Engine Important vehicle option details
    1995-2005 Chevrolet Cavalier4 Cyl 2.2L, 4 Cyl 2.2L Flex, 4 Cyl 2.3L, 4 Cyl 2.4L2 DOOR, 4 DOOR, CONVERTIBLE, LS 4 DOOR, LS CONVERTIBLE, Z24 2 DOOR
    2005-2010 Chevrolet Cobalt4 Cyl 2.0L, 4 Cyl 2.2L, 4 Cyl 2.4L2 DOOR, 4 DOOR, LEVEL 4 PERFORMANCE (SS) 2 DOOR, LEVEL 4 PERFORMANCE/SC (SS) 2 DOOR, LEVEL 4 PERFORMANCE/SC (SS) 4 DOOR, LEVEL ONE (LS) 2 DOOR, LEVEL ONE (LS) 4 DOOR, LEVEL THREE (SS) 2 DOOR, LEVEL THREE (SS) 4 DOOR, LEVEL TWO (LT) 2 DOOR, LEVEL TWO (LT) 4 DOOR
    2006-2011 Chevrolet HHR4 Cyl 2.0L, 4 Cyl 2.2L, 4 Cyl 2.2L Flex, 4 Cyl 2.4L5 DOOR HIGH ROOF HATCHBACK, 5 DOOR HIGH ROOF HATCHBACK SS, 5 DOOR HIGH ROOF PANEL, 5 DOOR HIGH ROOF PANEL SS, 5 DOOR UPLEVEL HIGH ROOF HATCHBACK, 5 DOOR UPLEVEL HIGH ROOF PANEL
    1997-2010 Chevrolet Malibu4 Cyl 2.2L, 4 Cyl 2.4L, 6 Cyl 3.1L, 6 Cyl 3.5L, 6 Cyl 3.5L Flex, 6 Cyl 3.6L, 6 Cyl 3.9L4 DOOR, 4 DOOR HATCHBACK, 4 DOOR HYBRID, 4 DOOR NOTCHBACK, BASE 4 DOOR NOTCHBACK, CLASSIC 4 DOOR NOTCHBACK, LS 4 DOOR, LS 4 DOOR HATCHBACK, LS 4 DOOR NOTCHBACK, LT 4 DOOR HATCHBACK, LT 4 DOOR NOTCHBACK, LTZ 4 DOOR HATCHBACK, LTZ 4 DOOR NOTCHBACK, LX 4 DOOR, MAXX SS 4 DOOR HATCHBACK, SS 4 DOOR NOTCHBACK
    1997-1998 Oldsmobile Achieva4 Cyl 2.4L, 6 Cyl 3.1L2 DOOR, 4 DOOR, SC 2 DOOR, SEDAN LEVEL I, SEDAN LEVEL II, SL 4 DOOR
    1999-2004 Oldsmobile Alero4 Cyl 2.2L, 4 Cyl 2.4L, 6 Cyl 3.4L2 DOOR, 4 DOOR, GL COUPE 2 DOOR, GL SEDAN 4 DOOR, GX 2 DOOR, GX SEDAN 4 DOOR, LEVEL I 2 DOOR, LEVEL I 4 DOOR, LEVEL II COUPE 2 DOOR, LEVEL II SEDAN 4 DOOR
    1997-1999 Oldsmobile Cutlass6 Cyl 3.1L2 DOOR, 4 DOOR, SC 2 DOOR, SEDAN LEVEL I, SEDAN LEVEL II, SL 4 DOOR
    2007-2010 Pontiac G54 Cyl 2.2L, 4 Cyl 2.4L2 DOOR, 4 DOOR, GT 2 DOOR, GT 4 DOOR, LS 2 DOOR, LS 4 DOOR, SE 2 DOOR, SE 4 DOOR, SPORT 2 DOOR, SPORT 4 DOOR
    2005-2010 Pontiac G64 Cyl 2.4L, 6 Cyl 3.5L, 6 Cyl 3.5L Flex, 6 Cyl 3.6L, 6 Cyl 3.9LGT 2 DOOR CONVERTIBLE, GT 2 DOOR NOTCHBACK, GT 4 DOOR NOTCHBACK, GTP 2 DOOR CONVERTIBL, GTP 2 DOOR NOTCHBACK, GXP 2 DOOR NOTCHBACK, GXP 4 DOOR NOTCHBACK, SE 4 DOOR NOTCHBACK, SE1 2 DOOR NOTCHBACK, SE1 4 DOOR NOTCHBACK
    1999-2005 Pontiac Grand Am4 Cyl 2.2L, 4 Cyl 2.4L, 6 Cyl 3.4LGT 2 DOOR, GT 2 DOOR COUPE, GT 4 DOOR, GT1 2 DOOR, GT1 2 DOOR COUPE, GT1 4 DOOR, SE 2 DOOR, SE 4 DOOR, SE 4 DOOR SEDAN, SE1 2 DOOR, SE1 4 DOOR
    View More
  • Customer Questions & Expert Answers

    Q:
    I would like to confirm if this is the correct part number for my vehicle. Please advise. Thank you. Posted by GMPartsGiant Specialist
    A:
    You can Select Your Vehicle to check if 24231142 fits your vehicle.
    Posted by GMPartsGiant Specialist
    Q:
    How to replace an oil pump assembly on Chevrolet Cobalt? Posted by Customer
    A:
    Drain the engine oil and remove the drivebelt. Loosen the right-front wheel lug nuts, raise the front of the vehicle and support it securely on jackstands. Remove the right front wheel. Remove the engine front cover. On the front side of the engine cover, remove the four bolts retaining the round gerotor cover from the engine cover. Working on the backside of the engine cover, loosen the oil pump cover screws a little at a time until they're all loose. When all of the screws are loose, remove the cover. Note any identification marks on the rotors and withdraw the rotors from the pump body. If no marks can be seen, use a permanent marker and make your own to ensure that they will be installed correctly. Thoroughly clean and dry the components. Inspect the rotors for obvious wear or damage. If either rotor, the pump body or the cover is scored or damaged, the complete oil pump assembly must be replaced. Also check the inner-to-outer rotor tip clearance, the outer rotor-to-housing clearance, and the rotor-to-cover side clearance. If the oil pump components are in acceptable condition, dip the rotors in clean engine oil and install them into the pump body with any identification marks positioned as noted during disassembly. Remove the oil pressure relief valve components from the front cover. Thoroughly clean and dry the components. Inspect the components for obvious wear or damage. Install them in the correct order. Install the rotors into the housing with the hub of the inner rotor facing the engine front cover. The inner rotor hub must be installed correctly or the engine front cover/gerotor cover will not fasten properly. Install the oil pump cover and screws and tighten by hand until snug. Then tighten the screws gradually and evenly to the torque. Install the oil pressure relief valve components. Install the engine front cover. Fill the engine with fresh engine oil. Install a new oil filter. Start the engine and check for leaks. Run the engine and make sure oil pressure comes up to normal quickly. If it doesn't, stop the engine and find out the cause. Severe engine damage can result from running an engine with insufficient oil pressure!
    Posted by GMPartsGiant Specialist
    Q:
    How to replace an oil pump assembly on Chevrolet HHR? Posted by Customer
    A:
    Drain the engine oil and remove the drivebelt. Loosen the right-front wheel lug nuts, raise the front of the vehicle and support it securely on jackstands. Remove the right front wheel. Remove the engine front cover. On the front side of the engine cover, remove the four bolts retaining the round gerotor cover from the engine cover. Working on the backside of the engine cover, loosen the oil pump cover screws a little at a time until they're all loose. When all of the screws are loose, remove the cover. Note any identification marks on the rotors and withdraw the rotors from the pump body. If no marks can be seen, use a permanent marker and make your own to ensure that they will be installed correctly. Thoroughly clean and dry the components. Inspect the rotors for obvious wear or damage. If either rotor, the pump body or the cover is scored or damaged, the complete oil pump assembly must be replaced. Also check the inner-to-outer rotor tip clearance, the outer rotor-to-housing clearance, and the rotor-to-cover side clearance. If the oil pump components are in acceptable condition, dip the rotors in clean engine oil and install them into the pump body with any identification marks positioned as noted during disassembly. Remove the oil pressure relief valve components from the front cover. Thoroughly clean and dry the components. Inspect the components for obvious wear or damage. Install them in the correct order. Install the rotors into the housing with the hub of the inner rotor facing the engine front cover. The inner rotor hub must be installed correctly or the engine front cover/gerotor cover will not fasten properly. Install the oil pump cover and screws and tighten by hand until snug. Then tighten the screws gradually and evenly to the torque. Install the oil pressure relief valve components. Install the engine front cover. Fill the engine with fresh engine oil. Install a new oil filter. Start the engine and check for leaks. Run the engine and make sure oil pressure comes up to normal quickly. If it doesn't, stop the engine and find out the cause. Severe engine damage can result from running an engine with insufficient oil pressure!
    Posted by GMPartsGiant Specialist
    Q:
    How to replace an oil pump assembly on Saturn ION? Posted by Customer
    A:
    Drain the engine oil and remove the drivebelt. Loosen the right-front wheel lug nuts, raise the front of the vehicle and support it securely on jackstands. Remove the right front wheel. Remove the engine front cover. On the front side of the engine cover, remove the four bolts retaining the round gerotor cover from the engine cover. Working on the backside of the engine cover, loosen the oil pump cover screws a little at a time until they're all loose. When all of the screws are loose, remove the cover. Note any identification marks on the rotors and withdraw the rotors from the pump body. If no marks can be seen, use a permanent marker and make your own to ensure that they will be installed correctly. Thoroughly clean and dry the components. Inspect the rotors for obvious wear or damage. If either rotor, the pump body or the cover is scored or damaged, the complete oil pump assembly must be replaced. Also check the inner-to-outer rotor tip clearance, the outer rotor-to-housing clearance, and the rotor-to-cover side clearance. If the oil pump components are in acceptable condition, dip the rotors in clean engine oil and install them into the pump body with any identification marks positioned as noted during disassembly. Remove the oil pressure relief valve components from the front cover. Thoroughly clean and dry the components. Inspect the components for obvious wear or damage. Install them in the correct order. Install the rotors into the housing with the hub of the inner rotor facing the engine front cover. The inner rotor hub must be installed correctly or the engine front cover/gerotor cover will not fasten properly. Install the oil pump cover and screws and tighten by hand until snug. Then tighten the screws gradually and evenly to the torque. Install the oil pressure relief valve components. Install the engine front cover. Fill the engine with fresh engine oil. Install a new oil filter. Start the engine and check for leaks. Run the engine and make sure oil pressure comes up to normal quickly. If it doesn't, stop the engine and find out the cause. Severe engine damage can result from running an engine with insufficient oil pressure!
    Posted by GMPartsGiant Specialist
    Q:
    How to disconnect the cable from the negative terminal of the battery and perform an oil pump replacement in 3.0L V6 engine on Saturn Vue? Posted by Customer
    A:
    Disconnect the cable from the negative terminal of the battery. Raise the front of the vehicle and support it securely on jackstands. Drain the engine oil. Remove the drivebelt, timing belt cover, and timing belt. Remove the rear timing belt cover. Take out the air conditioning compressor and idler pulley bracket bolts, tying the assembly out of the way without disconnecting the refrigerant lines. Unbolt the alternator and move it aside, supporting it with wire or rope. Remove the oil pump suction tube and discard the O-ring, which will need replacement. Remove the crankshaft sprocket and the three oil pan-to-oil pump bolts. Then, remove the main oil pump mounting bolts and separate the pump from the engine block. On the rear of the oil pump, loosen the oil pump cover screws gradually and remove the cover. Note any identification marks on the rotors and withdraw them from the pump body, ensuring the rotor marks face the same direction for reassembly. Clean and dry the components thoroughly, inspecting the rotors for wear or damage; if any part is scored or damaged, replace the entire oil pump assembly. If the components are acceptable, dip the rotors in clean engine oil and install them into the pump body with the identification marks positioned correctly, then install the pump cover and tighten the screws securely. Remove the oil pressure relief valve and oil control valve components from the oil pump body for inspection, clean and dry them, and install them in the correct order. Using a seal driver, install a new seal into the bore of the pump and place a new gasket onto the engine block, coating the oil pump side of the gasket with a thin layer of anaerobic sealant while avoiding entry into oil passageways. Prime the oil pump before installation by pouring clean oil into the pick support and turning the pump by hand. Install the oil pump to the engine, applying a non-hardening thread-locking compound to the bolts and tightening them to the specified torque. The remainder of the installation follows the reverse order of removal. Reconnect the battery, install a new oil filter, and fill the crankcase with oil. Start the engine and check for proper oil pressure and leaks.
    Posted by GMPartsGiant Specialist
    Q:
    How to remove and install the oil pump assembly in four cylinder engine on Saturn Vue? Posted by Customer
    A:
    Loosen the right-front wheel lug nuts, raise the front of the vehicle, and support it securely on jackstands before removing the right front wheel. Next, remove the drivebelt and drain the engine oil. Proceed to remove the engine front cover by taking out the four bolts retaining the round gerotor cover from the engine cover. On the rear of the engine cover, loosen the oil pump cover screws gradually until they are all loose, then remove the cover. Note any identification marks on the rotors and withdraw them from the pump body; if no marks are visible, use a permanent marker to create your own for correct installation. Clean and dry the components thoroughly, inspecting the rotors for wear or damage. If any rotor, the pump body, or the cover is scored or damaged, replace the complete oil pump assembly. Check the inner-to-outer rotor tip clearance, the outer rotor-to-housing clearance, and the rotor-to-cover side clearance. If the oil pump components are acceptable, dip the rotors in clean engine oil and install them into the pump body with the identification marks positioned as noted during disassembly. Remove the oil pressure relief valve components from the front cover, clean and dry them, and inspect for wear or damage before installing them in the correct order. Install the rotors into the housing with the hub of the inner rotor facing the engine front cover, ensuring the inner rotor hub is installed correctly for proper fastening of the engine front cover/gerotor cover. Install the oil pump cover and screws, tightening them by hand until snug, then gradually and evenly to the specified torque, followed by the installation of the oil pressure relief valve components. Fill the engine with fresh engine oil and install a new oil filler. Start the engine and check for leaks, ensuring that oil pressure comes up to normal quickly; if it doesn't, stop the engine and investigate the cause to prevent severe engine damage from insufficient oil pressure.
    Posted by GMPartsGiant Specialist
    Q:
    How to remove and install the timing belt and oil pump in 3.5L V6 engine on Saturn Vue? Posted by Customer
    A:
    Here's how to start the removal of the timing belt, The first step is to remove the belt idler pulley, then the oil filter mount assembly the oil pan and at last the oil pickup tube. Next, undoing the bolts frees the oil pump housing from the engine; if required there may be some space prying between the main bearing cap and the pump housing; release the oil transfer tube and the O-rings. For inspection, using Phillips screw driver to unscrew the pump covering screws provided at the rear of the housing, then remove the covering and, using feeler gauges to check the clearances on the outer rotor housing as well as in-between the two rotors. If there is any signs of wear or damage on the corresponding part, replace the pump and measure the rotor clearance by using feeler gauge. Scrape off the old sealant thoroughly on the pump body as well as the engine block; however, be careful not to harm the aluminum. For installation, remove the old crankshaft oil seal and prior to fitting the new one apply enginse oil or multipurpose grease to the seal lip. Coat the pump cavities with petroleum jelly, fix the cover and apply non hardening thread locking compound on the threads and fasten the screw heads in star like fashion. Wipe the gasket surfaces with acetone or lacquer thinner and put in the oil transfer tube with new O-rings. Put a strip of anaerobic sealant on the oil pump flange and also onto each of the threads of the mounting bolts and the parts should be bolted or screwed within 5 minutes after applying the sealant. Slide the pump over the flats provided on the oil pump drive rotor and align the same with the crankshaft flats Afterward tighten the mounting bolts of the pump in a criss-cross fashion. It is advisable to replace the O-ring so fit the oil pick-up tube/screen in place and properly tighten the nuts. Replace the rest parts in reverse order; allow the sealant to cure for 30 minutes; add the oil, and if everything is right start the engine to check oil pressure, leaks and finally the engine oil level.
    Posted by GMPartsGiant Specialist
    Q:
    How should the oil pump gears be maintained for the 1997 Oldsmobile Cutlass? Posted by Customer
    A:
    Clean the gears with an appropriate solution and inspect them for wear or scoring, replacing any unserviceable gears with new ones.
    Posted by GMPartsGiant Specialist
    See expert answers on similar Oil Pump
    Q:
    What should be checked regarding the oil pump screen during installation for the 1997 Oldsmobile Cutlass? Posted by Customer
    A:
    Ensure that the oil pump screen is parallel with the oil pan rails for proper fitting into the oil pan.
    Posted by GMPartsGiant Specialist
    See expert answers on similar Oil Pump
    Q:
    How should the parts be cleaned and inspected for the 1999 Oldsmobile Cutlass? Posted by Customer
    A:
    Clean all parts in solvent and dry them thoroughly, inspecting the body for cracks, wear, or other damage, as well as the gears. Check the drive gear shaft for looseness in the pump body and examine the inside of the pump cover for wear that could allow oil leakage. Inspect the pick-up screen and pipe assembly for any damage.
    Posted by GMPartsGiant Specialist
    See expert answers on similar Oil Pump
    Q:
    What should be done if any components are damaged for the 2009 Pontiac G6? Posted by Customer
    A:
    If any components are scored, scratched, or worn, replace the entire oil pump assembly, as no serviceable parts are currently available.
    Posted by GMPartsGiant Specialist
    See expert answers on similar Oil Pump
    Q:
    What should be done with the components after inspection for the 2006 Pontiac G6? Posted by Customer
    A:
    Clean and dry all components thoroughly, inspecting the rotors for wear or damage; if any component is scored or damaged, the entire oil pump assembly must be replaced.
    Posted by GMPartsGiant Specialist
    See expert answers on similar Oil Pump
    Q:
    What action should be taken if low oil pressure is indicated for the 1997 Oldsmobile Cutlass? Posted by Customer
    A:
    Shut off the engine and inspect all work.
    Posted by GMPartsGiant Specialist
    See expert answers on similar Oil Pump
    Q:
    How do you prime the oil pump for the 2007 Pontiac G6? Posted by Customer
    A:
    Prime the pump by pouring clean engine oil into the pick-up screen while turning the pump driveshaft.
    Posted by GMPartsGiant Specialist
    See expert answers on similar Oil Pump
    If you have any questions about this product, please don't hesitate to ask us. We will be happy to help you!

Genuine GM Part 24231142, the Right Choice

To ensure reliability, purchase GM part # 24231142 Pump,Automatic Transmission Fluid. It is sometimes referred to as GM Oil Pump. Directly from GM, genuine parts are superb with regards to quality, longevity, and fit. Every single part passed stringent quality testing, so you can be sure that it's safe, durable, and built to perform like your original parts. This part fits specific Chevrolet Cavalier, Cobalt, Malibu models. It fits Oldsmobile Achieva, Alero, Cutlass. It also fits Pontiac G5, Grand Am, Pursuit. This also fits Saturn Ion, L300, LW300.

GMPartsGiant.com is a leading supplier of genuine GM parts and accessories such as GM 24231142 Pump,Automatic Transmission Fluid. You're certainly in the right place if you're searching for the great cost-effective OEM GM parts. Look no further than our vast inventory of genuine GM parts offered at unbeatable online prices, all of which are backed by the manufacturer's warranty. Not to forget, our hassle-free return policy and quick delivery service ensure a smooth shopping experience for you. For detailed Chevrolet parts information, click here.

Why choose GM Parts Giant

  • Dedicated Service

    Your complete satisfaction is our #1 goal

  • Lowest Prices

    Best deals on genuine OE parts from dealerships

  • Fast Delivery

    Orders are processed and delivered promptly