Make sure this part fits

Saturn 90537632 Sprocket, Camshaft

2000-2007 Saturn

Customer Questions & Expert Answers (10)
GM 90537632 Sprocket, Camshaft
  • Part Description
    SPROCKET, Engine Camshaft
  • Manufacturer
    General Motors
Make sure this part fits
$28.46 MSRP: $47.09
You Save: $18.63 (40%)
Ships in 1-3 Business Days
1
ADD TO CART
  • Related Parts
  • Product Specifications
  • Vehicle Fitment
  • Customer Questions & Expert Answers
  • Product Specifications

    BrandGenuine Saturn
    Manufacturer Part Number90537632
    Part DescriptionSPROCKET, Engine Camshaft
    Other NamesCamshaft Gear
    Item Dimensions5.3 x 5.4 x 0.4 inches
    Item Weight1.00 Pounds
    ConditionNew
    Fitment TypeDirect Replacement
    ManufacturerGeneral Motors
    SKU90537632
    WarrantyThis genuine GM part is guaranteed by GM's factory warranty.
    Shipping & ReturnShipping Policy Return Policy
    Warning: California's Proposition 65
  • Vehicle Fitment

    Year Make Model Engine Important vehicle option details
    2003-2007 Saturn Ion4 Cyl 2.0L, 4 Cyl 2.2L2 DOOR, 4 DOOR, REDLINE 2 DOOR
    2001-2002 Saturn L1004 Cyl 2.2LL100, L200, L300, LS, LS1, LS2, LW1, LW2, LW200, LW300
    2001-2003 Saturn L2004 Cyl 2.2LL100, L200, L300, LS, LS1, LS2, LW1, LW2, LW200, LW300
    2004 Saturn L3004 Cyl 2.2LL300-1, L300-2, L300-3, LW300-1, LW300-2, LW300-3
    2000 Saturn LS4 Cyl 2.2LLS, LS1, LS2, LW1, LW2
    2000 Saturn LS14 Cyl 2.2LLS, LS1, LS2, LW1, LW2
    2000 Saturn LW14 Cyl 2.2LLS, LS1, LS2, LW1, LW2
    2001-2003 Saturn LW2004 Cyl 2.2LL100, L200, L300, LS, LS1, LS2, LW1, LW2, LW200, LW300
    2002-2007 Saturn Vue4 Cyl 2.2L, 4 Cyl 2.4LAWD, FWD, MANUAL TRANS HYBRID FWD, UPLEVEL AWD, UPLEVEL FWD, UPLEVEL V6 AWD, UPLEVEL V6 FWD
  • Customer Questions & Expert Answers

    Q:
    I am wonder if this is complete and correct part for my vehicle. Posted by GMPartsGiant Specialist
    A:
    You can Select Your Vehicle to check if 90537632 fits your vehicle.
    Posted by GMPartsGiant Specialist
    Q:
    How to remove and install timing chains and Cam Gear on Chevrolet Cobalt? Posted by Customer
    A:
    Special tools (an actuator locking tool and a timing chain retaining tool) are required to hold the timing chains in place and to lock the actuators in position during the procedure. Check with a dealer or auto parts store concerning availability and price of these tools prior to beginning this procedure. Remove the valve cover and paint an index mark on the chain and actuator for reassembly reference. Remove the timing chain guide bolts and guide. Install the actuator locking tool, and, using a 24 mm wrench on the hex of the cam shaft, rotate the camshaft clockwise until the actuator and tool align. Install the retainer bolts. Loosen the actuator bolt and remove the locking tool. Now remove the timing chain tensioner on the side of the actuator you are removing. Install the timing chain retaining tool on the side of the actuator you are removing. Be careful not to allow the actuator to move or rotate as you remove or install it. Remove the actuator retaining bolt, then remove the actuator as you carefully lift the timing chain from the actuator. Installation is the reverse of removal. Use a new actuator retaining bolt during reassembly.
    Posted by GMPartsGiant Specialist
    Q:
    How to remove and inspect the Timing Chain and Variable Timing Sprocket on Chevrolet Cobalt? Posted by Customer
    A:
    If you want to clear and inspect timing system components, start by disconnecting the negative battery terminal and removing the spark plugs, valve cover, oil pan, and drive belt. Remove the drive belt tensioner and engine front cover next before setting the No. 1 piston at TDC by lining up marks on the crankshaft sprocket with intake camshaft sprocket and exhaust camshaft sprocket. Remove timing chain tensioner, upper timing chain guide, adjustable timing chain guide. Then remove bolts on exhaust camshaft sprocket and intake camshaft sprocket discarding them while installing new ones for reassembly. Be careful when removing the timing chain through the top of cylinder head so as to avoid rotation of camshafts or crankshaft. Take out the timing chain drive sprocket and also remove the timing chain oiling nozzle from engine block. Every element should be checked for wear or damages and any that is in doubt replaced. Ensure that the crankshaft sprocket's timing mark is correctly positioned during installation while tightening a new bolt which secures an installation of an intake camshaft sprocket. Place back resetting "INT" end link on bright colored link at intake camshaft sprocket after lowering a timing in its place. A fixed link must be engaged onto crank shaft sprockets' times mark for adjustment chain guide to be mounted as well as a new bolted exhaust camshaft sprocket along with an upper one followed by an upper one too. Finally tighten all bolts according to torque values given for each of them. The suggested steps below are used in compressing a tensioner of a timing chain as it is installed into its place; apply RTV sealant to threads of a plug access to a timber guiding at a time plug access sealing application takes place/insertion is made; reinstall valve cover/engine front cover/ crank case refilled with fresh oil/attach battery/restart engine, check for leaks. The process should be handled by an expert because it can damage the engine in any error. Recheck tasks to ensure that timing marks are properly aligned before starting the engine.
    Posted by GMPartsGiant Specialist
    Q:
    How to remove and install timing chains and Cam Gear on Chevrolet HHR? Posted by Customer
    A:
    Special tools (an actuator locking tool and a timing chain retaining tool) are required to hold the timing chains in place and to lock the actuators in position during the procedure. Check with a dealer or auto parts store concerning availability and price of these tools prior to beginning this procedure. Remove the valve cover and paint an index mark on the chain and actuator for reassembly reference. Remove the timing chain guide bolts and guide. Install the actuator locking tool, and, using a 24 mm wrench on the hex of the cam shaft, rotate the camshaft clockwise until the actuator and tool align. Install the retainer bolts. Loosen the actuator bolt and remove the locking tool. Now remove the timing chain tensioner on the side of the actuator you are removing. Install the timing chain retaining tool on the side of the actuator you are removing. Be careful not to allow the actuator to move or rotate as you remove or install it. Remove the actuator retaining bolt, then remove the actuator as you carefully lift the timing chain from the actuator. Installation is the reverse of removal. Use a new actuator retaining bolt during reassembly.
    Posted by GMPartsGiant Specialist
    Q:
    How to remove and install Timing Belt and Variable Timing Sprocket on V6 engine on Saturn LS? Posted by Customer
    A:
    To start, unplug the cord from the negative terminal of the battery and remove the timing belt cover. Set engine at TDC for cylinder number one, then turn crankshaft counter-clockwise to 60 degrees before TDC, and pull out spark plugs. Now put on crankshaft locking tool on its place and turn in a direction clockwise until it stands against water pump pulley flange. This places engine at TDC number 1. Next, use tools to hold camshaft sprockets in place while also loosening timing belt tensioner, upper timing belt guide pulleys and lower timing belt guide pulleys so that you may release belt tension. Take off timing belt with camshaft sprockets if necessary. Inspect teeth of sprocket, timing belts; check how camshafts play axially in slots; make sure that there is no wear or damage on the Timing Belt Tensioner; and change any defective part. Ensure that we examine water pump too for its condition as well as clean up our working area around Timing Belt thoroughly together with the sprocket's teeth being washed by lacquer thinner. If we had removed them reinstall Timing Belt Sprockets ensuring their keys are still intact; position mark on these sprockets depending upon which side of keyways they are located into install Crank Shaft Locking Tool over there after removing marks from Teeth of these Pulleys (note: each tooth corresponds to some number). Take off Crank Shaft Locking Tool only after checking whether all Timing Marks coincide perfectly or not Remove crankshaft lock tool depending on engine type following either Engines Before 578511 instructions or Engines After 578512 ones For Engines before 578511 mark time belt guide pulleys positions and fit time belt over camshafts gears ,lower guide pulley and crankshaft gear using a wedge to keep everything stationary Install Time Belt around Tensioner , rear camshafts sprockets and below upper timing belt guide pulley; afterwards adjust positions of these pulleys correctly and tighten the Timing Belt properly. Recheck alignment marks, remove crankshaft lock tool and turn engine to make sure that everything is aligned Tighten pulleys and torque tensioner bolt again. Check all alignment marks Install time belt cover and connect battery back up For Engines after 578512 use tools to check camshaft timing marks Install time belt around rear camshafts sprockets/tensioner/upper timing belt guide pulley/front camshafts sprockets using a gauge that fits on them if necessary; As you rotate them, please don't forget to fully tension it Remove crankshaft lock tool , turn engine to verify alignment, recheck crankshaft & camshaft marks Install time belt cover and connect battery back up Remaining installation steps are just removal process in reverse.
    Posted by GMPartsGiant Specialist
    Q:
    How to remove and install a Timing Belt and Variable Timing Sprocket in 3.5L V6 engine on Saturn Vue? Posted by Customer
    A:
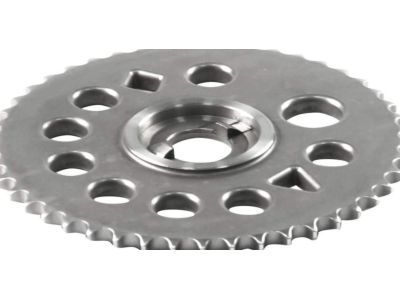
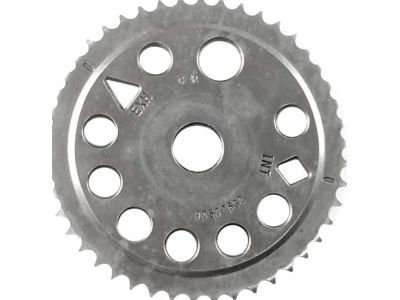
    To remove the timing belt, first disconnect the cable from the negative terminal of the battery. Place the transaxle in Park, apply the parking brake, and block the rear wheels. Remove the drivebelt and the spark plugs to facilitate turning the crankshaft, then position the number one piston at TDC. Loosen the lug nuts on the right front wheel, raise the front of the vehicle, and support it securely on jackstands before removing the right front wheel. Take off the right front inner fender splash shield and the upper timing belt covers, detaching the wiring harness and removing the bolts. If reusing the belt, mark it to indicate the direction of rotation and ensure the timing marks are properly aligned. Wedge a large screwdriver into the driveplate ring gear teeth and have an assistant unscrew the crankshaft pulley bolt. Access to the driveplate may vary between models, and when the crankshaft pulley bolt is loosened, check and align the timing marks again. Remove the lower timing belt tower and slip the timing belt guide plate off the crankshaft sprocket, noting its installation. Obtain a long bolt to hold the timing belt tensioner in position without applying excessive force. Remove the idler pulley bolt and the timing belt, discarding the idler pulley bolt for a new one upon installation. The camshaft sprockets can be removed if damaged or to replace oil seals, and if worn or damaged, the crankshaft sprocket can also be removed. Inspect the sprocket teeth for wear and damage, check the timing belt for cracks or oil residue, and ensure the camshaft has no excessive endplay. Clean the timing belt area and sprocket teeth, then install any removed sprockets with their keys and tighten the bolts. Install the idler pulley with a new bolt but do not tighten it yet. Recheck the timing marks and install the timing belt in a clockwise direction, ensuring the arrow on the belt points in the normal direction of rotation if reusing the original belt. Install the outer timing belt guide over the crankshaft sprocket, tighten the idler pulley bolt, and remove the long bolt holding the tensioner pulley. Turn the crankshaft slowly six revolutions clockwise to seat the belt, then return to TDC and recheck the alignment of the timing marks. Install the lower timing belt cover, crankshaft pulley, and tighten the bolt while ensuring the crankshaft does not turn. Recheck the timing marks, and complete the installation in reverse order of removal. After running the engine, check for coolant or oil leaks, and if the CHECK ENGINE light comes on, have a dealer perform a crankshaft position variation learn procedure. If the tensioner has been removed, compress it in a press until a drill bit or pin can be inserted to hold it in the retracted position, then install the tensioner carefully and tighten the mounting bolts. After completing the timing belt installation, remove the tensioner locating pin.
    Posted by GMPartsGiant Specialist
    Q:
    What are the initial steps for removing and inspecting the timing system components for the 2006 Chevrolet HHR? Posted by Customer
    A:
    The initial steps include disconnecting the negative battery terminal and removing the spark plugs, valve cover, engine oil, and drivebelt.
    Posted by GMPartsGiant Specialist
    See expert answers on similar Variable Timing Sprocket
    Q:
    What should you do after removing the valve cover for the 2006 Saturn ION? Posted by Customer
    A:
    Remove the timing chain guide bolts and guide.
    Posted by GMPartsGiant Specialist
    See expert answers on similar Cam Gear
    Q:
    What caution should be exercised during this procedure for the 2003 Saturn ION? Posted by Customer
    A:
    It's crucial to handle this procedure with expertise, as any errors can result in severe engine damage. Double-check all work and ensure the timing marks are correctly aligned before attempting to start the engine.
    Posted by GMPartsGiant Specialist
    See expert answers on similar Variable Timing Sprocket
    Q:
    What components should be removed after the drivebelt tensioner for the 2000 Saturn LS1? Posted by Customer
    A:
    The engine front cover, valve cover, timing chain tensioner, upper timing chain guide, exhaust camshaft sprocket bolt, adjustable timing chain guide, access bolt, and fixed timing chain guides should be removed.
    Posted by GMPartsGiant Specialist
    See expert answers on similar Variable Timing Sprocket
    If you have any questions about this product, please don't hesitate to ask us. We will be happy to help you!

Genuine GM Part 90537632, the Right Choice

To ensure reliability, purchase GM part # 90537632 Sprocket, Camshaft. It is sometimes referred to as Saturn Cam Gear, Saturn Variable Timing Sprocket. Directly from GM, genuine parts are superb with regards to quality, longevity, and fit. Every single part passed stringent quality testing, so you can be sure that it's safe, durable, and built to perform like your original parts. This part fits specific Saturn L300, LW1, LW200 models.

GMPartsGiant.com is a leading supplier of genuine GM parts and accessories such as GM 90537632 Sprocket, Camshaft. You're certainly in the right place if you're searching for the great cost-effective OEM GM parts. Look no further than our vast inventory of genuine GM parts offered at unbeatable online prices, all of which are backed by the manufacturer's warranty. Not to forget, our hassle-free return policy and quick delivery service ensure a smooth shopping experience for you. For detailed Saturn parts information, click here.

Why choose GM Parts Giant

  • Dedicated Service

    Your complete satisfaction is our #1 goal

  • Lowest Prices

    Best deals on genuine OE parts from dealerships

  • Fast Delivery

    Orders are processed and delivered promptly