Make sure this part fits

GM 12557558 Pan,Oil

1986-2007 GM

Customer Questions & Expert Answers (11)
GM 12557558 Pan,Oil
  • Part Description
    PAN, Engine Oil
  • Replaces
    12528916
  • Manufacturer
    General Motors
Make sure this part fits
$173.03 MSRP: $295.88
You Save: $122.85 (42%)
Ships in 1-3 Business Days
1
ADD TO CART
  • Related Parts
  • Product Specifications
  • Vehicle Fitment
  • Customer Questions & Expert Answers
  • Product Specifications

    BrandGenuine GM
    Manufacturer Part Number12557558
    Part DescriptionPAN, Engine Oil
    Other NamesOil Pan, Oil Pan Gasket
    Item Dimensions24.9 x 11.6 x 9.0 inches
    Item Weight7.50 Pounds
    ConditionNew
    Fitment TypeDirect Replacement
    Replaces12528916
    ManufacturerGeneral Motors
    SKU12557558
    WarrantyThis genuine GM part is guaranteed by GM's factory warranty.
    Shipping & ReturnShipping Policy Return Policy
    Warning: California's Proposition 65
  • Vehicle Fitment

    Year Make Model Engine Important vehicle option details
    1990-1992 Cadillac Brougham8 Cyl 5.0L, 8 Cyl 5.7LBROUGHAM 4 DOOR
    1999-2000 Cadillac Escalade8 Cyl 5.7L1 TON CREW CAB, 1/2 TON, 3/4 TON, 4 DOOR 1/2 TON, CLASSIC 4 DOOR 1/2 TON, CREW CAB 1 TON, EXTENDED CAB 1 TON, EXTENDED CAB 6'6" BOX 1/2 TON, EXTENDED CAB 6'6" BOX 3/4 TON, EXTENDED CAB 8' BOX 3/4 TON, K2500 CREW CAB, K3500 CAB CHASSIS 135.5, K3500 CAB CHASSIS 159.9, REGULAR CAB 1 TON, REGULAR CAB 3/4 TON, YUKON/DENALI/ESCALADE
    1987-1994 Chevrolet Blazer8 Cyl 5.0L, 8 Cyl 5.7L1/2 TON
    1992-1999 Chevrolet C15008 Cyl 5.0L, 8 Cyl 5.7LC1500 EXTENDED CAB LONG BOX, C1500 EXTENDED CAB STANDARD BOX, C1500 REGULAR CAB LONG BOX, C1500 REGULAR CAB STANDARD BOX
    1992-2000 Chevrolet C25008 Cyl 5.0L, 8 Cyl 5.7LC2500 CREW CAB, C2500 EXTENDED CAB LONG BOX, C2500 EXTENDED CAB STANDARD BOX, C2500 REGULAR CAB
    1992-2000 Chevrolet C35008 Cyl 5.7LC3500 CAB CHASSIS 135.5, C3500 CAB CHASSIS 159.9, C3500 CAB CHASSIS 183.5, C3500 CREW CAB LONG WHEELBASE, C3500 CREW CAB SHORT WHEELBASE, C3500 EXTENDED CAB, C3500 REGULAR CAB
    1986-1992 Chevrolet Camaro8 Cyl 5.0L, 8 Cyl 5.7L2 DOOR, RS 2 DOOR, RS CONVERTIBLE
    1989-1991 Chevrolet Caprice8 Cyl 5.0L, 8 Cyl 5.7L4 DOOR, BROUGHAM 4 DOOR, CLASSIC 4 DOOR, CLASSIC STATION WAGON, STATION WAGON
    1996-2002 Chevrolet Express8 Cyl 5.0L, 8 Cyl 5.7L1 TON CARGO EXPRESS, 1 TON COMMERCIAL/RECREATIONAL VEHICLE EXPRESS, 1 TON PASSENGER, 1/2 TON CARGO EXPRESS, 1/2 TON PASSENGER EXPRESS, 3/4 TON CARGO EXPRESS, 3/4 TON PASSENGER EXPRESS
    1992-1995 Chevrolet G108 Cyl 5.0L, 8 Cyl 5.7L1 TON CARGO, 1 TON COMMERCIAL/RECREATIONAL VEHICLE, 1 TON PASSENGER, 1/2 TON CARGO, 1/2 TON PASSENGER, 3/4 TON CARGO, 3/4 TON PASSENGER
    View More
  • Customer Questions & Expert Answers

    Q:
    I am wonder if this is complete and correct part for my vehicle. Posted by GMPartsGiant Specialist
    A:
    You can Select Your Vehicle to check if 12557558 fits your vehicle.
    Posted by GMPartsGiant Specialist
    Q:
    How to remove and install an oil pan on Chevrolet C1500? Posted by Customer
    A:
    Disconnect the negative battery cable to start the removal process, and jack up the vehicle on jackstands so that it is secure. To begin with, drain the engine oil and then remove the oil filter. If applicable, remove bellhousing cover strut rods and front engine mount strut rod brackets to unbolt crossover pipe from exhaust manifolds. In addition, remove engine oil cooler or transmission cooler lines from oil pan when necessary. If clearance needs it take off lower bellhousing cover and starter. For 4-wheel drive vehicles do this by removing the skid plate first, followed by removing front driveshaft; also remove some of the bolts/nuts for front driveaxle. Take out wheel leftwards towards rotating drive axle forward in order to pull out front axle shafts. When you have a big block VS engine which has an oil pressure gauge line on one side of its block; you should disconnect it first before removing distributor cap to avoid breakage then pull back fan shroud as far over fan as possible taking care not to damage radiator fins with cardboard if there is little room. Lift engine about three inches using an engine hoist after removing through-bolts from motor mounts ensuring oil pump pickup isn't damaged, distributor doesn't hit firewall, and fan doesn't hit radiator. Put wood blocks between crossmember & engine block to hold raised position then remove engine hoist thereafter. Positioning all engines in such a way that crankshaft's timining mark on vibration damper is at bottom continue by unfastening pan bolts & reinforcements tilting rear of pan down away from crankshaft throws, oil pump pick-up and front cross-member as well as towards bottom away from them also works well Note: for installation use a scraper tool which eliminates old gasket material and sealant from both pan plus block hence clean sealing surfaces via lacquer thinner or acetone while ensuring clean bolt holes in block are made Check pan flange for distortion especially around bolt holes and if so correct it Remove old rubber seals from rear main bearing cap and timing chain cover, clean grooves, install new seals (except engines with one-piece rubber gaskets), use RTV sealant or gasket adhesive to hold the new seals in place then apply RTV to block-to-seal junctions Apply the same sealant to the oil pan side gaskets when applicable Examine the one-piece rubber gasket, discarding it if it is damaged Use RTV silicone on all four corners of the pan gasket; being careful to go at least an inch in each direction from the corner; attach gasket to oil pan Carefully align pan against block, finger-tighten bolts/nuts (including reinforcement strips as required), and ensure that seals/gaskets haven't shifted before tightening them starting at center of pan & working outwards in spiral pattern in 3 steps ending with specified torque Finally, replace all parts in reverse order but never forget about filling engine with oil before starting it.
    Posted by GMPartsGiant Specialist
    Q:
    How to remove and install an oil pan on Chevrolet K1500? Posted by Customer
    A:
    Disconnect the negative battery cable to start the removal process, and jack up the vehicle on jackstands so that it is secure. To begin with, drain the engine oil and then remove the oil filter. If applicable, remove bellhousing cover strut rods and front engine mount strut rod brackets to unbolt crossover pipe from exhaust manifolds. In addition, remove engine oil cooler or transmission cooler lines from oil pan when necessary. If clearance needs it take off lower bellhousing cover and starter. For 4-wheel drive vehicles do this by removing the skid plate first, followed by removing front driveshaft; also remove some of the bolts/nuts for front driveaxle. Take out wheel leftwards towards rotating drive axle forward in order to pull out front axle shafts. When you have a big block VS engine which has an oil pressure gauge line on one side of its block; you should disconnect it first before removing distributor cap to avoid breakage then pull back fan shroud as far over fan as possible taking care not to damage radiator fins with cardboard if there is little room. Lift engine about three inches using an engine hoist after removing through-bolts from motor mounts ensuring oil pump pickup isn't damaged, distributor doesn't hit firewall, and fan doesn't hit radiator. Put wood blocks between crossmember & engine block to hold raised position then remove engine hoist thereafter. Positioning all engines in such a way that crankshaft's timining mark on vibration damper is at bottom continue by unfastening pan bolts & reinforcements tilting rear of pan down away from crankshaft throws, oil pump pick-up and front cross-member as well as towards bottom away from them also works well Note: for installation use a scraper tool which eliminates old gasket material and sealant from both pan plus block hence clean sealing surfaces via lacquer thinner or acetone while ensuring clean bolt holes in block are made Check pan flange for distortion especially around bolt holes and if so correct it Remove old rubber seals from rear main bearing cap and timing chain cover, clean grooves, install new seals (except engines with one-piece rubber gaskets), use RTV sealant or gasket adhesive to hold the new seals in place then apply RTV to block-to-seal junctions Apply the same sealant to the oil pan side gaskets when applicable Examine the one-piece rubber gasket, discarding it if it is damaged Use RTV silicone on all four corners of the pan gasket; being careful to go at least an inch in each direction from the corner; attach gasket to oil pan Carefully align pan against block, finger-tighten bolts/nuts (including reinforcement strips as required), and ensure that seals/gaskets haven't shifted before tightening them starting at center of pan & working outwards in spiral pattern in 3 steps ending with specified torque Finally, replace all parts in reverse order but never forget about filling engine with oil before starting it.
    Posted by GMPartsGiant Specialist
    Q:
    How to disconnect the cable from the negative battery terminal and remove the oil pan in V8 engine on Pontiac Firebird? Posted by Customer
    A:
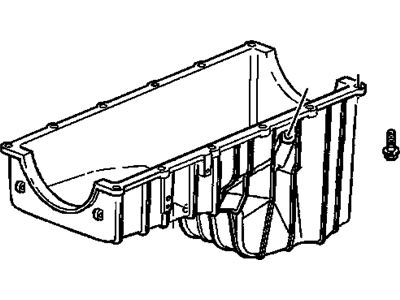
    Disconnect the cable from the negative battery terminal. On carbureted and TBI models, remove the air cleaner assembly, while on TPI models, remove the air intake duct. Remove the distributor cap to prevent damage when the engine is raised. Unbolt and remove the top half of the fan shroud, then raise the vehicle and support it on jack-stands. Drain the engine oil and disconnect the exhaust crossover pipe at the exhaust manifold flanges, lowering the exhaust pipes and suspending them from the frame with wire. If equipped with an automatic transmission, remove the converter shroud; if equipped with a manual transmission, remove the flywheel cover. Remove the starter, then turn the bolt at the center of the vibration damper to rotate the crankshaft until the timing mark is facing down at the 6 o'clock position, moving the forward crankshaft throw to the top for clearance at the front of the oil pan. Remove the throughbolt at each engine mount, then raise the engine slightly to allow the oil pan to clear the crossmember, preferably using an engine hoist with lifting chains. Alternatively, place a floor jack and a block of wood under the oil pan, ensuring the wood block spreads the load to prevent damage. Raise the engine slowly until wood blocks can be placed between the frame front crossmember and the engine block, checking clearances around the engine, especially at the distributor and cooling fan. Lower the engine onto the wood blocks, ensuring it is firmly supported, and if a hoist is used, keep the lifting chains secured. Remove the oil pan bolts, noting the different sizes and their locations, then remove the oil pan. Before reinstalling, ensure the sealing surfaces on the pan, block, and front cover are clean, removing any old gasket material if the original oil pan is being reused. Always use new gaskets and seals when installing the pan, lifting it into position and installing all bolts finger tight, tightening the end bolts first and then the remaining bolts from the center out to the ends. Lower the engine onto the mounts and install the throughbolts, then follow the removal steps in reverse order, filling the crankcase with the correct grade and quantity of oil, starting the engine, and checking for leaks.
    Posted by GMPartsGiant Specialist
    Q:
    How to remove and reinstall an oil pan in four cylinder engine on Pontiac Firebird? Posted by Customer
    A:
    Remove the ground cable from the battery before lifting the car on jack stands and draining the engines oil. Remove the exhaust pipe from the exhaust manifold and then unbolt the hanger bracket, also, unbolt the through bolts on the motor mounts. Having jacked up the car to a safe level, now using an engine hoist lift the engine just enough to take off the oil pan without contact with the steering and suspension assembly and make sure that the car is well supported while it's in this position. It is dangerous not to work below the engine when the vehicle is only standing on the hoist. Then unscrew the oil pan bolts, and pull the oil pan off the block, third, wash the pan with solvent and clean the adjacent sealing surfaces from any of the remains of old gasket and sealant. The rear pan oil seal must fit into the groove of the rear main bearing cap; use a small amount of ATV sealant at the contact point of the seal and the block. Place the front pan oil seal to the timing cover; secure the rubber tips on the front oil pan gasket into the holes provided in the timing gear cover. Applying again a light coat of gasket sealant as a retainer, place the pan side gaskets on the engine block having all four sections of the oil pan gasket in fit and finish and applying ATV type sealant round the parting line of the front seal and side gaskets. For the oil pan to fit into place, bolt the oil pan to the block with the bolts that fix the pan to the timing cover. All the bolts shall be tightened and the tightening sequence shall be crisscross at the same torque across the flanges and Washers, and the torque shall be tightened gradually at least in three or four steps. As for the rest of the steps, they are the inverted of the removal procedure that was depicted above.
    Posted by GMPartsGiant Specialist
    Q:
    What is the process for installing the new oil pan for the 2000 Chevrolet Express? Posted by Customer
    A:
    Attach the new gasket to the pan, install it, and tighten the bolts finger-tight, ensuring proper alignment of the oil gallery passages.
    Posted by GMPartsGiant Specialist
    See expert answers on similar Oil Pan
    Q:
    What should be done regarding the oil pan nut and transmission oil cooler lines for the 2000 Chevrolet Express? Posted by Customer
    A:
    Remove the oil pan nut and the bracket retaining the transmission oil cooler lines.
    Posted by GMPartsGiant Specialist
    See expert answers on similar Oil Pan
    Q:
    What should be done with the oil pan after removing the gasket for the 2007 Chevrolet Silverado? Posted by Customer
    A:
    You should wash out the oil pan with solvent.
    Posted by GMPartsGiant Specialist
    See expert answers on similar Oil Pan
    Q:
    What is the next component to be removed after the transmission bell housing covers for the 2007 GMC Sierra? Posted by Customer
    A:
    You should remove the crossmember.
    Posted by GMPartsGiant Specialist
    See expert answers on similar Oil Pan
    Q:
    What's the first step in the process of removing the oil pan for the 2007 Chevrolet Silverado? Posted by Customer
    A:
    The first step is to disconnect the cable from the negative terminal of the battery.
    Posted by GMPartsGiant Specialist
    See expert answers on similar Oil Pan
    Q:
    How should the exhaust crossover pipe be handled for the 1991 Pontiac Firebird? Posted by Customer
    A:
    Disconnect it at the exhaust manifold flanges, lower the exhaust pipes, and suspend them from the frame with wire.
    Posted by GMPartsGiant Specialist
    See expert answers on similar Oil Pan
    If you have any questions about this product, please don't hesitate to ask us. We will be happy to help you!

Genuine GM Part 12557558, the Right Choice

To ensure reliability, purchase GM part # 12557558 Pan,Oil. It is sometimes referred to as GM Oil Pan. Directly from GM, genuine parts are superb with regards to quality, longevity, and fit. Every single part passed stringent quality testing, so you can be sure that it's safe, durable, and built to perform like your original parts. This part fits specific Cadillac Brougham, Escalade models. It fits Chevrolet Camaro, Silverado, Tahoe. It also fits GMC Sierra, Suburban, Yukon. This also fits Pontiac Firebird.

GMPartsGiant.com is a leading supplier of genuine GM parts and accessories such as GM 12557558 Pan,Oil. You're certainly in the right place if you're searching for the great cost-effective OEM GM parts. Look no further than our vast inventory of genuine GM parts offered at unbeatable online prices, all of which are backed by the manufacturer's warranty. Not to forget, our hassle-free return policy and quick delivery service ensure a smooth shopping experience for you. For detailed GMC parts information, click here.

Why choose GM Parts Giant

  • Dedicated Service

    Your complete satisfaction is our #1 goal

  • Lowest Prices

    Best deals on genuine OE parts from dealerships

  • Fast Delivery

    Orders are processed and delivered promptly