Make sure this part fits

GM 12641015 Pan Assembly, Oil (Rwd)

2010-2012 GM

Customer Questions & Expert Answers (5)
GM 12641015 Pan Assembly, Oil (Rwd)
  • Part Description
    PAN, Engine Oil
  • Replaces
    12636675, 12611900
  • Manufacturer
    General Motors
Make sure this part fits
$210.44 MSRP: $328.16
You Save: $117.72 (36%)
Ships in 1-2 Business Days
1
ADD TO CART
  • Related Parts
  • Product Specifications
  • Vehicle Fitment
  • Customer Questions & Expert Answers
  • Product Specifications

    BrandGenuine GM
    Manufacturer Part Number12641015
    Part DescriptionPAN, Engine Oil
    Other NamesOil Pan
    Item Dimensions19.4 x 13.5 x 9.8 inches
    Item Weight15.70 Pounds
    ConditionNew
    Fitment TypeDirect Replacement
    Replaces12636675, 12611900
    ManufacturerGeneral Motors
    SKU12641015
    Shipping & ReturnShipping Policy Return Policy
    Warning: California's Proposition 65
  • Vehicle Fitment

    Year Make Model Engine Important vehicle option details
    2010-2012 Cadillac CTS6 Cyl 3.0L, 6 Cyl 3.6L2 DOOR COUPE, 4 DOOR, 4 DOOR (RHD), 4 DOOR SEDAN, 4 DOOR SEDAN(RHD), 4 DOOR STATION WAGON, 4 DOOR STATION WAGON(RHD), 4 DOOR WAGON, 4 DOOR WAGON(RHD)
    2010-2012 Chevrolet Camaro6 Cyl 3.6L2 DOOR CONVERTIBLE, 2 DOOR COUPE, LS 2 DOOR COUPE, LT 2 DOOR CONVERTIBLE, LT 2 DOOR COUPE
  • Customer Questions & Expert Answers

    Q:
    I am wonder if this is complete and correct part for my vehicle. Posted by GMPartsGiant Specialist
    A:
    You can Select Your Vehicle to check if 12641015 fits your vehicle.
    Posted by GMPartsGiant Specialist
    Q:
    How to remove and install an oil pan in V6 engine on Chevrolet Camaro? Posted by Customer
    A:
    Lifting the car and taking off the oil pan In order to take off the oil pan, you should first discharge the battery by detaching the cable from it's negative terminal. Then, next, disconnect the plenum, the intake manifold, the valve covers, and the timing chain cover. Depending on the make of the car remove the engine using a suitable engine support fixture and then remove the front subframe. Now remove the right-side engine mount bracket bolts and the bracket, then the long bolts that hold oil pan to the rear main oil seal housing-some model may be nuts on this. Undo all the remaining bolts that hold the oil pan with the timing cover and engine block apart and pry the oil pan off the engine block in areas noted above that will minimize rustled up pieces of metal. If necessary, you can remove the oil level sensor by rotating it counterclockwise until it comes loose from the oil pan, then undo the retaining bolts of the baffle and take it out also, and the oil pickup oil seal needs to be replaced also. Before installation, clean the surfaces on which the oil pan and engine block will be bolted with brake system cleaner, inspect the oil pump pickup for cracks or leakage and make sure that screen is not blocked or damaged. Replace the oil seal on the oil pickup for the pump, re-torque the bolts in the bottom of the oil pan and fit the baffle. Tap two studs of M8 x 1.25 mm bolts and thread for at least 25 mm while the nut head of the bolts are capped and place the threaded studs on the oil pan bolt holes for the alignment. Use a 1/8-inch wide groove of RTV sealant to the mated surface of the oil pan and to the corners of the timing chain cover and rear main seal housing. Place the oil pan and secure the bolts loosely; also, remove the threaded dowel pins and properly tighten the oil pan bolts with a desired torque sequence. Last of all, put the correct kind and amount of oil, taking action and turning on the engine, then inspect for leakage before returning the car to operation.
    Posted by GMPartsGiant Specialist
    Q:
    How to remove and install the oil pan in V8 engine on Chevrolet Camaro? Posted by Customer
    A:
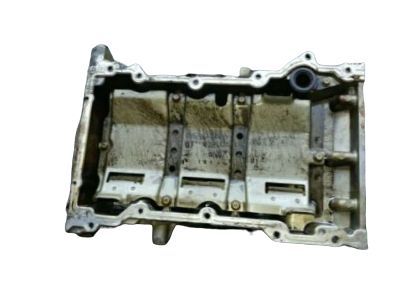
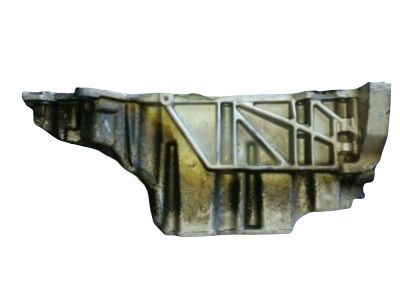
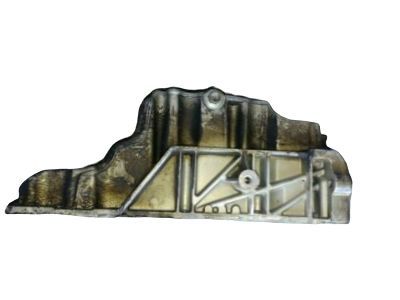
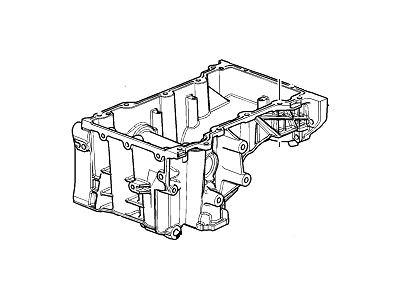
    Before proceeding with the removal of the oil pan, one requires to have the air conditioning system evacuated by a professional then pull the cable of the negative terminal of the battery. Lift the vehicle properly with jackstands remove the engine oil from it and then proceed to remove the oil filter then the air filter housing and air intake resonator. Subsequently, disconnect all the wiring harness brackets which are attached near the oil pan also the brackets which secure the transmission oil cooler lines on the passenger side to be undone; finally pull the electrical connector from the oil level sensor present on the right side of the oil pan. It is not completely necessary, but remove the front exhaust pipes from the engine and the rest of the exhaust system to make the oil pan removal easier. Pull the starter motor and the two hourly plastic housings on each side of the bell housing, besides, disconnect the ac line to the compressor and cover. Place a support handle above the engine so that the engine can be lifted a little in order to carry out the removal of engine mount nuts and the mount which joins the subframe. Nuf that nu subframe, nad complete the removal of the transmission to oil pan bolts. If so fitted, undo the engine oil cooler line and the adaptor from beside the driver's side of the oil pan, and also the access plugs over the nuts at the rear of the oil pan. Last of all, take out all the oil pan bolts and drop away the oil pan from the engine, it might be required to use rubber mallet in order to break the gasket. For installation, and for removal you should also remove the gasket, and flush the oil pan with solvent and clean the oil pan gasket mating surface and the engine block mounting surface. Run a thin RTV sealant up to 0.2 inch wide along the seams of where the front and rear covers meet the engine block, put the new gasket onto the oil pan and install it and at this time tighten the bolts to finger tight while also making sure that the oil gallery passages are properly aligned. Check the fit between the rear wall of oil pan and the front wall of the trans housing, and if clear and interlocking, then slowly tighten the oil pan bolts in a star pattern till you get the torque specified for it. It is recommended to reinstall the subframe, then reverse the removal procedure, replace the oil in the engine, start the car, and assure that there are no leaks driving the car.
    Posted by GMPartsGiant Specialist
    Q:
    What is the proper method for tightening the oil pan-to-engine block bolts for the 2011 Cadillac CTS? Posted by Customer
    A:
    Tighten the oil pan-to-engine block bolts gradually in a criss-cross pattern from the center outwards to the specified torque.
    Posted by GMPartsGiant Specialist
    See expert answers on similar Oil Pan
    Q:
    How is the oil pickup removed for the 2011 Cadillac CTS? Posted by Customer
    A:
    The oil pickup can be removed once the bolts in the bottom of the oil pan are taken out, and the oil pickup oil seal should be discarded.
    Posted by GMPartsGiant Specialist
    See expert answers on similar Oil Pan
    If you have any questions about this product, please don't hesitate to ask us. We will be happy to help you!

Genuine GM Part 12641015, the Right Choice

To ensure reliability, purchase GM part # 12641015 Pan Assembly, Oil (Rwd). It is sometimes referred to as GM Oil Pan. Directly from GM, genuine parts are superb with regards to quality, longevity, and fit. Every single part passed stringent quality testing, so you can be sure that it's safe, durable, and built to perform like your original parts. This part fits specific Cadillac CTS models. It fits Chevrolet Camaro.

GMPartsGiant.com is a leading supplier of genuine GM parts and accessories such as GM 12641015 Pan Assembly, Oil (Rwd). You're certainly in the right place if you're searching for the great cost-effective OEM GM parts. Look no further than our vast inventory of genuine GM parts offered at unbeatable online prices, all of which are backed by the manufacturer's warranty. Not to forget, our hassle-free return policy and quick delivery service ensure a smooth shopping experience for you. For detailed Chevrolet parts information, click here.

Why choose GM Parts Giant

  • Dedicated Service

    Your complete satisfaction is our #1 goal

  • Lowest Prices

    Best deals on genuine OE parts from dealerships

  • Fast Delivery

    Orders are processed and delivered promptly