Make sure this part fits

GMC 90537298 Sprocket,Water Pump

2010-2017 GMC Terrain

Customer Questions & Expert Answers (11)
GM 90537298 Sprocket,Water Pump
  • Part Description
    SPROCKET, Engine Coolant Pump
  • Manufacturer
    General Motors
Make sure this part fits
$38.82 MSRP: $61.03
You Save: $22.21 (37%)
Ships in 1-2 Business Days
1
ADD TO CART
  • Related Parts
  • Product Specifications
  • Vehicle Fitment
  • Customer Questions & Expert Answers
  • Product Specifications

    BrandGenuine GMC
    Manufacturer Part Number90537298
    Part DescriptionSPROCKET, Engine Coolant Pump
    Item Dimensions4.2 x 4.2 x 1.1 inches
    Item Weight0.80 Pounds
    ConditionNew
    Fitment TypeDirect Replacement
    ManufacturerGeneral Motors
    SKU90537298
    WarrantyThis genuine GM part is guaranteed by GM's factory warranty.
    Shipping & ReturnShipping Policy Return Policy
    Warning: California's Proposition 65
  • Vehicle Fitment

    Year Make Model Engine Important vehicle option details
    2010-2017 GMC Terrain4 Cyl 2.4LSLE1 SUV, SLE2 SUV, SLT SUV
  • Customer Questions & Expert Answers

    Q:
    I am wonder if this is complete and correct part for my vehicle. Posted by GMPartsGiant Specialist
    A:
    You can Select Your Vehicle to check if 90537298 fits your vehicle.
    Posted by GMPartsGiant Specialist
    Q:
    How to replace the Timing Chain and Variable Timing Sprocket, and what precautions should be taken to avoid engine damage in four cylinder engine on Chevrolet Malibu? Posted by Customer
    A:
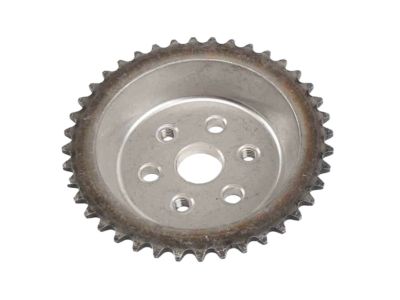
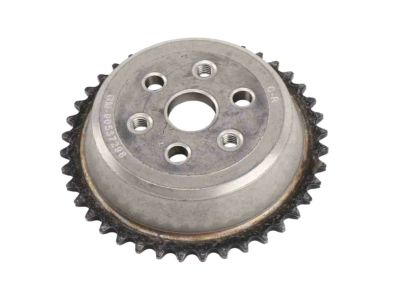
    The time-keeping system is very much intricate and any wrong doing to the system is very likely to cause a very severe harm to the engine. People who have little experience in the matter certainly should not attempt this procedure; if there is any doubt about one's ability, one should seek the advice of a specialist. Recheck all work to be carried out before starting the engine. This is quite a complicated process and for that, should read through all the instructions and gather all the requisite tools and components for the process such as new camshaft sprocket bolts. Starting with decreasing the fuel pressure, the removal of spark plugs, setting the engine to a TDC, the removal of the negative cable to the battery, the removal or the valve cover, the draining of the engine oil, and the final removal of the drive belt together with the timing chain cover. Subsequently, take out the upper timing chain guide bolts and guide and then compress the tensioner, finally, take out the tensioner and gasket. Further, the rear and front timing chain guides, the timing chain fixed on crankshaft and camshaft sprockets, and timing chain tensioner are to be eradicated. Disconnect the timing chain oil nozzle by unscrewing it with an Allen wrench; slide off the camshaft sprocket(s) also and dispose the old bolt. For 1.5L engines, it is necessary to remove the upper oil pan and oil pump, turn the oil pump drive chain tensioner away from the chain and lock it in the retracted position and then, remove the tensioner. Relieve the oil pump chain from the sprockets and wash all the parts with solvent which should then be checked for signs of wear or damage, should there be any replace them. Prior to engaging the engine crank the crankshaft should be manually rotated several times, preferably two at least and it should be felt that there is some load on the shaft. For the 1.5L engines, position the oil pump drive chain over the crankshaft sprocket, then install oil pump along with the tensioner and properly adjust the position of the spring of the tensioner and tightly fix the tensioner bolt. Let go of the retaining tool then fit in the upper oil pan. On the timing chain, fit the oil nozzle as well as the camshaft positions should also be checked before the fitting of the camshaft sprockets and tightening of new bolts. Grasp the camshaft with a wrench and tighten the nut for the actuator sprocket; place the crankshaft sprocket on the crankshaft so that the keyway will fit into place. Position the timing chain of the car over the crankshaft sprocket and over the camshaft sprockets so that the timing marks matched and then add the timing chain guides and the tensioner and fasten all the bolts to the correct measurement of torque. Check that the colored links of the timing chain coincide, install the timing chain cover and the valve cover and complete the assembly the other way round. Last but not the least inspect the exhaust system then replace the oil filter, add oil to the crankcase, connect the battery, add thermostat and coolant to the cooling system then start the engine to check the engine for leaks.
    Posted by GMPartsGiant Specialist
    Q:
    How to remove and inspect the Timing Chain and Variable Timing Sprocket on Chevrolet HHR? Posted by Customer
    A:
    If you want to clear and inspect timing system components, start by disconnecting the negative battery terminal and removing the spark plugs, valve cover, oil pan, and drive belt. Remove the drive belt tensioner and engine front cover next before setting the No. 1 piston at TDC by lining up marks on the crankshaft sprocket with intake camshaft sprocket and exhaust camshaft sprocket. Remove timing chain tensioner, upper timing chain guide, adjustable timing chain guide. Then remove bolts on exhaust camshaft sprocket and intake camshaft sprocket discarding them while installing new ones for reassembly. Be careful when removing the timing chain through the top of cylinder head so as to avoid rotation of camshafts or crankshaft. Take out the timing chain drive sprocket and also remove the timing chain oiling nozzle from engine block. Every element should be checked for wear or damages and any that is in doubt replaced. Ensure that the crankshaft sprocket's timing mark is correctly positioned during installation while tightening a new bolt which secures an installation of an intake camshaft sprocket. Place back resetting "INT" end link on bright colored link at intake camshaft sprocket after lowering a timing in its place. A fixed link must be engaged onto crank shaft sprockets' times mark for adjustment chain guide to be mounted as well as a new bolted exhaust camshaft sprocket along with an upper one followed by an upper one too. Finally tighten all bolts according to torque values given for each of them. The suggested steps below are used in compressing a tensioner of a timing chain as it is installed into its place; apply RTV sealant to threads of a plug access to a timber guiding at a time plug access sealing application takes place/insertion is made; reinstall valve cover/engine front cover/ crank case refilled with fresh oil/attach battery/restart engine, check for leaks. The process should be handled by an expert because it can damage the engine in any error. Recheck tasks to ensure that timing marks are properly aligned before starting the engine.
    Posted by GMPartsGiant Specialist
    Q:
    How to remove and replace the Timing Chain and Variable Timing Sprocket in four cylinder engine on Saturn LS1? Posted by Customer
    A:
    Unplug the cable from the negative battery terminal and facing TDC for number one cylinder, drain the engine oil. Remove drivebelt. Remove of drivebelt tensioner from front cover. Remove the engine front cover. Remove valve cover. Remove timing chain tensioner. Take off upper timing chain guide. Remove exhaust camshaft sprocket bolt. Undo adjustable timing chain guide's access bolt and remove fixed timing chain guide upper mounting bolt at the same time unscrew fixed timing chain guide upper mounting bolt through access hole with screwdriver located on lower camchain housing.Remove intake camshaft sprocket boltly unscrew it out through top of head;timing retainer about head.Invert cylinder block and slide out loose link.Install on camshaft exhaust camshaft sprocket screwing three bolts with specified torque.Install lower timing chain guide.Screw in intake camshaft sprocket for fixing purpose only.Instal uppr fixe timin hain gui desiged t supot upp cha.A wrench should be put on the intake camshaft hex and then tighten intake camshaft bolt.A wrench, placed onto exhaust cahmshat hex will help to tightenthe exhauscshat bo.Istall thathian tnserfosiic over91ding thrugh aperuare.Depending on application, this may be required.Install cylinder heads torquing each head bolts gradually in four steps.Apply small amount of RTV sealant to threads before replacing valve cover.Replace engine plastic covers.Reattach battery terminal wires and check for any leaks.
    Posted by GMPartsGiant Specialist
    Q:
    How to remove and inspect the Timing Chain and Variable Timing Sprocket on Saturn ION? Posted by Customer
    A:
    If you want to clear and inspect timing system components, start by disconnecting the negative battery terminal and removing the spark plugs, valve cover, oil pan, and drive belt. Remove the drive belt tensioner and engine front cover next before setting the No. 1 piston at TDC by lining up marks on the crankshaft sprocket with intake camshaft sprocket and exhaust camshaft sprocket. Remove timing chain tensioner, upper timing chain guide, adjustable timing chain guide. Then remove bolts on exhaust camshaft sprocket and intake camshaft sprocket discarding them while installing new ones for reassembly. Be careful when removing the timing chain through the top of cylinder head so as to avoid rotation of camshafts or crankshaft. Take out the timing chain drive sprocket and also remove the timing chain oiling nozzle from engine block. Every element should be checked for wear or damages and any that is in doubt replaced. Ensure that the crankshaft sprocket's timing mark is correctly positioned during installation while tightening a new bolt which secures an installation of an intake camshaft sprocket. Place back resetting "INT" end link on bright colored link at intake camshaft sprocket after lowering a timing in its place. A fixed link must be engaged onto crank shaft sprockets' times mark for adjustment chain guide to be mounted as well as a new bolted exhaust camshaft sprocket along with an upper one followed by an upper one too. Finally tighten all bolts according to torque values given for each of them. The suggested steps below are used in compressing a tensioner of a timing chain as it is installed into its place; apply RTV sealant to threads of a plug access to a timber guiding at a time plug access sealing application takes place/insertion is made; reinstall valve cover/engine front cover/ crank case refilled with fresh oil/attach battery/restart engine, check for leaks. The process should be handled by an expert because it can damage the engine in any error. Recheck tasks to ensure that timing marks are properly aligned before starting the engine.
    Posted by GMPartsGiant Specialist
    Q:
    What caution should be exercised during this procedure for the 2007 Chevrolet Cobalt? Posted by Customer
    A:
    It's crucial to handle this procedure with expertise, as any errors can result in severe engine damage. Double-check all work and ensure the timing marks are correctly aligned before attempting to start the engine.
    Posted by GMPartsGiant Specialist
    See expert answers on similar Variable Timing Sprocket
    Q:
    What is the first step in the timing system procedure for the 2016 Chevrolet Equinox? Posted by Customer
    A:
    Begin by disconnecting the cable from the negative battery terminal and removing the spark plugs.
    Posted by GMPartsGiant Specialist
    See expert answers on similar Variable Timing Sprocket
    Q:
    How should the camshaft be positioned if it has turned for the 2017 GMC Terrain? Posted by Customer
    A:
    Position the dowel pin at 3 o'clock, mesh the timing chain with the camshaft sprocket, and engage it with the crankshaft sprocket, ensuring the timing marks are aligned.
    Posted by GMPartsGiant Specialist
    See expert answers on similar Variable Timing Sprocket
    Q:
    What is the final step after completing the timing belt installation for the 2006 Saturn Vue? Posted by Customer
    A:
    Remove the tensioner locating pin.
    Posted by GMPartsGiant Specialist
    See expert answers on similar Variable Timing Sprocket
    Q:
    What should be done after disconnecting the battery for the 2007 Pontiac G6? Posted by Customer
    A:
    After disconnecting the battery, remove the hood.
    Posted by GMPartsGiant Specialist
    See expert answers on similar Variable Timing Sprocket
    Q:
    What should you inspect before removing the timing belt for the 2000 Saturn LS? Posted by Customer
    A:
    Inspect the sprocket teeth, timing belt, camshaft endplay, timing belt tensioner, and water pump for wear or damage.
    Posted by GMPartsGiant Specialist
    See expert answers on similar Variable Timing Sprocket
    If you have any questions about this product, please don't hesitate to ask us. We will be happy to help you!

Genuine GM Part 90537298, the Right Choice

To ensure reliability, purchase GM part # 90537298 Sprocket,Water Pump. It is sometimes referred to as GMC Variable Timing Sprocket. Directly from GM, genuine parts are superb with regards to quality, longevity, and fit. Every single part passed stringent quality testing, so you can be sure that it's safe, durable, and built to perform like your original parts. This part fits specific GMC Terrain models.

GMPartsGiant.com is a leading supplier of genuine GM parts and accessories such as GM 90537298 Sprocket,Water Pump. You're certainly in the right place if you're searching for the great cost-effective OEM GM parts. Look no further than our vast inventory of genuine GM parts offered at unbeatable online prices, all of which are backed by the manufacturer's warranty. Not to forget, our hassle-free return policy and quick delivery service ensure a smooth shopping experience for you. For detailed GMC parts information, click here.

Why choose GM Parts Giant

  • Dedicated Service

    Your complete satisfaction is our #1 goal

  • Lowest Prices

    Best deals on genuine OE parts from dealerships

  • Fast Delivery

    Orders are processed and delivered promptly