Make sure this part fits

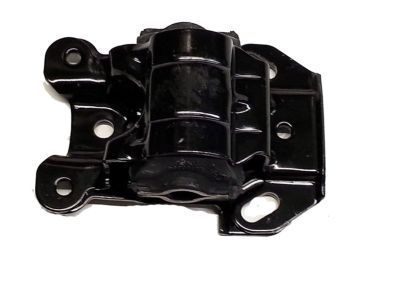
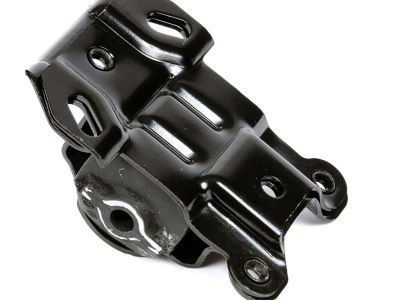
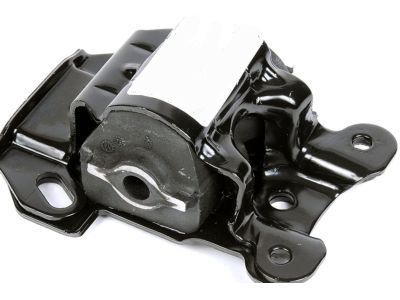
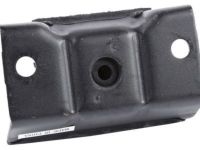
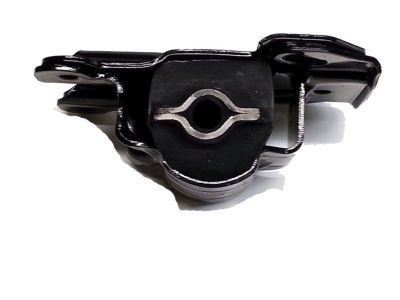
Chevrolet 22188284 Mount,Engine

1982-2005 Chevrolet

Customer Questions & Expert Answers (16)
GM 22188284 Mount,Engine
  • Part Description
    MOUNT, Engine Mounting
  • Replaces
    17989409, 22145879, 14082803, 17996145, 22112974, 22146241, 22145863, 17981702
  • Manufacturer
    General Motors
Make sure this part fits
$48.28 MSRP: $82.57
You Save: $34.29 (42%)
Ships in 1-2 Business Days
1
ADD TO CART
  • Related Parts
  • Product Specifications
  • Vehicle Fitment
  • Customer Questions & Expert Answers
  • Product Specifications

    BrandGenuine Chevrolet
    Manufacturer Part Number22188284
    Part DescriptionMOUNT, Engine Mounting
    Other NamesFront Mount, Motor Mount, Mount, Side Mount
    Item Dimensions6.0 x 4.7 x 2.8 inches
    Item Weight2.30 Pounds
    ConditionNew
    Fitment TypeDirect Replacement
    Replaces17989409, 22145879, 14082803, 17996145, 22112974, 22146241, 22145863, 17981702
    ManufacturerGeneral Motors
    SKU22188284
    WarrantyThis genuine GM part is guaranteed by GM's factory warranty.
    Shipping & ReturnShipping Policy Return Policy
    Warning: California's Proposition 65
  • Vehicle Fitment

    Year Make Model Engine Important vehicle option details
    1985-2005 Chevrolet Astro4 Cyl 2.5L, 6 Cyl 4.3LVAN ASTRO
    1992-1994, 1985-1986 Chevrolet Blazer6 Cyl 4.3L1/2 TON
    1985-1986 Chevrolet C106 Cyl 4.3LREGULAR CAB LONG BOX, REGULAR CAB STANDARD BOX
    1988-1995 Chevrolet C15006 Cyl 4.3L, 8 Cyl 5.0L, 8 Cyl 5.7L, 8 Cyl 6.2L Diesel, 8 Cyl 7.4LC1500 EXTENDED CAB LONG BOX, C1500 EXTENDED CAB STANDARD BOX, C1500 REGULAR CAB LONG BOX, C1500 REGULAR CAB STANDARD BOX
    1985-1986 Chevrolet C206 Cyl 4.3LCREW CAB, REGULAR CAB
    1988-1995 Chevrolet C25006 Cyl 4.3L, 8 Cyl 5.0L, 8 Cyl 5.7L, 8 Cyl 6.2L Diesel, 8 Cyl 7.4LC2500 EXTENDED CAB LONG BOX, C2500 EXTENDED CAB STANDARD BOX, C2500 REGULAR CAB
    1985-1986 Chevrolet C30CAB CHASSIS 135.5, CAB CHASSIS 159.9, CREW CAB, REGULAR CAB
    1988-1991 Chevrolet C35008 Cyl 5.7L, 8 Cyl 6.2L Diesel, 8 Cyl 7.4LC3500 CAB CHASSIS 135.5, C3500 CAB CHASSIS 159.9, C3500 CAB CHASSIS 183.5, C3500 EXTENDED CAB, C3500 REGULAR CAB
    1985-1990 Chevrolet Caprice6 Cyl 4.3L, 8 Cyl 5.0L4 DOOR, BROUGHAM 4 DOOR, CLASSIC 2 DOOR, CLASSIC 4 DOOR, CLASSIC STATION WAGON, STATION WAGON
    1985-1987 Chevrolet El Camino6 Cyl 4.3LEL CAMINO, MONTE CARLO
    View More
  • Customer Questions & Expert Answers

    Q:
    I would like to confirm if this is the correct part number for my vehicle. Please advise. Thank you. Posted by GMPartsGiant Specialist
    A:
    You can Select Your Vehicle to check if 22188284 fits your vehicle.
    Posted by GMPartsGiant Specialist
    Q:
    How should engine mounts be checked and replaced to prevent damage to driveline components in V6 engine on Chevrolet Astro? Posted by Customer
    A:
    Although they are self-lubricating, engine mounts rarely demand service; however, damaged or worn mounts should be replaced as soon as possible because they can cause drivetrain components to fail. To examine the mounts, the engine has to be lifted slightly off from the mounts as the weight is off the mounts, this means removing the engine cover in the process. This vehicle should be lifted by jack stands and a jack should be placed at the engine oil pan with a large piece of wood inserted between the head of the jack and the oil pan so as to lift the engine just enough to afford the mounts the pressure relief they need. Checking the mounts for crack, hardened rubber or delamination from the metal plates as the rubber frequently splits down the middle. He also mentions that by using rubber preservative one is able to slow the process of deterioration. Third, apply the large screwdriver or pry bar to the mount and try move it, if there is a relative movement between the mount plates and the engine or frame it is necessary to lower the engine till the mount fasteners are tightened. For replacement, remove the negative terminal of the battery, and make sure the car is supported properly on jack stands, more so for models that have the theft audio system, one has to disable this before removing the battery terminal. Take off the nut and pull out the mount through-bolt in the frame bracket, lift the engine upward to cancel the mount-to-block bolts and to separate the mount. After installation, the mount bolts are tightened in reverse sequence with a Loctite applied, as well.
    Posted by GMPartsGiant Specialist
    Q:
    How to replace hardened, cracked, or separated Engine Mount while keeping the engine/transmission in four cylinder engine on Chevrolet Astro? Posted by Customer
    A:
    If the rubber mounts are worn down, dry roasted or separated from the metal backing plates, then they will require replacement, though this can be accomplished whether the engine or transmission remains in the car or not. Start with the removal of the negative cable from the battery, however, it is recommended not to disconnect the power supply of the anti-theft system if your model is armed with it or the audio system. Then securely jack up the front of the vehicle and place it on jack stands. place a jack on the support and make sure to insert a block of wood in between the jack head and the oil pan. Loosen and then undo the engine mount to chassis bolts and the mount to engine support bracket bolts but do not remove the support bracket from the engine. Screw the engine upward until it lifts the bracket off of the mount then, take out the engine mount. Put the new mount in the place, and fasten the mount-to-engine support bracket bolts, then put the nuts and tighten them, then the mount-to-chassis bolts. Last, but not least, you should remove the jack and also the jack stands and then let the vehicle down.
    Posted by GMPartsGiant Specialist
    Q:
    How to remove the motor and transmission mount on Chevrolet Astro? Posted by Customer
    A:
    To eradicate the mount from a vehicle, start by hoisting the vehicle and securely supporting it on jackstands. Then, use a floor jack and a block of wood to support the transmission. Next, remove the nut on mount-to-support bracket along with two nuts and bolts on cross-member support brackets. After that, remove the two bolts mounting transmission brace to engine rear. Proceed to remove the two upper insulators between bracket supports. Slide out bracket support with its mount away from cross member and over transmission. Lastly, draw out mount off its support bracket plate downwards while holding it firm at all times during this process. To reinstall the mount, just do what is recommended in reverse order for removal.
    Posted by GMPartsGiant Specialist
    Q:
    How to check and replace engine mounts on Chevrolet C1500? Posted by Customer
    A:
    Engine mounts seldom require attention, but broken or deteriorated mounts should be replaced immediately or the added strain placed on the driveline components may cause damage. During the check, the engine must be raised slightly to remove the weight from the mounts and remove the distributor cap before raising the engine. Raise the vehicle and support it securely on jackstands, then position the jack under the engine oil pan. Place a large block of wood between the jack head and the oil pan, then carefully raise the engine just enough to take the weight off the mounts. Check the mounts to see if the rubber is cracked, hardened or separated from the metal plates. Sometimes the rubber will split right down the center. Rubber preservative may be applied to the mounts to slow deterioration. Check for relative movement between the mount plates and the engine or frame (use a large screwdriver or pry bar to attempt to move the mounts). If movement is noted, lower the engine and tighten the mount fasteners. Disconnect the negative cable from the battery, then raise the vehicle and support it securely on jackstands. Remove the nut and withdraw the mount through-bolt from the bracket. Raise the engine slightly, then remove the mount-to-engine block bolts 0/6 and small block V8) or mount-to-frame bolts (big block V8) and detach the mount. Installation is the reverse of removal. Use thread locking compound on the mount bolts and be sure to tighten them securely.
    Posted by GMPartsGiant Specialist
    Q:
    How to check and maintain the motor and transmission mount on Chevrolet Caprice? Posted by Customer
    A:
    Raise the car for access beneath and support it firmly with stands, ensuring the vehicle is secured since some jostling is necessary to check the mounts. Push upward and pull downward on the transmission extension housing while observing the transmission mount. If the extension can be pushed upwards but cannot be pulled down, it indicates that the rubber is worn and the mount is bottomed out. Additionally, if the rubber portion of the mount separates from the metal plate, it signifies that the mount should be changed. Finally, check that all attaching screws or nuts are tight on the crossmember and the transmission.
    Posted by GMPartsGiant Specialist
    Q:
    How to Inspect and Replace Engine Mounts in V6 engine on Chevrolet Caprice? Posted by Customer
    A:
    To inspect the front mount, raise the engine slightly to create tension on the rubber mount using a hoist or jack placed under the forward edge of the oil pan, and check for heat cracks on the hard rubber surface, rubber separating from the metal plate, or splits through the center. For the rear mount, elevate the vehicle on a hoist and push up and down on the transmission tail shaft while observing the mount; if the rubber separates from the metal plate or the tail shaft moves excessively, replace the mount. If there is movement between the mount's metal plate and the attaching point, tighten the bolts or screws. To replace the front mount, relieve tension by raising the engine slightly, then remove the engine mount-to-engine block bolts and the through bolt, taking care to only loosen the through bolt on the 229 V6 model. Install the new mount along with the through bolts and nuts, then secure the engine mount-to-engine block bolts, ensuring all fasteners are torqued to specifications. For the rear mount replacement, raise the engine to relieve weight, remove the bolts attaching the cross member to the mount, and then take out the mount-to-transmission bolts before removing the engine mount. Finally, install the new mount on the transmission, align and start the crossmember-to-mount bolts while lowering the transmission onto the mount, and torque tighten all bolts.
    Posted by GMPartsGiant Specialist
    Q:
    How to check and maintain the motor and transmission mount of a vehicle on Chevrolet El Camino? Posted by Customer
    A:
    Lift the car for some degree of access to the underside and then use stands to safely and firmly secure the car as you're going to need to shake it a bit to check for the mounts. Pull down the transmission extension housing while at the same time apply an upward force on the transmission mount. If the extension can be operated in an UP direction but the DOWN direction is blocked, then this is a good sign that the rubber is already worn out and the mount is fully engaged at the bottom. Also, if the rubber part of the mount is worn out, and has come off the metal plate, it is a sign that the mount needs replacement. Last of all, check that all the nuts and screws which attach cross member to the car or the nut that holds the cross member to the transmission are tight.
    Posted by GMPartsGiant Specialist
    Q:
    How to inspect and replace the front and rear engine mounts in V6 engine on Chevrolet El Camino? Posted by Customer
    A:
    To inspect the front mount, raise the engine slightly to create tension on the rubber mount using a hoist or jack placed under the forward edge of the oil pan, and check for heat cracks on the hard rubber surface, rubber separating from the metal plate, or splits through the center. For the rear mount, elevate the vehicle on a hoist and push up and down on the transmission tail shaft while observing the mount; if the rubber separates from the metal plate or the tail shaft moves excessively, replace the mount. If there is movement between the mount's metal plate and the attaching point, tighten the bolts or screws. To replace the front mount, relieve tension by raising the engine slightly, then remove the engine mount-to-engine block bolts and the through bolt, taking care to only loosen the through bolt on the 200/229 V6 model. Install the new mount along with the through bolts and nuts, then secure the engine mount-to-engine block bolts, ensuring all fasteners are torqued to specifications. For the rear mount replacement, raise the engine to relieve weight, remove the bolts attaching the cross member to the mount, then take out the mount-to-transmission bolts and the engine mount itself. Finally, install the new mount on the transmission, aligning and starting the cross member-to-mount bolts while lowering the transmission, and torque tighten all bolts.
    Posted by GMPartsGiant Specialist
    Q:
    How to check and replace the rear motor and transmission mount on Chevrolet K1500? Posted by Customer
    A:
    Take a large-sized screwdriver or pry bar to slide it between the transmission and the crossmember, after which you will need to lift the transmission a little bit upwards in order to examine the rear transmission mount for signs of wear. If this part comes out of contact with an insulator considerably, so your mount is already deteriorated. You may remove the nut fastening the insulator onto a transverse beam and bolts that fix an insulator to a case for changing any mount. Push up a gear-box by means of jack and take away pillows. The installation is reversed from the removal process. Be sure to fasten all nuts well.
    Posted by GMPartsGiant Specialist
    Q:
    How to check and replace engine mounts on Chevrolet K1500? Posted by Customer
    A:
    Engine mounts seldom require attention, but broken or deteriorated mounts should be replaced immediately or the added strain placed on the driveline components may cause damage. During the check, the engine must be raised slightly to remove the weight from the mounts and remove the distributor cap before raising the engine. Raise the vehicle and support it securely on jackstands, then position the jack under the engine oil pan. Place a large block of wood between the jack head and the oil pan, then carefully raise the engine just enough to take the weight off the mounts. Check the mounts to see if the rubber is cracked, hardened or separated from the metal plates. Sometimes the rubber will split right down the center. Rubber preservative may be applied to the mounts to slow deterioration. Check for relative movement between the mount plates and the engine or frame (use a large screwdriver or pry bar to attempt to move the mounts). If movement is noted, lower the engine and tighten the mount fasteners. Disconnect the negative cable from the battery, then raise the vehicle and support it securely on jackstands. Remove the nut and withdraw the mount through-bolt from the bracket. Raise the engine slightly, then remove the mount-to-engine block bolts 0/6 and small block V8) or mount-to-frame bolts (big block V8) and detach the mount. Installation is the reverse of removal. Use thread locking compound on the mount bolts and be sure to tighten them securely.
    Posted by GMPartsGiant Specialist
    Q:
    How to remove the motor and transmission mount on GMC Safari? Posted by Customer
    A:
    To eradicate the mount from a vehicle, start by hoisting the vehicle and securely supporting it on jackstands. Then, use a floor jack and a block of wood to support the transmission. Next, remove the nut on mount-to-support bracket along with two nuts and bolts on cross-member support brackets. After that, remove the two bolts mounting transmission brace to engine rear. Proceed to remove the two upper insulators between bracket supports. Slide out bracket support with its mount away from cross member and over transmission. Lastly, draw out mount off its support bracket plate downwards while holding it firm at all times during this process. To reinstall the mount, just do what is recommended in reverse order for removal.
    Posted by GMPartsGiant Specialist
    Q:
    How can I check the rear transmission mount for wear for the 1989 Chevrolet C1500? Posted by Customer
    A:
    Insert a large screwdriver or pry bar into the space between the transmission and the crossmember and try to pry the transmission up slightly.
    Posted by GMPartsGiant Specialist
    See expert answers on similar Motor And Transmission Mount
    Q:
    How do you replace the front mounts for the 1986 Chevrolet Caprice? Posted by Customer
    A:
    First, remove the through-bolt and nut. Then, raise the engine slightly using a hoist or jack with a wood block under the oil pan before removing the mount and frame bracket assembly from the cross member.
    Posted by GMPartsGiant Specialist
    See expert answers on similar Engine Mount
    Q:
    What should be done after raising the transmission for the 1986 Chevrolet El Camino? Posted by Customer
    A:
    Remove the mount to transmission bolts, followed by the mount.
    Posted by GMPartsGiant Specialist
    See expert answers on similar Engine Mount
    Q:
    Will this mount fit either side of the engine? Posted by Customer
    A:
    Yes, this will fit either side of the vehicle
    Posted by GMPartsGiant Specialist 15/7/2021
    If you have any questions about this product, please don't hesitate to ask us. We will be happy to help you!

Genuine GM Part 22188284, the Right Choice

To ensure reliability, purchase GM part # 22188284 Mount,Engine. It is sometimes referred to as Chevrolet Engine Mount, Chevrolet Motor And Transmission Mount. Directly from GM, genuine parts are superb with regards to quality, longevity, and fit. Every single part passed stringent quality testing, so you can be sure that it's safe, durable, and built to perform like your original parts. This part fits specific Chevrolet Blazer, P30, Tahoe models.

GMPartsGiant.com is a leading supplier of genuine GM parts and accessories such as GM 22188284 Mount,Engine. You're certainly in the right place if you're searching for the great cost-effective OEM GM parts. Look no further than our vast inventory of genuine GM parts offered at unbeatable online prices, all of which are backed by the manufacturer's warranty. Not to forget, our hassle-free return policy and quick delivery service ensure a smooth shopping experience for you. For detailed Chevrolet parts information, click here.

Why choose GM Parts Giant

  • Dedicated Service

    Your complete satisfaction is our #1 goal

  • Lowest Prices

    Best deals on genuine OE parts from dealerships

  • Fast Delivery

    Orders are processed and delivered promptly