Make sure this part fits

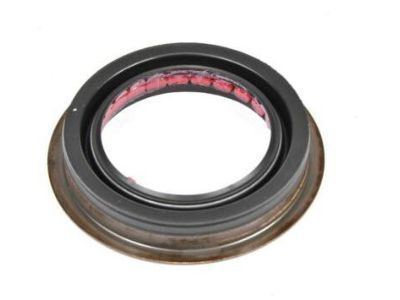
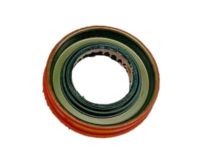
GM 26064029 Seal, Differential Drive Pinion Gear

1997-2018 GM

Customer Questions & Expert Answers (14)
GM 26064029 Seal, Differential Drive Pinion Gear
  • Part Description
    SEAL, Differential Drive Pinion Shaft Bearing
  • Manufacturer
    General Motors
Make sure this part fits
$26.09 MSRP: $43.18
You Save: $17.09 (40%)
Ships in 1-2 Business Days
1
ADD TO CART
  • Related Parts
  • Product Specifications
  • Vehicle Fitment
  • Customer Questions & Expert Answers
  • Product Specifications

    BrandGenuine GM
    Manufacturer Part Number26064029
    Part DescriptionSEAL, Differential Drive Pinion Shaft Bearing
    Other NamesFront Seal, Pinion Seal
    Item Dimensions4.0 x 3.9 x 0.6 inches
    Item Weight0.40 Pounds
    ConditionNew
    Fitment TypeDirect Replacement
    ManufacturerGeneral Motors
    SKU26064029
    WarrantyThis genuine GM part is guaranteed by GM's factory warranty.
    Shipping & ReturnShipping Policy Return Policy
    Warning: California's Proposition 65
  • Vehicle Fitment

    Year Make Model Engine Important vehicle option details
    2005-2014, 1999-2000 Cadillac Escalade8 Cyl 5.3L, 8 Cyl 5.7L, 8 Cyl 6.0L, 8 Cyl 6.0L Flex, 8 Cyl 6.2L, 8 Cyl 6.2L Flex1/2 TON, 3/4 TON, 4 DOOR 1/2 TON, CLASSIC 4 DOOR 1/2 TON, EXT 1/2 TON, EXTENDED CAB 6'6" BOX 1/2 TON, EXTENDED CAB 6'6" BOX 3/4 TON, EXTENDED CAB 8' BOX 3/4 TON, K2500 CREW CAB, REGULAR CAB 3/4 TON, YUKON XL/DENALI XL/ESCALADE ESV, YUKON/DENALI/ESCALADE
    2007-2013 Chevrolet Avalanche8 Cyl 5.3L, 8 Cyl 5.3L Flex, 8 Cyl 6.0L1/2 TON
    1997-1999 Chevrolet C15006 Cyl 4.3L, 8 Cyl 5.0L, 8 Cyl 5.7L, 8 Cyl 6.5L DieselC1500 EXTENDED CAB LONG BOX, C1500 EXTENDED CAB STANDARD BOX, C1500 REGULAR CAB LONG BOX, C1500 REGULAR CAB STANDARD BOX
    1997-2000 Chevrolet C25008 Cyl 5.0L, 8 Cyl 5.7L, 8 Cyl 6.5L Diesel, 8 Cyl 7.4LC2500 CREW CAB, C2500 EXTENDED CAB LONG BOX, C2500 EXTENDED CAB STANDARD BOX, C2500 REGULAR CAB
    2009-2012 Chevrolet Colorado4 Cyl 2.9L, 5 Cyl 3.7L, 8 Cyl 5.3LCREW CAB, EXTENDED CAB, EXTENDED LENGTH, PICKUP
    2009-2017, 1997-2002 Chevrolet Express4 Cyl 2.8L Diesel, 6 Cyl 4.3L, 8 Cyl 4.8L, 8 Cyl 4.8L Flex, 8 Cyl 5.0L, 8 Cyl 5.3L, 8 Cyl 5.7L, 8 Cyl 6.0L, 8 Cyl 6.0L Flex, 8 Cyl 6.5L Diesel, 8 Cyl 6.6L Diesel1 TON CARGO EXPRESS, 1 TON CARGO SAVANA, 1 TON COMMERCIAL/RV CUTAWAY, 1 TON PASSENGER, 1/2 TON CARGO EXPRESS, 1/2 TON CARGO SAVANA, 1/2 TON PASSENGER EXPRESS, 1/2 TON PASSENGER SAVANA, 3/4 TON CARGO EXPRESS, 3/4 TON CARGO SAVANA, 3/4 TON PASSENGER EXPRESS, 3/4 TON PASSENGER SAVANA
    1997-1999 Chevrolet K15006 Cyl 4.3L, 8 Cyl 5.0L, 8 Cyl 5.7L, 8 Cyl 6.5L DieselK1500 EXTENDED CAB LONG BOX, K1500 EXTENDED CAB STANDARD BOX, K1500 REGULAR CAB LONG BOX, K1500 REGULAR CAB STANDARD BOX
    1997-2000 Chevrolet K25008 Cyl 5.0L, 8 Cyl 5.7L, 8 Cyl 6.5L Diesel, 8 Cyl 7.4LK2500 CREW CAB, K2500 EXTENDED CAB LONG BOX, K2500 EXTENDED CAB STANDARD BOX, K2500 REGULAR CAB
    2005-2006 Chevrolet SSR8 Cyl 6.0LSPORT TRUCK
    1999-2018 Chevrolet Silverado6 Cyl 4.3L, 8 Cyl 4.8L, 8 Cyl 4.8L Flex, 8 Cyl 5.3L, 8 Cyl 5.3L Flex, 8 Cyl 6.0L, 8 Cyl 6.0L Flex, 8 Cyl 6.2L Flex, 8 Cyl 6.6L Diesel, 8 Cyl 8.1L1500 CREW CAB, 1500 CREW CAB LONG BOX, 1500 CREW CAB STANDARD BOX, 1500 DOUBLE CAB STANDARD BOX, 1500 EXTENDED CAB STANDARD BOX, 1500 REGULAR CAB LONG BOX, 1500 REGULAR CAB STANDARD BOX, 2500 CREW CAB LONG BOX, 2500 CREW CAB STANDARD BOX, 2500 EXTENDED CAB LONG BOX, 2500 EXTENDED CAB STANDARD BOX, 2500 REGULAR CAB, CLASSIC 1500 CREW CAB LONG BOX, CLASSIC 1500 CREW CAB STANDARD BOX, CLASSIC 1500 EXTENDED CAB STANDARD BOX, CREW CAB 1/2 TON, EXTENDED CAB 5'8" BOX 1/2 TON, EXTENDED CAB 6'6" BOX 1/2 TON, EXTENDED CAB 8' BOX 1/2 TON, REGULAR CAB 6'6" BOX 1/2 TON, REGULAR CAB 8' BOX 1/2 TON
    View More
  • Customer Questions & Expert Answers

    Q:
    I would like to confirm if this is the correct part number for my vehicle. Please advise. Thank you. Posted by GMPartsGiant Specialist
    A:
    You can Select Your Vehicle to check if 26064029 fits your vehicle.
    Posted by GMPartsGiant Specialist
    Q:
    How to remove and install a differential seal on Chevrolet Avalanche? Posted by Customer
    A:
    To remove and install a differential pinion seal, first loosen the wheel lug nuts and raise the front or rear of the vehicle on jackstands. Remove the wheels and disconnect the driveshaft from the differential pinion flange. Rotate the pinion and record the torque required to rotate it. Mark the relationship of the pinion flange to the shaft and count the number of exposed threads on the shaft. Use a special tool or chain wrench to immobilize the flange and remove the pinion nut. Withdraw the flange and pry out the old seal. Install the new seal by lubricating the lips and tapping it evenly into position. Apply RTV sealant to the ends of the splines visible in the center of the flange and install the washer and a new pinion nut. Tighten the nut until the recorded number of threads are exposed and measure the torque required to rotate the pinion. Tighten the nut in small increments until it matches the recorded figure and exceeds it by 5 in-lbs. Reinstall all components and tighten all fasteners to their specified torque values.
    Posted by GMPartsGiant Specialist
    Q:
    How to remove and install a differential seal on Chevrolet Tahoe? Posted by Customer
    A:
    To remove and install a differential pinion seal, first loosen the wheel lug nuts and raise the front or rear of the vehicle on jackstands. Remove the wheels and disconnect the driveshaft from the differential pinion flange. Rotate the pinion and record the torque required to rotate it. Mark the relationship of the pinion flange to the shaft and count the number of exposed threads on the shaft. Use a special tool or chain wrench to immobilize the flange and remove the pinion nut. Withdraw the flange and pry out the old seal. Install the new seal by lubricating the lips and tapping it evenly into position. Apply RTV sealant to the ends of the splines visible in the center of the flange and install the washer and a new pinion nut. Tighten the nut until the recorded number of threads are exposed and measure the torque required to rotate the pinion. Tighten the nut in small increments until it matches the recorded figure and exceeds it by 5 in-lbs. Reinstall all components and tighten all fasteners to their specified torque values.
    Posted by GMPartsGiant Specialist
    Q:
    How to remove and install a differential seal on Chevrolet Silverado? Posted by Customer
    A:
    To remove and install a differential pinion seal, first loosen the wheel lug nuts and raise the front or rear of the vehicle on jackstands. Remove the wheels and disconnect the driveshaft from the differential pinion flange. Rotate the pinion and record the torque required to rotate it. Mark the relationship of the pinion flange to the shaft and count the number of exposed threads on the shaft. Use a special tool or chain wrench to immobilize the flange and remove the pinion nut. Withdraw the flange and pry out the old seal. Install the new seal by lubricating the lips and tapping it evenly into position. Apply RTV sealant to the ends of the splines visible in the center of the flange and install the washer and a new pinion nut. Tighten the nut until the recorded number of threads are exposed and measure the torque required to rotate the pinion. Tighten the nut in small increments until it matches the recorded figure and exceeds it by 5 in-lbs. Reinstall all components and tighten all fasteners to their specified torque values.
    Posted by GMPartsGiant Specialist
    Q:
    How to replace the front Differential Seal on Chevrolet Trailblazer? Posted by Customer
    A:
    Although you can get to the left side seal from the front also, the best way to replace the left side seal is to remove the wheel lug nuts, lift the vehicle, put it on jack stands, and remove the wheel along with the splash shield located on the front axle. Subsequently, take out the left driveaxle and carry out the same exercise by drawing the lubricant from the front differential. Mounted on the puller is the old seal, which is replaced by a new seal that is then installed using a seal driver or a slightly smaller socket with the lips of the seal lubricated with multi purpose grease. When the axleshaft has been inserted, refill the differential with the correct type of lubricant, fit the driveaxle, replace the splash shield, and bolt the wheel; slowly lower the vehicle to the ground and test. For right side seal, have to need to take out the differential and also need to drain the lubricant from the front differential. Once more, disengage the old seal with seal remover or slide hammer with an adapter, then with the seal driver or slightly smaller socket install the new seal, it is recommended you coat the lips of the seal with multipurpose grease before re installation of the differential.
    Posted by GMPartsGiant Specialist
    Q:
    How to remove and install a differential seal on GMC Sierra? Posted by Customer
    A:
    To remove and install a differential pinion seal, first loosen the wheel lug nuts and raise the front or rear of the vehicle on jackstands. Remove the wheels and disconnect the driveshaft from the differential pinion flange. Rotate the pinion and record the torque required to rotate it. Mark the relationship of the pinion flange to the shaft and count the number of exposed threads on the shaft. Use a special tool or chain wrench to immobilize the flange and remove the pinion nut. Withdraw the flange and pry out the old seal. Install the new seal by lubricating the lips and tapping it evenly into position. Apply RTV sealant to the ends of the splines visible in the center of the flange and install the washer and a new pinion nut. Tighten the nut until the recorded number of threads are exposed and measure the torque required to rotate the pinion. Tighten the nut in small increments until it matches the recorded figure and exceeds it by 5 in-lbs. Reinstall all components and tighten all fasteners to their specified torque values.
    Posted by GMPartsGiant Specialist
    Q:
    How to replace the differential seals on Chevrolet Trailblazer? Posted by Customer
    A:
    It is used in both the front and rear pinion oil seal. First of all, set the vehicle on a lift or jack it up, secure it on jackstands and asymmetrically block the opposite wheels. Take off the wheels and detach the driveshaft from the pinion flange, that may be placed aside for the time being. Manually move the pinion clockwise and counter clockwise several times then use a beam-type or dial-type inch-pound torque wrench to find out the amount of torque needed to rotate the pinion and this is recorded for future use. Align the pinion flange to the shaft and then count the number of threads which are available on the shaft. A special tool or chain wrench could be used to arrest the movement of the companion flange while loosening of the self locking pinion nut. Stepping off the pinion nut and pulling out the flange is possible with the help of two-jaw puller but do not pry or hammer . Remove the old seal and dispose it as advised: using seal removal tool/large screwdriver gently. Now, the lips of the new seal has to be lubricated with wheel bearing grease so that the housing space between the seal lips were filled with it, after that , putting it into the housing neatly using seal installation tool large socket in that ensures the seal enters squarely into the housing and to the full depth. Mount the pinion flange upside-down over the coupled hub, that coincides with the marks made, then tighten the pinion nut until the flange is drawn into position without hammering. Squash a bead of RTV sealant along the external face of the splines which are seen from center of the flange to keep out oil. Mount the washer and get a new pinion nut tighten until the number of threads exposed as recommended. Turn the pinion with your fingers and measure the torque that was required to turn it to tighten the nut in small rotations until you are able to match the figure that you have recorded previously, increasing the above until you are able to turn the above a little more than the earlier recorded figure by 5 in-lbs due to the drag of a new oil seal. Lastly, reassemble all elements which have been removed during the work, and apply the backward process of, and tighten all bolts and nuts to there correct torque.
    Posted by GMPartsGiant Specialist
    Q:
    What is the next step after securing the 2009 Chevrolet Colorado on jackstands? Posted by Customer
    A:
    Remove the wheels.
    Posted by GMPartsGiant Specialist
    See expert answers on similar Differential Seal
    Q:
    What's the first step before working on the rear axle assembly for the 1997 Chevrolet C1500? Posted by Customer
    A:
    Raise the rear of the vehicle and support it securely on jackstands. Block the front wheels to keep the vehicle from rolling off the stands.
    Posted by GMPartsGiant Specialist
    See expert answers on similar Differential Seal
    Q:
    How do you prevent the companion flange from moving while loosening the pinion nut for the 1999 Chevrolet Express? Posted by Customer
    A:
    Use a chain wrench to keep the companion flange from moving while loosening the self-locking pinion nut.
    Posted by GMPartsGiant Specialist
    See expert answers on similar Differential Seal
    Q:
    How should you tighten the pinion nut on semi-floating axles for the 1997 Chevrolet K1500? Posted by Customer
    A:
    Tighten the nut carefully until the original number of threads are exposed. Measure the torque required to rotate the pinion and tighten the nut in small increments until it matches the figure recorded earlier. In order to compensate for the drag of the new oil seal, the nut should be tightened more until the rotational torque of the pinion slightly exceeds what was recorded earlier, but not by more than 5 in-lbs.
    Posted by GMPartsGiant Specialist
    See expert answers on similar Differential Seal
    Q:
    How should the new seal be installed of the 2007 Chevrolet Suburban? Posted by Customer
    A:
    The new seal should be installed by lubricating the lips and tapping it evenly into position.
    Posted by GMPartsGiant Specialist
    See expert answers on similar Differential Seal
    Q:
    What is the next step after draining the front differential lubricant for the 2009 GMC Canyon? Posted by Customer
    A:
    The next step is to disconnect the lower stabilizer bar link from the lower control arm.
    Posted by GMPartsGiant Specialist
    See expert answers on similar Differential Seal
    Q:
    What is the first step to remove and install a differential pinion seal for the 2012 GMC Yukon? Posted by Customer
    A:
    The first step is to loosen the wheel lug nuts and raise the front or rear of the vehicle on jackstands.
    Posted by GMPartsGiant Specialist
    See expert answers on similar Differential Seal
    If you have any questions about this product, please don't hesitate to ask us. We will be happy to help you!

Genuine GM Part 26064029, the Right Choice

To ensure reliability, purchase GM part # 26064029 Seal, Differential Drive Pinion Gear. It is sometimes referred to as GM Differential Seal. Directly from GM, genuine parts are superb with regards to quality, longevity, and fit. Every single part passed stringent quality testing, so you can be sure that it's safe, durable, and built to perform like your original parts. This part fits specific Cadillac Escalade models. It fits Chevrolet Express, Silverado, Tahoe. It also fits GMC Sierra, Suburban, Yukon. This also fits Hummer H2, H3, H3T.

GMPartsGiant.com is a leading supplier of genuine GM parts and accessories such as GM 26064029 Seal, Differential Drive Pinion Gear. You're certainly in the right place if you're searching for the great cost-effective OEM GM parts. Look no further than our vast inventory of genuine GM parts offered at unbeatable online prices, all of which are backed by the manufacturer's warranty. Not to forget, our hassle-free return policy and quick delivery service ensure a smooth shopping experience for you. For detailed GMC parts information, click here.

Why choose GM Parts Giant

  • Dedicated Service

    Your complete satisfaction is our #1 goal

  • Lowest Prices

    Best deals on genuine OE parts from dealerships

  • Fast Delivery

    Orders are processed and delivered promptly