Make sure this part fits

Oldsmobile 12533558 Cylinder Head Assembly (W/Studs)

1996-1999 Oldsmobile Bravada

Customer Questions & Expert Answers (13)
GM 12533558 Cylinder Head Assembly (W/Studs)
  • Part Description
    Head Asm,Cyl (W/Studs)
  • Replaces
    12533134
  • Manufacturer
    General Motors
Make sure this part fits
$310.73 MSRP: $491.12
You Save: $180.39 (37%)
Ships in 1-3 Business Days
1
ADD TO CART
  • Related Parts
  • Product Specifications
  • Vehicle Fitment
  • Customer Questions & Expert Answers
  • Product Specifications

    BrandGenuine Oldsmobile
    Manufacturer Part Number12533558
    Part DescriptionHead Asm,Cyl (W/Studs)
    Item Dimensions18.9 x 9.2 x 7.7 inches
    Item Weight33.30 Pounds
    ConditionNew
    Fitment TypeDirect Replacement
    Replaces12533134
    ManufacturerGeneral Motors
    SKU12533558
    WarrantyThis genuine GM part is guaranteed by GM's factory warranty.
    Shipping & ReturnShipping Policy Return Policy
    Warning: California's Proposition 65
  • Vehicle Fitment

    Year Make Model Engine Important vehicle option details
    1996-1999 Oldsmobile Bravada6 Cyl 4.3LBRAVADA
  • Customer Questions & Expert Answers

    Q:
    I am wonder if this is complete and correct part for my vehicle. Posted by GMPartsGiant Specialist
    A:
    You can Select Your Vehicle to check if 12533558 fits your vehicle.
    Posted by GMPartsGiant Specialist
    Q:
    How to disassemble cylinder heads and valves on Chevrolet Astro? Posted by Customer
    A:
    New or remanufactured cylinder heads can be easily bought from dealers or auto parts stores and it makes much more sense for do it yourself mechanics to just buy a new one to replace the originals rather than spending time and money to dismantle, inspect, and refurbish the heads. In disassembly, the intake and exhaust valves are removed together with other components. First, remove the nuts of the rocker arms, the pivot balls, and the rocker arms from the cylinder head studs making sure that the set parts are labeled in order to fit them again. If it is necessary to remove the valves, it will be useful to mark them and put them along with the parts in sets, so that it will be easy to return them to their places in the valve guides. Oversight the compressor on the first valve in order that one is capable of compressing it, afterwards, pull off the keepers, the retainer, the shield, springs and the spring seat. Take the O-ring seal off the valve stem and the umbrella type seal from the guide after which the valve is to be pulled out of the head. In case the valve binds apply force to the opposite direction and remove burr on the keeper groove area. Do the same to the other valves; assemble all parts needed for reinstallation in separate compartments. When valves and other components were removed and stored, the head should be washed, and other disassembly processes are to be done in case of a full engine rebuild before washing and physical assessment begins.
    Posted by GMPartsGiant Specialist
    Q:
    How should a Cylinder Head be prepared for reassembly after valve servicing on Chevrolet Blazer? Posted by Customer
    A:
    Regardless of whether a head was sent to an automotive repair shop for valve servicing, ensure it is clean before beginning reassembly. If a head was sent out for valve servicing, the valves and related components will already be in place, so start the reassembly procedure with the first valve. Lubricate and install the first valve by applying engine assembly lube or clean engine oil to the valve stem. For a four-cylinder engine, install the spring seats over each of the valve guides and new seals on the valve guides for the intake valve only on the V6 engine. Gently tap each seal into place using a hammer and a deep socket or seal installation tool, ensuring they are not twisted or cocked during installation. Set the valve springs, oil shield for the V6 engine intake valve only, and retainer or rotator for the V6 engine exhaust valve in place. Compress the springs with a valve spring compressor and carefully install the O-ring oil seal in the lower groove of the valve stem for the V6 engine, ensuring it lies flat and is not twisted. Position the keepers in the upper groove, then slowly release the compressor to ensure they seat properly, applying a small dab of grease to hold them in place if necessary. Repeat the procedure for the remaining valves, ensuring all components are returned to their original locations without mixing them up. Check the installed valve spring height with a ruler graduated in 1/32-inch increments or a dial caliper, measuring from the top of each spring seat or shim(s) to the top of the oil shield or the bottom of the retainer. If the height exceeds specifications, shims can be added under the springs to correct it. Finally, apply engine assembly lube to the rocker arm faces and pivot balls, then install the rocker arms and pivots on the cylinder head studs, threading the nuts on three or four turns only, as they will be tightened following a specific procedure when the heads are installed on the engine.
    Posted by GMPartsGiant Specialist
    Q:
    How to disassemble and inspect cylinder heads on Chevrolet C1500? Posted by Customer
    A:
    New and rebuilt cylinder heads are commonly available for most engines at dealerships and auto parts stores. Some specialized tools are necessary for the disassembly and inspection procedures, and replacement parts may not be readily available, making it more practical and economical for the home mechanic to purchase replacement heads rather than disassemble, inspect and recondition the originals. On 7.4 liter (454 cubic inch) engines, two head designs are generally available-"open chamber" and "closed chamber." These heads will interchange as far as bolt patterns, accessory mounting, etc. is concerned, but the different combustion chamber designs require different piston dome shapes. If you're purchasing a set of reconditioned cylinder heads, make sure the new heads match the combustion chamber design of the originals. Cylinder head disassembly involves removal of the intake and exhaust valves and related components. If they're still in place, remove the rocker arm nuts, pivot balls and rocker arms from the cylinder head studs. Label the parts or store them separately so they can be reinstalled in their original locations. Before the valves are removed, arrange to label and store them, along with their related components, so they can be kept separate and reinstalled in the same valve guides they are removed from. Compress the springs on the first valve with a spring compressor and remove the keepers. Carefully release the valve spring compressor and remove the retainer or (if used) rotator, the shield, the springs and the spring seat or shims (if used). Remove the oil seal(s) from the valve stem and the umbrella-type seal from the guide (if used), then pull the valve out of the head. If the valve binds in the guide (won't pull through), push it back into the head and deburr the area around the keeper groove with a fine file or whetstone. Repeat the procedure for the remaining valves. Remember to keep all the parts for each valve together so they can be reinstalled in the same locations. Once the valves and related components have been removed and stored in an organized manner, the head should be thoroughly cleaned and inspected. If a complete engine overhaul is being done, finish the engine disassembly procedures before beginning the cylinder head cleaning and inspection process.
    Posted by GMPartsGiant Specialist
    Q:
    How to thoroughly clean cylinder heads and related valve train components on Chevrolet K1500? Posted by Customer
    A:
    Clean the cylinder heads thoroughly and its related valve train components, removing old gasket material from the head gasket, along with sealing compound at the intake manifold and exhaust manifold sealing surfaces. Clear away scale buildup in the coolant passages and clean out via wire brush all kinds of holes as well as threaded holes. With a solvent wash down, completely dry cleaner rocker arm pivot stud threads, cylinder head, rocker arms push rods, spring retainers plus keepers, valve springs shields. The valves can be scraped to get rid of heavy deposits while the valve heads' epidermis can be cleaned free of deposit through electrically driven wire brushes. Examine for cracks in coolant wairs or warping. The condition of valves seating stem guide clearance faces spring wear retainers and covers end pivots are checked out for wear damage or proper installation by measuring margin width on spring seats as well as blade contact area between two adjacent rockers push rod ends bolted stud guide plates pull rods arm nuts studs are observed at every opportunity if broken replace them. For poor conditions reassemble valve parts into cylinder head: however for good conditions, reassemble them without major service operations performed on the same parts again.
    Posted by GMPartsGiant Specialist
    Q:
    How to remove the cylinder head on 2.2L four cylinder engine on Chevrolet S10? Posted by Customer
    A:
    To remove the cylinder head, start by disconnecting the negative battery cable and draining the cooling system. The drive belt should be removed, and this should be followed by removing the upper fan shroud, fan/clutch assembly and the water pump pulley. Then release it from all its connections including radiator hoses, coolant temperature sensor electrical connector, heater hose form thermostat housing, upper radiator hose and thermostat housing. Finally remove the air cleaner assembly in addition to upper and lower intake manifolds for models made prior to 1999 while on 1999 and later models it is a one-piece intake manifold. Subsequently you have to eliminate the dipstick tube, alternator bracket and also air conditioning compressor bracket next to them along with power steering pump. At last, take off exhaust manifold; above that are valve covers (that cover rocker arms) as well as pushrods. Later unbolt and remove engine lifting bracket from rear of cylinder head. Write down on a cardboard outline of the cylinders and bolt pattern then mark front of engine for cylinder head removal. Next you have to loosen head mounting bolts by turning them 1/4-turn at a time; keep these bolts in a cardboard holder when they are removed. Gently lift off the head from the engine block making sure that you do not pry at any other point except for where it overhangs toward thermostat end if seized. Place this head on a wooden block. In cases where applicable all external parts must be transferred from old cylinder head unto new one during installation. Ensure clean mating surfaces between cylinder head and block and have machining work done on head to check for distortion or cracks in an automotive machine shop. Take care to clean mating surfaces thoroughly before chasing threads in hole of head bolt then use thread sealer for all threads of cylinder-head bolts. Place new gasket over dowel pins in block, then drop heads onto block without touching gasket surface first. Following the tightening of bolts, do the other installation steps in reverse order. Finally change the oil and filter, add coolant, run the engine and check for leaks.
    Posted by GMPartsGiant Specialist
    Q:
    What are the steps involved in disassembling and reconditioning a cylinder head for home mechanics on GMC Jimmy? Posted by Customer
    A:
    New and re-manufactured cylinder heads are usually easily obtainable from vendors, and most stock them for almost all the engines that are available in the current market; it is therefore easier for a home-brew mechanic to purchase a new head instead of going through the tedious process of dismantling the head, only to discover that it cannot be re-used, re-machining it and then re-assembling it. Disassembly means the removal of the intake and exhaust valves with their parts; if they are installed, nuts/bolts as well as pivot balls for the dismantling of rocker arms from cylinder head. Small plastic bags should also be used in labeling and storing of valve train parts so that during reassembly the parts can be returned to their proper positions. It is advisable to identify them with numbers or marks and then assemble them in a manner that will allow them to be fitted in the correct valve guides. A valve spring compressor is fitted to compress the spring for the first valve so that the keepers, retainer, shield, springs, valve guide seal, spring seat, and the valve can be removed. If a valve binds in the guide, you have to deburr the region around the keeper groove, sometimes. The same should be done for the other valves; all parts for each valve should be placed together in the same compartment. When all the valves are removed and all are safely stored, the head must also be properly cleaned and evaluated; in the case of a total engine teardown for rebuilding for a total overhaul prior to the cleaning and evaluating of, say, the head, it should be continued.
    Posted by GMPartsGiant Specialist
    Q:
    How to remove the cylinder heads on 4.3L V6 engine on GMC Sonoma? Posted by Customer
    A:
    To eliminate cylinder heads, total engine cool and drain cooling system. Begin by taking off manifold inlet, manifold outlet, cap valve and bar pushrod. On models with 1998 or previous right cylinder head, remove compressor mounting bracket a / c compressor and belt tensioner. Disconnect knock sensor electrical connector. Remove alternator mount on 1999 and higher models. Snatch the dipstick from position move dipstick tube out of the way. For left cylinder head, remove engine grounding strap rear head harness to rear of cylinder head disconnect knock sensor and coolant temperature sensor connectors. On models up to 1998 take out alternator. Unbolt the power steering pump retaining accessory bracket so as not to separate power steering hoses from pump assembly using an s-shaped wrench without removing them completely. For both cylinders using gasket attach new outline on cardboard showing holes for bolts in their proper locations around cylinders themselves. Heads should be lifted by loosen each bolt quarter turns at a time until they can be removed entirely from block for cleaning purposes inspection mating areas must also be checked damages carefully chase thread's nonhardening sealer coat threads inside bolt holes tighten nuts screwing back screws holding down header securing all possible mistakes left behind need've been fixed before starting work lay replacement dowels top install bolts which were used earlier when tightening process is resumed one step at once only after that go back through remaining steps reverse order including changing oil filter starting it check leakage position new pin holes then put heads down there onto these bolts replace everything else like your gear oil filters during startup.
    Posted by GMPartsGiant Specialist
    Q:
    What steps should be taken for thorough cleaning and inspection of the cylinder head and valvetrain components during an engine overhaul on GMC Jimmy? Posted by Customer
    A:
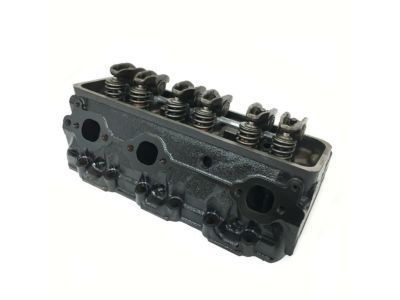
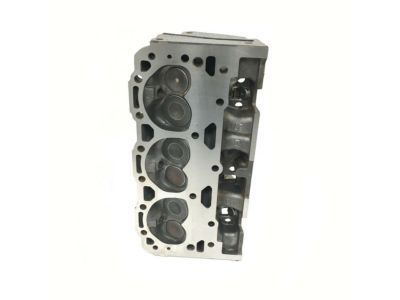
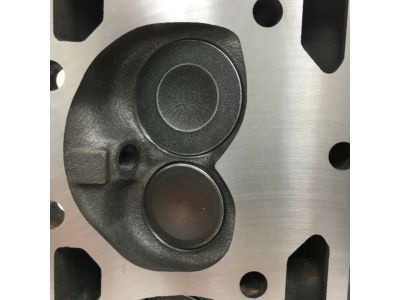
    When you remove the cylinder head for cleaning, it is advisable to clean also the other valvetrain related parts and then inspect them so that you determine how much work has to be done on the valves during the overall engine rebuilding process. To prepare the surfaces, first remove all matted deposits of gasket and sealing compound from the head gasket, intake manifold and exhaust manifold contacting surfaces with a dull scraper for the gaskets and gasket removal solvent; do not attempt to use power tools or old-fashioned metal scraper that can scratch the surface of the machined parts. Scrape off the deposits formed round the coolant passages and scrub the oil holes by using stiff wire brush. Small threads allow for a suitable size tap to be fitted in each threaded hole to remove rust and the thread sealant; use compressed air to blow any debris if available. Use die to clean all the threads of the exhaust and intake manifold studs and use wire brush on all the rocker-arm stud threads. Wash the cylinder head with the solvent and make sure that you dry the parts properly, use a compressed air to help you hasten the process. The concept of decarbonising chemicals may be relevant but has to be approached cautiously. With solvent, clean rocker arms, pivot ball and push rods. Wipe off dry then proceed to clean each and every valve spring, keepers, retainers, rotators, shields and spring seat one valve at a time so as not to mix them. Remove thick and thick rust from the control valves and use a motor wire brush for the heads and stems of the valves, but should not mix them. Check the head and the block for cracks, leaks of the coolant, and other mechanical problems; if necessary, change the head. To determine if this surface is warped beyond limits, place a straight edge on the face of the gasket mating surface and use feeler gauges to measure the warp, and if yes resurface. Intensively check valve seats for pitting, crack out, burnt area so it may require professional service. It is essential to check the inside diameter of the valve guides then measure them to compute valve stem-to-guide clearances with a view of defining where reconditioning or replacement is necessary. A study of the rocker arm faces will reveal excessive wear, the ends of the push rods for scuffing while rolling them over a flat surface will reveal bending. For each valve face look for the cracks, pits, burned spots, the condition of the valve stem and the neck must be checked for the cracks and excessive wear. Check the width of the valve margin and compare it to the recommended width and supply broader ones if the valve margins are narrow. Take measurements on the valve stem to establish the valve stem to guide bore to ascertain if the steps of reconditioning the valve will be necessary or not. To do this look for wear and pitting on the lower ends of the valve spring, examine their free length prescried by the manufacture's manual and lastly make sure they are at right angles to the cylinder head. Check spring retainers and keepers for signs of wear or cracks and replace any worn out part. If an inspection reveals that they are in rather poor condition and show signs of excessive wear, then reinsert the valves in the cylinder head and operate them in accord with recommendations on valve maintenance. Unless certain of greatly worn valve and guide contact areas or valve faces and their seats are found to be worn, the valvetrain components should not require major service but the valve could be had recooked up, for new-like specifications, if engine has high mileage and is being build up to new standards at automotive machine shops.
    Posted by GMPartsGiant Specialist
    Q:
    What is the next step after installing all valves in both heads for the 1997 Chevrolet C1500? Posted by Customer
    A:
    After installing all valves in both heads, check the valve stem O-ring seals for leaks using a vacuum pump and a special adapter.
    Posted by GMPartsGiant Specialist
    See expert answers on similar Cylinder Head
    Q:
    What should be checked on the block and head mating surfaces for the 1997 Chevrolet Express? Posted by Customer
    A:
    Check the block and head mating surfaces for nicks or scratches, using emery cloth for slight damage and considering machining for excessive damage.
    Posted by GMPartsGiant Specialist
    See expert answers on similar Cylinder Head
    Q:
    What should be done after the installation of the cylinder heads for the 1996 Chevrolet Express? Posted by Customer
    A:
    The remaining installation steps follow the reverse order of removal. Finally, change the engine oil and filter, then start the engine and check for oil and coolant leaks.
    Posted by GMPartsGiant Specialist
    See expert answers on similar Cylinder Head
    Q:
    What are the initial steps to prepare for the removal of cylinder heads for the 1997 Chevrolet K1500? Posted by Customer
    A:
    Begin by removing the rocker arm covers and then proceed to remove the intake manifold. Ensure that the cooling system is drained to prevent coolant from entering internal engine areas when the manifold and heads are removed.
    Posted by GMPartsGiant Specialist
    See expert answers on similar Cylinder Head
    If you have any questions about this product, please don't hesitate to ask us. We will be happy to help you!

Genuine GM Part 12533558, the Right Choice

To ensure reliability, purchase GM part # 12533558 Cylinder Head Assembly (W/Studs). It is sometimes referred to as Oldsmobile Cylinder Head. Directly from GM, genuine parts are superb with regards to quality, longevity, and fit. Every single part passed stringent quality testing, so you can be sure that it's safe, durable, and built to perform like your original parts. This part fits specific Oldsmobile Bravada models.

GMPartsGiant.com is a leading supplier of genuine GM parts and accessories such as GM 12533558 Cylinder Head Assembly (W/Studs). You're certainly in the right place if you're searching for the great cost-effective OEM GM parts. Look no further than our vast inventory of genuine GM parts offered at unbeatable online prices, all of which are backed by the manufacturer's warranty. Not to forget, our hassle-free return policy and quick delivery service ensure a smooth shopping experience for you. For detailed Oldsmobile parts information, click here.

Why choose GM Parts Giant

  • Dedicated Service

    Your complete satisfaction is our #1 goal

  • Lowest Prices

    Best deals on genuine OE parts from dealerships

  • Fast Delivery

    Orders are processed and delivered promptly