Make sure this part fits

GM 12601240 Pan,Oil

2001-2017 GM

Customer Questions & Expert Answers (14)
GM 12601240 Pan,Oil
  • Part Description
    PAN, Engine Oil
  • Replaces
    12578193
  • Manufacturer
    General Motors
Make sure this part fits
$151.86 MSRP: $261.96
You Save: $110.10 (43%)
Ships in 1-2 Business Days
1
ADD TO CART
  • Related Parts
  • Product Specifications
  • Vehicle Fitment
  • Customer Questions & Expert Answers
  • Product Specifications

    BrandGenuine GM
    Manufacturer Part Number12601240
    Part DescriptionPAN, Engine Oil
    Other NamesOil Pan
    Item Dimensions21.8 x 16.3 x 14.7 inches
    Item Weight10.70 Pounds
    ConditionNew
    Fitment TypeDirect Replacement
    Replaces12578193
    ManufacturerGeneral Motors
    SKU12601240
    WarrantyThis genuine GM part is guaranteed by GM's factory warranty.
    Shipping & ReturnShipping Policy Return Policy
    Warning: California's Proposition 65
  • Vehicle Fitment

    Year Make Model Engine Important vehicle option details
    2010-2015 Buick Allure4 Cyl 2.4LCX 4 DOOR SEDAN, CXL 4 DOOR SEDAN
    2010-2016 Buick LaCrosse4 Cyl 2.4LCX 4 DOOR SEDAN, CXL 4 DOOR SEDAN
    2011-2017 Buick Regal4 Cyl 2.4LCX 4 DOOR SEDAN, CXL 4 DOOR SEDAN
    2012-2017 Buick Verano4 Cyl 2.4LCX 4 DOOR NOTCHBACK, CXL 4 DOOR NOTCHBACK
    2012-2015 Chevrolet Captiva Sport4 Cyl 2.4LSPORT LS FWD, SPORT LT FWD
    2005-2010 Chevrolet Cobalt4 Cyl 2.0L, 4 Cyl 2.2L, 4 Cyl 2.4L2 DOOR, 4 DOOR, LEVEL 4 PERFORMANCE (SS) 2 DOOR, LEVEL 4 PERFORMANCE/SC (SS) 2 DOOR, LEVEL 4 PERFORMANCE/SC (SS) 4 DOOR, LEVEL ONE (LS) 2 DOOR, LEVEL ONE (LS) 4 DOOR, LEVEL THREE (SS) 2 DOOR, LEVEL THREE (SS) 4 DOOR, LEVEL TWO (LT) 2 DOOR, LEVEL TWO (LT) 4 DOOR
    2010-2017 Chevrolet Equinox4 Cyl 2.4LLS SUV, LT SUV, LTZ SUV
    2006-2011 Chevrolet HHR4 Cyl 2.0L, 4 Cyl 2.2L, 4 Cyl 2.2L Flex, 4 Cyl 2.4L5 DOOR HIGH ROOF HATCHBACK, 5 DOOR HIGH ROOF HATCHBACK SS, 5 DOOR HIGH ROOF PANEL, 5 DOOR HIGH ROOF PANEL SS, 5 DOOR UPLEVEL HIGH ROOF HATCHBACK, 5 DOOR UPLEVEL HIGH ROOF PANEL
    2014 Chevrolet Impala4 Cyl 2.4LLS 4 DOOR NOTCHBACK, LT 4 DOOR NOTCHBACK
    2005-2014 Chevrolet Malibu4 Cyl 2.2L, 4 Cyl 2.4L4 DOOR HATCHBACK, 4 DOOR HYBRID, 4 DOOR NOTCHBACK, BASE 4 DOOR NOTCHBACK, LS 4 DOOR HATCHBACK, LS 4 DOOR NOTCHBACK, LT 4 DOOR HATCHBACK, LT 4 DOOR NOTCHBACK, LTZ 4 DOOR HATCHBACK, LTZ 4 DOOR NOTCHBACK, MAXX SS 4 DOOR HATCHBACK, SS 4 DOOR NOTCHBACK
    View More
  • Customer Questions & Expert Answers

    Q:
    I am wonder if this is complete and correct part for my vehicle. Posted by GMPartsGiant Specialist
    A:
    You can Select Your Vehicle to check if 12601240 fits your vehicle.
    Posted by GMPartsGiant Specialist
    Q:
    How to remove and install the oil pan on Chevrolet Cobalt? Posted by Customer
    A:
    On 2008 and later 2.0L turbocharged engines, the engine must be raised enough to provide clearance to remove the oil pan. An engine support fixture or other safe engine lifting device must be used. Additionally, the passenger-side engine mount must be removed. Drain the engine oil and remove the drivebelt. Loosen the right-front wheel lug nuts, raise the front of the vehicle and support it securely on jackstands. Remove the right front wheel. Remove the splash shield from below the right side of the engine compartment. Remove the lower air conditioning compressor mounting bolt. Loosen, but don't remove, the other compressor mounting bolts. Remove the dipstick and the dipstick tube (the tube is bolted to the intake manifold). On 2.0L supercharged engines, remove the intercooler pump bracket bolt at the oil pan. Remove the oil pan bolts. Follow the reverse of the tightening sequence. Carefully remove the oil pan from the lower crankcase. If the oil pan is difficult to separate from the lower crankcase, use a rubber mallet or a block of wood and a hammer to jar it loose. If it's stubborn and still won't come off, pry carefully on casting protrusions (not the mating surfaces!). Installation: Using a gasket scraper, thoroughly clean all old gasket material from the lower crankcase and oil pan. Remove residue and oil film with a solvent such as acetone or lacquer thinner. Apply a 2 mm bead of RTV sealant to the perimeter of the oil pan, inboard of the bolt holes, and around the oil suction port. Allow the sealant to set-up before installing the oil pan to the engine (but be sure to install the pan within the time given by the sealant manufacturer). Install the oil pan and bolts. Follow the correct torque sequence and lighten the bolts to the torque. The remaining installation is the reverse of removal. Be sure to lighten the wheel lug nuts to the torque. Refill the engine with oil and install a new oil filter, then run the engine and check for leaks.
    Posted by GMPartsGiant Specialist
    Q:
    How to remove and install an oil pan in 3.4L V6 engine on Chevrolet Equinox? Posted by Customer
    A:
    To remove the oil pan it is necessary to detach the cable from the negative terminal of the battery and use the fixture for the engine and the jack-stands to lift the car. Withdraw the engine oil and remove the oil filter, and also pull the transaxle brace out from the oil pan. After that, take out the starter bolts and the air conditioning compressor and place the later beside. In case there is an AWD vehicle, this requires elimination of the transfer case; for FWD car, eliminate the driveaxle together with the intermediate shaft. It is helpful to use the engine support fixture to take some of the weight off of the engine mounts and then remove one of the front engine mounts and lift the engine as necessary. Take off the RH rear oil pan to transaxle bolt, then remove the oil pan side bolts and the vertical mounting bolts. Take special caution when removing the oil pan from the block; use gentle force as possible taking the use of a soft-face hammer while striking lightly on the surfaces that are adjacent to the sealing areas. For refitting remove the pan and wipe the exterior and interior with a clean cloth and, using a scraper, remove all residual sealant and gasket material from the mating gasket surfaces; apply RTV sealant to the required joints and slip on the new oil pan gasket. Place the oil pan onto the block and fit the upper nuts/bolts Or thread the bolt into the hole first and then put the nut next to it before tightening all to the torque mentioned above and this should be done in a criss-cross manner, three times. Once the pan-to-block bolts are engaged tighten the oil pan side bolts together with the oil pan to transaxle brace. The following is a step by step process of conducting the remove and reinstall procedure of the vehicle engine: Reversing the removal process, add the necessary oil to the engine, start the vehicle to reach normal operational temperature as well as checking for any signs of leakage.
    Posted by GMPartsGiant Specialist
    Q:
    How to remove and install the oil pan on Chevrolet HHR? Posted by Customer
    A:
    On 2008 and later 2.0L turbocharged engines, the engine must be raised enough to provide clearance to remove the oil pan. An engine support fixture or other safe engine lifting device must be used. Additionally, the passenger-side engine mount must be removed. Drain the engine oil and remove the drivebelt. Loosen the right-front wheel lug nuts, raise the front of the vehicle and support it securely on jackstands. Remove the right front wheel. Remove the splash shield from below the right side of the engine compartment. Remove the lower air conditioning compressor mounting bolt. Loosen, but don't remove, the other compressor mounting bolts. Remove the dipstick and the dipstick tube (the tube is bolted to the intake manifold). On 2.0L supercharged engines, remove the intercooler pump bracket bolt at the oil pan. Remove the oil pan bolts. Follow the reverse of the tightening sequence. Carefully remove the oil pan from the lower crankcase. If the oil pan is difficult to separate from the lower crankcase, use a rubber mallet or a block of wood and a hammer to jar it loose. If it's stubborn and still won't come off, pry carefully on casting protrusions (not the mating surfaces!). Installation: Using a gasket scraper, thoroughly clean all old gasket material from the lower crankcase and oil pan. Remove residue and oil film with a solvent such as acetone or lacquer thinner. Apply a 2 mm bead of RTV sealant to the perimeter of the oil pan, inboard of the bolt holes, and around the oil suction port. Allow the sealant to set-up before installing the oil pan to the engine (but be sure to install the pan within the time given by the sealant manufacturer). Install the oil pan and bolts. Follow the correct torque sequence and lighten the bolts to the torque. The remaining installation is the reverse of removal. Be sure to lighten the wheel lug nuts to the torque. Refill the engine with oil and install a new oil filter, then run the engine and check for leaks.
    Posted by GMPartsGiant Specialist
    Q:
    How to remove and install an oil pan in 2.4L four cylinder engine on GMC Terrain? Posted by Customer
    A:
    Before you can get the oil pan, you have to drop the engine oil and the drivebelt as well. Turn the right-front wheel lug nuts slightly counterclockwise, lift the front of the car, and set it on jackstands, then remove the right front wheel. Then pull the splash shield with bolts and nuts from under the right side of the engine compartment; now unbolt the lower air conditioning compressor mounting bolt but do not detach the other bolts. Take off the dipstick and dipstick tube which is located on the intake manifold by being bolted on it. Suspend an engine support which works across the top of the engine on the fender edges and must be securely bolted together. Disconnect the right engine mount and the bolts for the secondary air injection pump, lift the pump off the side of the oil pan and set aside, suspend. Unfasten the four bolts joining the oil pan to transaxle and the rest of the oil pan bolts in a reversal of the tightening pattern and after doing that detach the oil pan from the lower crankcase using a rubber mallet if necessary. For installation, counter sunk and cleaned all the old gasket material in the lower crankcase and the oil pan with a gasket scraper and solvent. Squirt a 2 mm thick layer of RTV sealant along the margin of the oil pan, inside the circles defined by the bolt holes and around the oil suction port prior to the installation of the oil pan. Substitute the oil pan and bolts to engage them as tightly as possible in a sequence as recommended within the torque limits. The rest of the installation is done in the reverse order to the removal and it is important to tighten the wheel lug nuts to the proper torque. Last but not the least, the amounts of oil in the engine should be replenished, an oil filter should be changed and the engine should be started to check if there is any leakage.
    Posted by GMPartsGiant Specialist
    Q:
    How to remove and install an oil pan in 3.0L and 3.6L V6 engine on GMC Terrain? Posted by Customer
    A:
    The steps to follow so as to remove the oil pan involve lifting the vehicle by using the jack and placing it on the jackstand. Then take out the engine torque mounts, then the fasteners for the splash shield and the shield itself. Discharge the engine oil and also remove the oil filter. On 3.6L models, a fixture that bolsters the top of the engine, and is bolted to it in a way that will support its weight, should be in place. Remove the exhaust manifold and the catalytic converter and take out the pipes that are connecting the two. Unbolt and pull out the air conditioning compressor and next take the timing chain front cover also. Now, the mounting bolts of the oil pan has to be taken off and then, at the right points, the oil pan has to be lifted. After the removal of bolts fitted at the base of oil pan, the oil pickup can be taken out and if the pickup seal has been removed, then, it must be replaced. For installation, clean the oil pan and the engine block, examine the oil pump pickup for crack and obstruction. Replace the oil seal on the oil pump pickup, replace the pickup and secure with the fasteners. Bend two parallel studs from M8 x1.25 mm bolts having head using the bolt holes labelled 1 and 2 for orientation and screw them into the oil pan. Squash on a 3mm-wide strip of oxygen sensor-safe RTV sealant over the oil pan mating face and over the four corners where front and rear covers join the block. Place the oil pan and fasten the bolts just enough till loose, then remove the aligning studs and fasten the oil pan bolts in proper sequence with the standard torque, a special case for the two bolts accepting the rear main oil seal housing. Last processes are similar to the removal processes but in the opposite order; new oil filter is installed, correct type and amount of oil is added and the engine is started and checked for any leakage.
    Posted by GMPartsGiant Specialist
    Q:
    How to disconnect the cable from the negative terminal of the battery and remove the oil pan in 3.5L,3.9L V6 engine on Pontiac G6? Posted by Customer
    A:
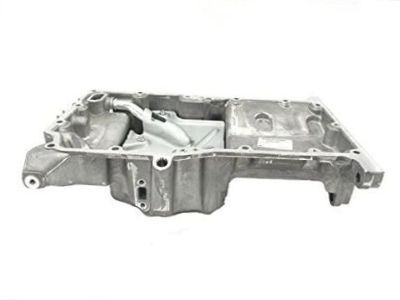
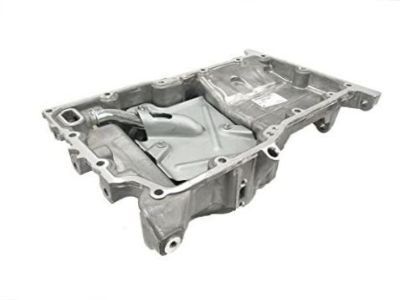
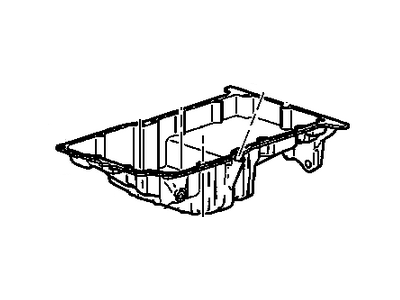
    Disconnect the cable from the negative terminal of the battery. If working on a 3.5L engine, install an engine support fixture, raise the vehicle, and support it securely on jackstands. Drain the engine oil and remove the starter. Remove the air conditioning compressor mounting bolts and position it to the side. For 3.9L engines, disconnect the oil level sensor wiring. Remove all transaxle braces from the oil pan and then the oil pan mounting bolts. For 3.5L V6 models, remove the oil filter and its adapter, take the weight off the engine mounts using the engine support fixture, and remove the engine mount bracket from the front passenger side of the engine. Remove the torque converter bolts, ground wires, and wiring brackets from the transaxle. Loosen all transaxle-to-engine bolts a few turns without removing them, then raise the engine/transaxle assembly slightly. Remove the oil pan mounting bolts and pull the engine about 1/2-inch away from the transaxle to allow the oil pan to clear the protruding boss on the transaxle. Carefully separate the oil pan from the block without prying between the block and the pan to avoid damaging the sealing surfaces. Clean the pan with solvent, removing all old sealant and gasket material from the block and pan mating surfaces, and ensure the bolt holes in the block are clear. Apply a bead of RTV sealant to the front of the gasket and each side of the rear main cap, then install the new one-piece oil pan gasket. Place the oil pan in position on the block and install the nuts/bolts, tightening them to the specified torque starting at the center. After tightening the pan-to-block bolts, install the oil pan side bolts and tighten them to torque. For 2007 and later 3.5L models, re-join the engine and transaxle, tightening the bolts to torque, and install the flywheel/drive plate-to-torque converter bolts. Install the oil pan-to-transaxle brace and torque the bolts to specifications. For 3.9L V6 engines, install the transaxle brace and tighten the bolts to torque. The remaining steps are the reverse of the removal procedure, tightening the subframe bolts to torque. Refill the engine with oil, run it until normal operating temperature is reached, and check for leaks.
    Posted by GMPartsGiant Specialist
    Q:
    How to remove and install an engine oil pan in four cylinder engine on Saturn Vue? Posted by Customer
    A:
    Before pulling the engine out, there is an engine support that has to be fitted across the engine bay and this will need to have some of the weight shifted off the right engine mount. Place the vehicle on car jacks so that it is raised well and then remove the engine oil of the vehicle. Next, a right engine mount and its bracket should be detached and the engine should be raised several inches for the oil pan. Lose the lower air conditioning compressor mounting bolt and half tighten the other three compressor mounting bolts without pulling them out. Remove the dipstick and the dipstick tube which is fixed to the intake manifold. Loosen the oil pan bolts in the order of how they were tightened and then gently un bolt the oil pan from the lower crankcase. For installation, remove old gasket deposits from the lower crank case and oil pan using gasket scraper and brake system cleaner with a view of removing the remaining deposits and oil films. Use a 2 mm thickness of the RTV sealant along the circumference of the oil pan, to the inside of the bolt holes' interior and around the oil suction port before fitting of the oil pan is done. Bolt the oil pan and its bolts into a suitable sequence in the right torque for the car model. Reassemble the carrier in the reverse order in which the following components were removed; do not forget to tighten the wheel lug nuts to the correct torque. Last but not the least, put back the oil used earlier, replace the oil filter, let the engine run and then look out for any dripping.
    Posted by GMPartsGiant Specialist
    Q:
    How to remove and install an oil pan in 3.5L V6 engine on Saturn Vue? Posted by Customer
    A:
    To remove the oil pan, first disconnect the cable from the negative terminal of the battery, block the rear wheels, and set the parking brake. Raise the front of the vehicle and support it securely on jackstands. Drain the engine oil and remove the oil filter. Unbolt the exhaust pipes from the upper catalytic converter assemblies and from the rear portion of the exhaust system, then remove the front portion of the exhaust system along with its bracket. Remove the torque converter cover if equipped, then unbolt and lower the oil pan. If the pan is stuck, carefully pry at the tabs on the casting corners without damaging the mating surfaces. For installation, use a scraper to remove all traces of old sealant from the block and oil pan, ensuring not to gouge the soft aluminum surfaces, and clean the mating surfaces with brake system cleaner. Make sure the threaded bolt holes in the block are clean and inspect the oil pump pick-up screen assembly for damage and a blocked strainer. Apply a bead of gray RTV sealant to the mating surface of the oil pan and install it within 4 minutes of sealant application. Carefully position the oil pan on the engine block and install the bolts, tightening them gradually in a criss-cross pattern to the specified torque. After tightening the oil pan-to-block bolts, also tighten the pan-to-trans axle bolts. The remainder of the installation follows the reverse order of removal, ensuring to add oil and install a new oil filler. Wait 30 minutes to allow the sealant to cure before adding oil, then reconnect the battery and run the engine to check for oil pressure and leaks.
    Posted by GMPartsGiant Specialist
    Q:
    What is the cleaning procedure for the lower crankcase and oil pan for the 2013 Chevrolet Malibu? Posted by Customer
    A:
    Clean all old gasket material from the lower crankcase and oil pan, ensuring the surface is oil-free before applying sealant.
    Posted by GMPartsGiant Specialist
    See expert answers on similar Oil Pan
    Q:
    What is the first step to remove the oil pan for the 2007 Pontiac G6? Posted by Customer
    A:
    The first step is to drain the engine oil and take off the drivebelt.
    Posted by GMPartsGiant Specialist
    See expert answers on similar Oil Pan
    Q:
    How should the 2006 Pontiac G6 be prepared for oil pan removal? Posted by Customer
    A:
    Raise the vehicle and support it securely on jackstands, then remove the right engine mount.
    Posted by GMPartsGiant Specialist
    See expert answers on similar Oil Pan
    Q:
    What should be applied to the oil pan before installing it for the 2005 Saturn ION? Posted by Customer
    A:
    Apply a 2 mm bead of RTV sealant to the perimeter of the oil pan, inboard of the bolt holes, and around the oil suction port. Allow the sealant to set-up before installing the oil pan to the engine (but be sure to install the pan within the time given by the sealant manufacturer).
    Posted by GMPartsGiant Specialist
    See expert answers on similar Oil Pan
    Q:
    How should the oil pan be separated from the engine block for the 2006 Saturn Vue? Posted by Customer
    A:
    Carefully separate the oil pan from the engine block, avoiding prying between the two surfaces except at designated pry points to prevent damage and potential oil leaks. If needed, use a large rubber mallet or a wood block and hammer to dislodge it.
    Posted by GMPartsGiant Specialist
    See expert answers on similar Oil Pan
    If you have any questions about this product, please don't hesitate to ask us. We will be happy to help you!

Genuine GM Part 12601240, the Right Choice

To ensure reliability, purchase GM part # 12601240 Pan,Oil. It is sometimes referred to as GM Oil Pan. Directly from GM, genuine parts are superb with regards to quality, longevity, and fit. Every single part passed stringent quality testing, so you can be sure that it's safe, durable, and built to perform like your original parts. This part fits specific Buick Allure, LaCrosse, Regal models. It fits Chevrolet Cobalt, Equinox, Impala. It also fits GMC Terrain. This also fits Saturn Ion, L200, LW200.

GMPartsGiant.com is a leading supplier of genuine GM parts and accessories such as GM 12601240 Pan,Oil. You're certainly in the right place if you're searching for the great cost-effective OEM GM parts. Look no further than our vast inventory of genuine GM parts offered at unbeatable online prices, all of which are backed by the manufacturer's warranty. Not to forget, our hassle-free return policy and quick delivery service ensure a smooth shopping experience for you. For detailed GMC parts information, click here.

Why choose GM Parts Giant

  • Dedicated Service

    Your complete satisfaction is our #1 goal

  • Lowest Prices

    Best deals on genuine OE parts from dealerships

  • Fast Delivery

    Orders are processed and delivered promptly