Make sure this part fits

Cadillac 89060436 Seal Kit,Crankshaft Rear Oil

2002-2024 Cadillac

Customer Questions & Expert Answers (34)
GM 89060436 Seal Kit,Crankshaft Rear Oil
  • Part Description
    SEAL KIT, Engine Rear Main Bearing
  • Position
    Rear
  • Replaces
    12550574, 12585671, 89018162
  • Manufacturer
    General Motors
Make sure this part fits
$21.93 MSRP: $36.30
You Save: $14.37 (40%)
Ships in 1-3 Business Days
1
ADD TO CART
  • Related Parts
  • Product Specifications
  • Vehicle Fitment
  • Customer Questions & Expert Answers
  • Product Specifications

    BrandGenuine Cadillac
    Manufacturer Part Number89060436
    Part DescriptionSEAL KIT, Engine Rear Main Bearing
    Other NamesCrankshaft Seal, Rear Main Seal
    Item Dimensions5.1 x 5.3 x 1.0 inches
    Item Weight0.50 Pounds
    PositionRear
    ConditionNew
    Fitment TypeDirect Replacement
    Replaces12550574, 12585671, 89018162
    ManufacturerGeneral Motors
    SKU89060436
    WarrantyThis genuine GM part is guaranteed by GM's factory warranty.
    Shipping & ReturnShipping Policy Return Policy
    Warning: California's Proposition 65
  • Vehicle Fitment

    Year Make Model Engine Important vehicle option details
    2022-2024 Cadillac CT58 Cyl 6.2LV-SERIES NOTCHBACK-BLACKWING
    2009-2019, 2004-2007 Cadillac CTS8 Cyl 5.7L, 8 Cyl 6.0L, 8 Cyl 6.2L4 DOOR V-SERIES SEDAN, V 2 DOOR COUPE, V 4 DOOR, V 4 DOOR SEDAN, V 4 DOOR WAGON
    2023-2024, 2002-2014 Cadillac Escalade8 Cyl 5.3L, 8 Cyl 6.0L, 8 Cyl 6.0L Flex, 8 Cyl 6.2L, 8 Cyl 6.2L Flex1/2 TON, 3/4 TON, EXT 1/2 TON, EXT 3/4 TON, YUKON XL/DENALI XL/ESCALADE ESV, YUKON/DENALI/ESCALADE
  • Customer Questions & Expert Answers

    Q:
    Do these parts fit my vehicle? Posted by GMPartsGiant Specialist
    A:
    You can Select Your Vehicle to check if 89060436 fits your vehicle.
    Posted by GMPartsGiant Specialist
    Q:
    How to install a new rear crankshaft seal during a complete engine overhaul in 5.7L, 6.0L, 6.2L V8 engine on Cadillac CTS? Posted by Customer
    A:
    When carrying out a complete engine overhaul and instilling a new rear Crankshaft Seal, start by disconnecting the transmission. Next, you should remove the flywheel/driveplate. Twist the Crankshaft Seal counterclockwise from the rear cover by applying the use of a screwdriver and ensure that you do not damage the crankshaft or the seal bore. Also, notice how far the old seal is sunk into the housing bore for the correct position of the new seal. Wipe the inside of the seal bore with a shop towel, but make sure that no dirt or oil gets in contact with the area. Apply a thin line of lubricant over the outside diameter of the new seal and slip it over the end of the crankshaft so that it has the lip facing towards the engine. It is preferred to use an end-loading type of seal installation tool to drive the new seal into place; this can be done with a large socket, section of pipe, or other blunt tool if no seal installation tool is available to drive the seal fully into the bore and flush with the rear cover. Last but not least, the fitting of the flywheel or drive plate has to be followed by the fitting of the transmission.
    Posted by GMPartsGiant Specialist
    Q:
    How to disconnect the cable from the negative battery terminal and replace the rear crankshaft seal in 2.8L, 3.0L, 3.6L V6 engine on Cadillac CTS? Posted by Customer
    A:
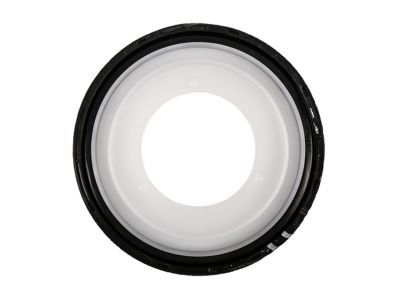
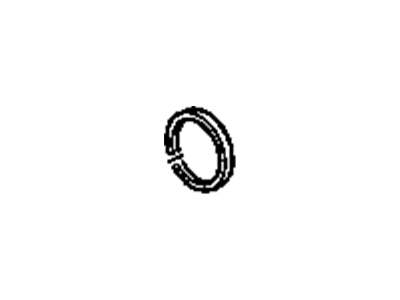
    Disconnect the cable from the negative battery terminal. Remove the transmission and then take out the flywheel/driveplate along with the oil pan. Remove the retaining bolts and take off the seal housing from the engine, being careful not to scratch the machined faces of the cylinder block, rear Crankshaft Seal housing, or oil pan while scraping old gasket material. Thoroughly clean the mounting surfaces of the oil pan, rear Crankshaft Seal housing, and engine block of old gasket material and sealer, using a rag soaked in lacquer thinner, acetone, or brake cleaner. If the seal is supplied separately from the seal housing, note the installed position of the old seal before tapping it out with a small punch or seal removal tool. Lubricate the outside diameter of the new seal and install it over the seal housing, ensuring the lip points toward the engine. Preferably, use a seal installation tool to press the new seal back into place; if unavailable, use a large socket, section of pipe, or a blunt tool to carefully drive the new seal squarely into the seal bore to the same position as the original seal. Install two threaded dowel pins to the cylinder block for correct rear Crankshaft Seal housing alignment. Apply a 1/8-inch (3mm) wide bead of RTV sealant around the mating face of the rear Crankshaft Seal housing, avoiding the bolt holes. Slide the seal over the crankshaft and dowel pins, then tighten the upper bolts finger-tight. Most new rear Crankshaft Seals and housing assemblies come with a seal protector on the inside running face of the seal, which should remain in place until the housing is positioned. Remove the dowel pins and install the remaining rear Crankshaft Seal housing bolts, tightening them to the specified torque before removing the seal protector. Install the oil pan and flywheel/driveplate, then complete the installation in reverse order of removal. Finally, add oil, run the engine, and check for oil leaks.
    Posted by GMPartsGiant Specialist
    Q:
    How to remove and install front Crankshaft Seal in V8 engine on Chevrolet Avalanche? Posted by Customer
    A:
    Remove the crankshaft balancer. Note how the seal is installed the new one must be installed to the same depth and facing the same way. Carefully pry the oil seal out of the cover with a seal puller or a large screwdriver. Be very careful not to distort the cover or scratch the crankshaft! Wrap the electrician's tape around the tip of the screwdriver to avoid damage to the crankshaft. If the seal is being replaced with the timing chain cover removed, support the cover on top of two blocks of wood and drive the seal out from the rear with a hammer and punch. Apply clean engine oil or multi-purpose grease to the outer edge of the new seal, then install it in the cover with the lip (spring side) facing IN. Drive the seal into place with a large socket and a hammer (if a large socket isn't available, a piece of pipe will also work). Make sure the seal enters the bore squarely and stops when the front face is at the proper depth. Check the surface on the balancer hub that the crankshaft seal rides on. If the surface has been grooved from long-time contact with the seal, replace the crankshaft balancer. Lubricate the balancer hub with clean engine oil and reinstall the crankshaft balancer. The remainder of installation is the reverse of removal.
    Posted by GMPartsGiant Specialist
    Q:
    How can the rear crankshaft seal be removed in V6 engine on Chevrolet Camaro? Posted by Customer
    A:
    The rear Crankshaft Seal cannot be removed from the seal housing; both components are only serviceable as a single unit. Begin by disconnecting the cable from the negative battery terminal. Next, remove the transmission, followed by the flywheel/driveplate and the oil pan. After that, remove the retaining bolts to detach the seal housing from the engine. Thoroughly clean the mounting surfaces of the oil pan, rear Crankshaft Seal housing, and engine block to eliminate old gasket material and sealer, using a rag soaked in lacquer thinner, acetone, or brake cleaner. Install two threaded dowel pins to the cylinder block for proper alignment of the rear Crankshaft Seal housing. Apply a 1/8-inch (3mm) wide bead of RTV sealant around the mating face of the rear Crankshaft Seal housing, ensuring not to fill the bolt holes. Slide the seal over the crankshaft and dowel pins, then tighten the upper bolts finger-tight. Most new rear Crankshaft Seals and housing assemblies come with a seal protector on the inside running face of the seal, which should remain in place until the housing is positioned. Remove the dowel pins and install the remaining rear Crankshaft Seal housing bolts, tightening them to the specified torque before removing the seal protector. Proceed to install the oil pan and flywheel/driveplate. The remainder of the installation follows the reverse order of removal. Finally, add oil, run the engine, and check for any oil leaks.
    Posted by GMPartsGiant Specialist
    Q:
    How to remove and install the rear crankshaft seal in inline engine on Chevrolet Colorado? Posted by Customer
    A:
    To remove the transmission, first, it is necessary to remove the driveplate or flywheel. Check for leakage around the Crankshaft Seal, oil pan, the surface of the engine block, and the Crankshaft Seal housing since, in most cases, an oil pan gasket leak will appear as a rear Crankshaft Seal leak. Subsequently, take off the rear Crankshaft Seal housing bolts jointly with the other two bolts that fix the oil pan at the rear Crankshaft Seal housing. Place two nuts on the jackscrews and fasten each until the housing is freely parted from the block, then, remove the housing. Remove the rear Crankshaft Seal from the housing and determine whether the crankshaft has nicks, grooves as well as damages. For installation, wash and examine any region of the Crankshaft Seal housing before greasing the outer rim of the seal with engine oil, avoiding the inner circle that ought to touch the crankshaft in order to avoid leakage. Place the seal into the housing so that the lips are toward the engine; this may require the use of a special implement to drive it home, if such an implement is available, the seal should not be struck to a greater depth than it was originally. Place an approximate 3/16-inch bead of RTV sealant on the housing to block contact area and engage the housing to the block with the seal lips fitted over the crankshaft, but not folded. Last, include the bolts and tighten them with the required torque and then the driveplate together with the transmission was installed.
    Posted by GMPartsGiant Specialist
    Q:
    How to remove and replace the rear crankshaft seal in V8 engine on Chevrolet Camaro? Posted by Customer
    A:
    Remove the transmission. Next, pull out the flywheel / driveplate and place it to one side for the time being. Remove the Crankshaft Seal with a screwdriver from the crankshaft front side but be gentle lest you mar the crankshaft or the seal bore. See how far the old seal is sunk into the housing bore before its removal, to be able to align the new seal correctly. Using the shop towel clean the seal bore in the block and make sure that it is free from oil and dirt. Apply oil externally on the new seal and place it over the end of the crankshaft, the lip side should face the engine. If possible insert a seal installation tool into the hole and push the new seal back into the correct position; if a seal installation tool is not available, a large socket extension fitted to a pipe, or any blunt implement can be used in the correct manner to center the new seal in the seal bore and flush with the rear cover. Last, fit the flywheel/driveplate on the engine and then the transmission was fitted as well.
    Posted by GMPartsGiant Specialist
    Q:
    How to remove and replace the rear crankshaft seal on Chevrolet Corvette? Posted by Customer
    A:
    Take out the transmission and driveshaft out of the car entirely. Following that, remove the flywheel/driveplate. By using a screw driver you pry the Crankshaft Seal from the rear cover being very careful not to damage the crankshaft or scratch the seal bore. Observe the depth of the old seal for the right fit before installing the new seal, then, use shop towel in cleaning the seal bore to remove any oil or dirt. Put some oil on the outer diameter of the new seal, and place it over the tip of the crankshaft with the help of your fingers; the lips should face the engine. If possible, recommended sealing installation tool should be used and in the absence of the tool, a large socket, a section of a pipe or any blunt tool must be used to force the seal to fit tightly in the bore and flush with the rear cover. Last but not the least, refit the flywheel/driveplate and even the transmission and the driveshaft.
    Posted by GMPartsGiant Specialist
    Q:
    How to install a new rear crankshaft seal during a complete engine overhaul in 4.8L, 5.3L, 6.0L V8 engine on Chevrolet Express? Posted by Customer
    A:
    If you're installing a new rear Crankshaft Seal during a complete engine overhaul, begin by removing the transmission. Next, take out the driveplate. Carefully pry the Crankshaft Seal from the rear cover using a screwdriver, ensuring not to nick or scratch the crankshaft or the seal bore. Note how far the old seal is recessed into the housing bore for proper installation depth of the new seal. Clean the seal bore in the block thoroughly with a shop towel, removing all traces of oil and dirt. Lubricate the outside diameter of the new seal and install it over the end of the crankshaft, ensuring the lip points toward the engine. Ideally, use a seal installation tool to press the new seal into place; if unavailable, a large socket can be used to drive the seal squarely into the bore and flush with the rear cover. Finally, reinstall the driveplate and then the transmission.
    Posted by GMPartsGiant Specialist
    Q:
    How to remove and replace the rear crankshaft seal in V6 engine on Chevrolet Impala? Posted by Customer
    A:
    Remove the transaxle and then the driveplate. Inspect the Crankshaft Seal, oil pan, and engine block surface for signs of leakage, as an oil pan gasket leak can sometimes mimic a rear Crankshaft Seal leak. Carefully pry the Crankshaft Seal from the block using a screwdriver, taking care not to nick or scratch the crankshaft or seal bore. Clean the seal bore thoroughly with a shop towel, ensuring all oil and dirt are removed. Lubricate the lips of the new seal with engine oil or multi-purpose grease, then install it over the end of the crankshaft, ensuring the lips point toward the engine, and carefully tap it into place. A special aftermarket tool may be available at local auto parts stores to assist with this process; it fits the diameter of the seal and, when used with a hammer, drives the seal in without exceeding the depth of the original installation. Finally, reinstall the driveplate and then the transaxle.
    Posted by GMPartsGiant Specialist
    Q:
    How to remove and replace the rear crankshaft seal in V8 engine on Chevrolet Impala? Posted by Customer
    A:
    Remove the transaxle. Next, take out the driveplate. Carefully pry the Crankshaft Seal from the rear cover using a screwdriver, ensuring not to nick or scratch the crankshaft or the seal bore. Note how far the old seal is recessed into the housing bore for proper installation depth of the new seal. Clean the seal bore thoroughly with a shop towel, removing all traces of oil and dirt. Lubricate the outside diameter of the new seal and install it over the end of the crankshaft, ensuring the lip points toward the engine. Ideally, use a seal installation tool to press the new seal into place; if unavailable, a large socket, section of pipe, or blunt tool can be used to drive the seal squarely into the bore and flush with the rear cover. Finally, install the flywheel/driveplate and then the transmission.
    Posted by GMPartsGiant Specialist
    Q:
    How to replace rear crankshaft seal on V8 engine on GMC Yukon? Posted by Customer
    A:
    Remove the transmission and the driveplate. Take a screwdriver and pry the Crankshaft Seal from the rear cover without nicking or scratching the seal bore, or crankshaft. Note how far it is recessed into this housing bore prior to removal so that the new seal can be set at this depth. Grab a shop towel and thoroughly clean out all traces of oil and dirt from the block's seal bore. Do not lubricate the seal or touch the sealing lip. Make sure that it is installed properly as it has reverse-lip design on it. The second requirement is that you must see its part number when this seal has been installed. The best way to do this is to use a tool for installing seals to fit in this new one by pushing the tool onto it until it goes back into its place completely. In case, there isn't an appropriate seal installing instrument, one can take a big drift and softly drive this new seal directly into its bore located near rear cover; after which, flush them together so they appear even with one another. Finally, install drive plate and transmission again.
    Posted by GMPartsGiant Specialist
    Q:
    How to replace rear crankshaft seal on 4.3L V6 engine on GMC Sierra? Posted by Customer
    A:
    Remove the transmission and the driveplate. Inspect the oil seal, as well as the oil pan and engine block surface for signs of leakage. Sometimes an oil pan gasket leak can appear to be a rear Crankshaft Seal leak. Pry the Crankshaft Seal from the block with a screwdriver, being careful not to nick or scratch the crankshaft or the seal bore. Thoroughly clean the seal bore in the block with a shop towel, removing all traces of oil and dirt. Lubricate all surfaces with a very small amount of engine oil. Install the Crankshaft Seal over the end of the crankshaft and carefully tap it into place. Most seals are marked "This Side Out" to eliminate confusion as they have a different design than the old-style seals previously used. The tool tightly fits the diameter of the Crankshaft Seal and, used with a hammer, drives the seal in. Install the driveplate and the transmission.
    Posted by GMPartsGiant Specialist
    Q:
    How to replace rear crankshaft seal on 4.3L V6 engine on Chevrolet Suburban? Posted by Customer
    A:
    Remove the transmission and the driveplate. Inspect the oil seal, as well as the oil pan and engine block surface for signs of leakage. Sometimes an oil pan gasket leak can appear to be a rear Crankshaft Seal leak. Pry the Crankshaft Seal from the block with a screwdriver, being careful not to nick or scratch the crankshaft or the seal bore. Thoroughly clean the seal bore in the block with a shop towel, removing all traces of oil and dirt. Lubricate all surfaces with a very small amount of engine oil. Install the Crankshaft Seal over the end of the crankshaft and carefully tap it into place. Most seals are marked "This Side Out" to eliminate confusion as they have a different design than the old-style seals previously used. The tool tightly fits the diameter of the Crankshaft Seal and, used with a hammer, drives the seal in. Install the driveplate and the transmission.
    Posted by GMPartsGiant Specialist
    Q:
    How to replace rear crankshaft seal on 4.3L V6 engine on Chevrolet Tahoe? Posted by Customer
    A:
    Remove the transmission and the driveplate. Inspect the oil seal, as well as the oil pan and engine block surface for signs of leakage. Sometimes an oil pan gasket leak can appear to be a rear Crankshaft Seal leak. Pry the Crankshaft Seal from the block with a screwdriver, being careful not to nick or scratch the crankshaft or the seal bore. Thoroughly clean the seal bore in the block with a shop towel, removing all traces of oil and dirt. Lubricate all surfaces with a very small amount of engine oil. Install the Crankshaft Seal over the end of the crankshaft and carefully tap it into place. Most seals are marked "This Side Out" to eliminate confusion as they have a different design than the old-style seals previously used. The tool tightly fits the diameter of the Crankshaft Seal and, used with a hammer, drives the seal in. Install the driveplate and the transmission.
    Posted by GMPartsGiant Specialist
    Q:
    How to remove and install the rear crankshaft seal in six cylinder engine on Chevrolet Trailblazer? Posted by Customer
    A:
    First, you need to take out the driveplate and thereby observe the oil seal, oil pan, surface of the engine block and housing of the rear Crankshaft Seal since an oil pan gasket leak can give the similar sign as a rear Crankshaft Seal leak. Next, the rear Crankshaft Seal housing bolts should be withdrawn and two bolts need to be inserted into the jackscrew holes at the housing then each of the screw should be tightened until the housing is detached from the block, after which it should be removed. Remove the rear Crankshaft Seal from the housing and make sure that there are no nicks grooves or damaged part on the crank shaft. In installation, it is required to clean and check the oil seal housing next, lubricate outer seal face with engine oil slightly while the inner part of the face contacting the crank shaft should be free from oil in a slight sense in order avoid leakage. Fit the seal into the housing to face the lips of the rubber toward the engine; it should be driven in to the depth of the original seal, using a specific tool if available to ensure that it does not go deeper. Extinguish a 3/16-inch wide line of RTV sealant in a pattern to the mating surface of the housing and the engine block, thereafter installing the housing over the block while preventing the seal lips from folding around the rear of the crankshaft. Last, fasten and torque the bolts to the required amount of turn then reassemble the driveplate and transmission.
    Posted by GMPartsGiant Specialist
    Q:
    How to replace the rear Crankshaft Seal in V8 engine on GMC Canyon? Posted by Customer
    A:
    If the rear Crankshaft Seal housing is to be installed on the engine block then special tools are required to place the housing block in the proper position over the end of the crankshaft since this alignment is most important since the seal if slightly off center is apt to leak. First, of course, must come the complete removal of the transmission and then the driveplate. Cautiously remove the Crankshaft Seal with a screwdriver using the flange of the crankshaft and inserted is the seal bore. As you can see how deeply the old seal is sunk into the housing bore the depth should be similar on the new seal and also the seal bore in the block should be thoroughly cleaned of any signs of oil & dirt. Lubrication of the seal and touching the sealing lip should also be avoided and the seal must be properly fitted with the part No. displayed. Probably the best recommendation is to use the seal installation tool which is used to push the new seal into its rightful position before the reinstallation of the driveplate followed by the transmission.
    Posted by GMPartsGiant Specialist
    Q:
    What should be done after installing the crankshaft balancer for the 2011 Cadillac CTS? Posted by Customer
    A:
    The remainder of the installation follows the reverse order of removal.
    Posted by GMPartsGiant Specialist
    See expert answers on similar Crankshaft Seal
    Q:
    What is the procedure for installing the new seal for the 2014 Cadillac CTS? Posted by Customer
    A:
    Start installing the new seal by pressing it into the oil pump cover. Once it is started, use a seal driver or a suitable socket of the correct size to carefully drive the seal squarely into place, ensuring it is flush with the engine cover and remains square when installed.
    Posted by GMPartsGiant Specialist
    See expert answers on similar Crankshaft Seal
    Q:
    What is the procedure for installing the rear seal housing on 4.8L, 5.3L, and 6.0L V8 engines for the 2019 Chevrolet Express? Posted by Customer
    A:
    For 4.8L, 5.3L, and 6.0L V8 engines, loosely install the rear seal housing retaining bolts and align the housing by measuring the distance from the oil pan rail to the seal housing on both sides, adjusting as necessary to achieve even measurements before tightening the bolts.
    Posted by GMPartsGiant Specialist
    See expert answers on similar Crankshaft Seal
    Q:
    What precautions should be taken when removing the seal for the 2015 Chevrolet Camaro? Posted by Customer
    A:
    Be careful not to scratch, gouge, or distort the area that the seal fits into, or a leak will develop.
    Posted by GMPartsGiant Specialist
    See expert answers on similar Crankshaft Seal
    Q:
    What is the final step in the installation process for the 2013 Chevrolet Corvette? Posted by Customer
    A:
    The remainder of the installation is the reverse of the removal.
    Posted by GMPartsGiant Specialist
    See expert answers on similar Crankshaft Seal
    Q:
    What is the first step in the process for the 2014 Chevrolet Camaro? Posted by Customer
    A:
    Remove the crankshaft balancer.
    Posted by GMPartsGiant Specialist
    See expert answers on similar Crankshaft Seal
    Q:
    What precautions should be taken when removing the old seal for the 2018 Chevrolet Express? Posted by Customer
    A:
    The old seal should be pried out carefully, noting its recessed depth for proper installation of the new seal.
    Posted by GMPartsGiant Specialist
    See expert answers on similar Crankshaft Seal
    Q:
    How should the oil seal be removed from the cover for the 2016 Chevrolet Express? Posted by Customer
    A:
    Carefully pry the oil seal out of the cover using a seal puller or a large screwdriver, taking care not to damage the crankshaft or distort the cover. Wrapping electrician's tape around the screwdriver tip can help prevent damage.
    Posted by GMPartsGiant Specialist
    See expert answers on similar Crankshaft Seal
    Q:
    What is the first step in removing the crankshaft balancer for the 2007 Chevrolet Impala? Posted by Customer
    A:
    Remove the crankshaft balancer and note how the seal is installed, ensuring the new one is positioned to the same depth and orientation.
    Posted by GMPartsGiant Specialist
    See expert answers on similar Crankshaft Seal
    Q:
    How should the oil seal be removed for the 2017 Chevrolet Express? Posted by Customer
    A:
    Carefully pry the oil seal out of the cover using a seal puller, ensuring not to scratch, gouge, or distort the area where the seal fits to prevent oil leaks.
    Posted by GMPartsGiant Specialist
    See expert answers on similar Crankshaft Seal
    Q:
    What is the final step before reinstalling the crankshaft pulley for the 2006 Chevrolet Monte Carlo? Posted by Customer
    A:
    Lubricate the pulley hub with clean engine oil.
    Posted by GMPartsGiant Specialist
    See expert answers on similar Crankshaft Seal
    Q:
    What should be checked on the balancer hub surface for the 2004 Chevrolet Trailblazer? Posted by Customer
    A:
    Check the balancer hub surface for grooves caused by long-term contact with the seal.
    Posted by GMPartsGiant Specialist
    See expert answers on similar Crankshaft Seal
    Q:
    Why is it important to note how far the old seal is recessed into the housing bore for the 2005 Chevrolet Trailblazer? Posted by Customer
    A:
    It is important to ensure the new seal is installed to the same depth.
    Posted by GMPartsGiant Specialist
    See expert answers on similar Crankshaft Seal
    Q:
    What surfaces need to be protected during this process for the 2011 GMC Canyon? Posted by Customer
    A:
    It is crucial to protect the crankshaft end surface and the engine front cover.
    Posted by GMPartsGiant Specialist
    See expert answers on similar Crankshaft Seal
    Q:
    How is the press-on sleeve for the damper surface installed for the 2013 Chevrolet Silverado? Posted by Customer
    A:
    The press-on sleeve is installed with a hammer and a block of wood by pressing it into place.
    Posted by GMPartsGiant Specialist
    See expert answers on similar Crankshaft Seal
    Q:
    Hi A. I need exhaust manifold gaskets (2) manifold to head. B. Exhaust manifold to catalytic converter pipe (2). C. Rear main seal. D. Oil cooler to base (4 o rings) E. oil lines from dry sump to bottom of oil pan, metal washer outside with o ring molded in. I also want to order harness 84019970 and module 12704477. Thank you Posted by Customer: 2016 Chevrolet Corvette
    A:
    use part# 12623359 x1 84214924 x1 22768504 x1 12698626 x4 89060436 x1 15272179 x2 and 12657093 x2 per vin#
    Posted by GMPartsGiant Specialist 5/8/2021
    Q:
    What is this rear crankshaft seal made from? Posted by Customer
    A:
    This rear crankshaft seal is made from rubber
    Posted by GMPartsGiant Specialist 9/5/2021
    If you have any questions about this product, please don't hesitate to ask us. We will be happy to help you!

Genuine GM Part 89060436, the Right Choice

To ensure reliability, purchase GM part # 89060436 Seal Kit,Crankshaft Rear Oil. It is sometimes referred to as Cadillac Crankshaft Seal. Directly from GM, genuine parts are superb with regards to quality, longevity, and fit. Every single part passed stringent quality testing, so you can be sure that it's safe, durable, and built to perform like your original parts. This part fits specific Cadillac CT5, CTS, Escalade models.

GMPartsGiant.com is a leading supplier of genuine GM parts and accessories such as GM 89060436 Seal Kit,Crankshaft Rear Oil. You're certainly in the right place if you're searching for the great cost-effective OEM GM parts. Look no further than our vast inventory of genuine GM parts offered at unbeatable online prices, all of which are backed by the manufacturer's warranty. Not to forget, our hassle-free return policy and quick delivery service ensure a smooth shopping experience for you. For detailed Cadillac parts information, click here.

Why choose GM Parts Giant

  • Dedicated Service

    Your complete satisfaction is our #1 goal

  • Lowest Prices

    Best deals on genuine OE parts from dealerships

  • Fast Delivery

    Orders are processed and delivered promptly